How to Install Flask and Python 3 With Virtual Environments
Getting started
Installation
We'll need just a few things to get started with building Flask applications. Crucially we'll need Python 3, a terminal, and a text editor. Many systems come built in with Python 3. If you run into issues, Appendix A has some common issues and resolutions, including installation instructions for Windows.
tip
If you need a text editor, we use Visual Studio Code. Like Flask it's free, and powerful out of the box but can be customized for power users.
Let's start by creating a folder for our Flask projects. This is the folder where we will place each of the example applications we build throughout this book.
mkdir fullstack-flask
cd fullstack-flask
Then let's create a folder for our first Flask application.
mkdir 'first-flask-app'
cd 'first-flask-app'
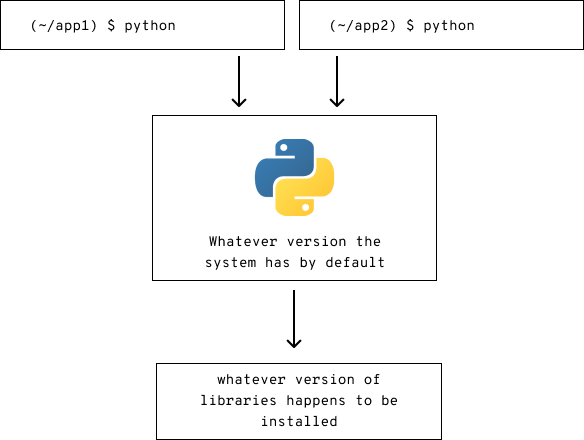
Now that we have Python 3, we'll want to install Flask. Flask is packaged as a library that we can install using pip, a package manager for Python. Before we do that, we should set up an environment within our project folder where we can specify exactly which version of Python and libraries we would like to use. Python 3 comes built in with a tool to create "virtual environments" called virtualenv. What this will do is reference a version of Python and libraries installed within the specific project folder. Using virtualenv makes it easier to manage multiple projects that may have conflicting dependencies.
When we work without virtual environments and have multiple projects, we can quickly run into conflicts between versions of underlying libraries and Python versions.
When we use virtual environments, we can isolate the version of Python and which version the project uses.

In order to make virtual environments work, we need to "activate" each one before running our application so that our terminal session will use the correct version before each
Within the first-flask-app folder, we are going to want to create a folder for the virtual environment which we can call env. We'll only need to do this once. By running this command, we create a folder and set up a virtualenv tied to the version of Python we are using. The -m venv flag tells Python to run the built in virtualenv module.
python3 -m venv env
Now that the environment is configured, we'll need to make sure our terminal session uses virtualenv's configuration for Python instead of the defaults. To do so, we run a script to activate the virtual environment.
source env/bin/activate
This will prefix your terminal prompt with (env) to let you know that it has been activated. Now we can install Flask.
pip install flask
Hello World: Dice
Our goal for this part is to have a page that loads in our browser that displays a random number every time we load the page.
In order to have a page that displays a random number, we're going to have write some logic that we can later tell Flask to serve to the browser. Let's start by writing a function that returns the result of a dice roll. We're going to need to create a file to write the function in; we can use the same file to run the Flask web server as well. We'll call this file hello_world.py.
This lesson preview is part of the Fullstack Flask: Build a Complete SaaS App with Flask course and can be unlocked immediately with a single-time purchase. Already have access to this course? Log in here.
Get unlimited access to Fullstack Flask: Build a Complete SaaS App with Flask with a single-time purchase.
[00:00 - 00:07] Let's go ahead and build our first Flask app. The first step is to go into our terminal and create a folder for all of our projects.
[00:08 - 00:22] So in our terminal, I've created a folder here called Flask. Now within I'm going to make a new folder for our first Flask app.
[00:23 - 00:32] Now that I'm here, one thing I want to do is I want to verify that we have Python 3. So I can type this to open up an interpreter and now I can run Python.
[00:33 - 00:44] For example, I can do 1+1 or I can say print tola and that works. So that means we have Python 3 installed and it's all set up.
[00:45 - 00:56] Now I want to open this folder in our text editor and to do that, I'm going to type code dot. And what that does is that opens VS code in our current folder.
[00:57 - 01:07] So once I hit this, I can take into VS code here and within VS code, I can actually go and create a new file. So I'm going to call my file server dot py.
[01:08 - 01:26] So here in server dot py, I can write Python code. For example, I can say print hello and then when I go back to my terminal, I can run Python 3 server dot py and it prints hello.
[01:27 - 01:39] Now if you remember in our slides, we went over a really simple function of how to get random numbers. Let's go ahead and paste that into our own terminal.
[01:40 - 02:07] So here I have the code to generate random dice and I can verify that by going back in our terminal and running Python 3-i server and this runs interactively so I have a console and so now it can call the roll dice function and then that'll give me a random number. Alright, so we now have a functioning Python script.
[02:08 - 02:18] Now our job is actually to install Flask and turn this into a web server. To do that, we're actually going to go and set up a virtual environment first.
[02:19 - 02:43] So the way we're going to set up a virtual environment is by running Python 3-m and then is the name of the virtual and module and we're going to create one inside of a folder called n. Now that I've done this, you can see that there's now a folder in n and I can do run a script located in the end folder.
[02:44 - 02:53] And now I'm inside a virtual environment. So if I run Python here, it'll point me to the right version of Python.
[02:54 - 03:18] I can also run which Python to see which version of Python is pointing to me to and you can see it's pointing me to a version of Python that's within this folder. Now that we have Python and a virtual environment all configured, we can actually install Flask and to do that, we're going to use the Python package manager and run pip install Flask.
[03:19 - 03:28] Now what this does is it installs Flask and all of its dependencies so that we 're ready to go. And this means that we can now import Flask.
[03:29 - 03:41] And once we have that and that works, we can do that within our code as well. So here in our VS code editor, we're going to want to also import Flask.
[03:42 - 03:48] And we can do that up here. You can say import Flask.
[03:49 - 03:57] Now we're going to have to define our application. So the way we can do that is we can say Flask and we have to initialize it with a name.
[03:58 - 04:16] The standard is to initialize it with the name of the Python module that we're running. And the way we can do that is by using this double underscore name method that 's available in VS in Python that gives us the name of the module.
[04:17 - 04:27] And so what we want to do here is we don't just want to import Flask, we actually want to import the class Flask. So from Flask, import Flask.
[04:28 - 04:35] And then we've created an application here. And then the last line of code we're going to need is app.route.
[04:36 - 04:52] And so this is telling Flask to route all requests to our web server at the root URL to this function and then just return whatever gets returned here. Now let's go ahead and try and run that within our terminal.
[04:53 - 05:05] In order to run that, we're going to have to specify a few things for Flask. Namely that our Flask app is in server and that our Flask environment is in development.
[05:06 - 05:13] But once we specify those two environment variables, we can actually just type Flask run. And that actually starts a web server.
[05:14 - 05:25] So we can go ahead and check Firefox here and refresh a page that's going to localize report 5000. And then once we see that, we see the dice rolled one.
[05:26 - 05:33] And then if we continue to refresh the page, we see random numbers here. So that's pretty cool.
[05:34 - 05:44] We've just been up a Flask application in three additional lines of code. Pretty sweet, right?
[05:45 - 05:49] In the next few videos, we're going to go over building something a little more complicated and maybe more useful as well.