Completing Your AI Agent by Adding Tools to It
This lesson preview is part of the n8n Automation: Building AI-Powered Workflows course and can be unlocked immediately with a \newline Pro subscription or a single-time purchase. Already have access to this course? Log in here.
Get unlimited access to n8n Automation: Building AI-Powered Workflows, plus 90+ \newline books, guides and courses with the \newline Pro subscription.
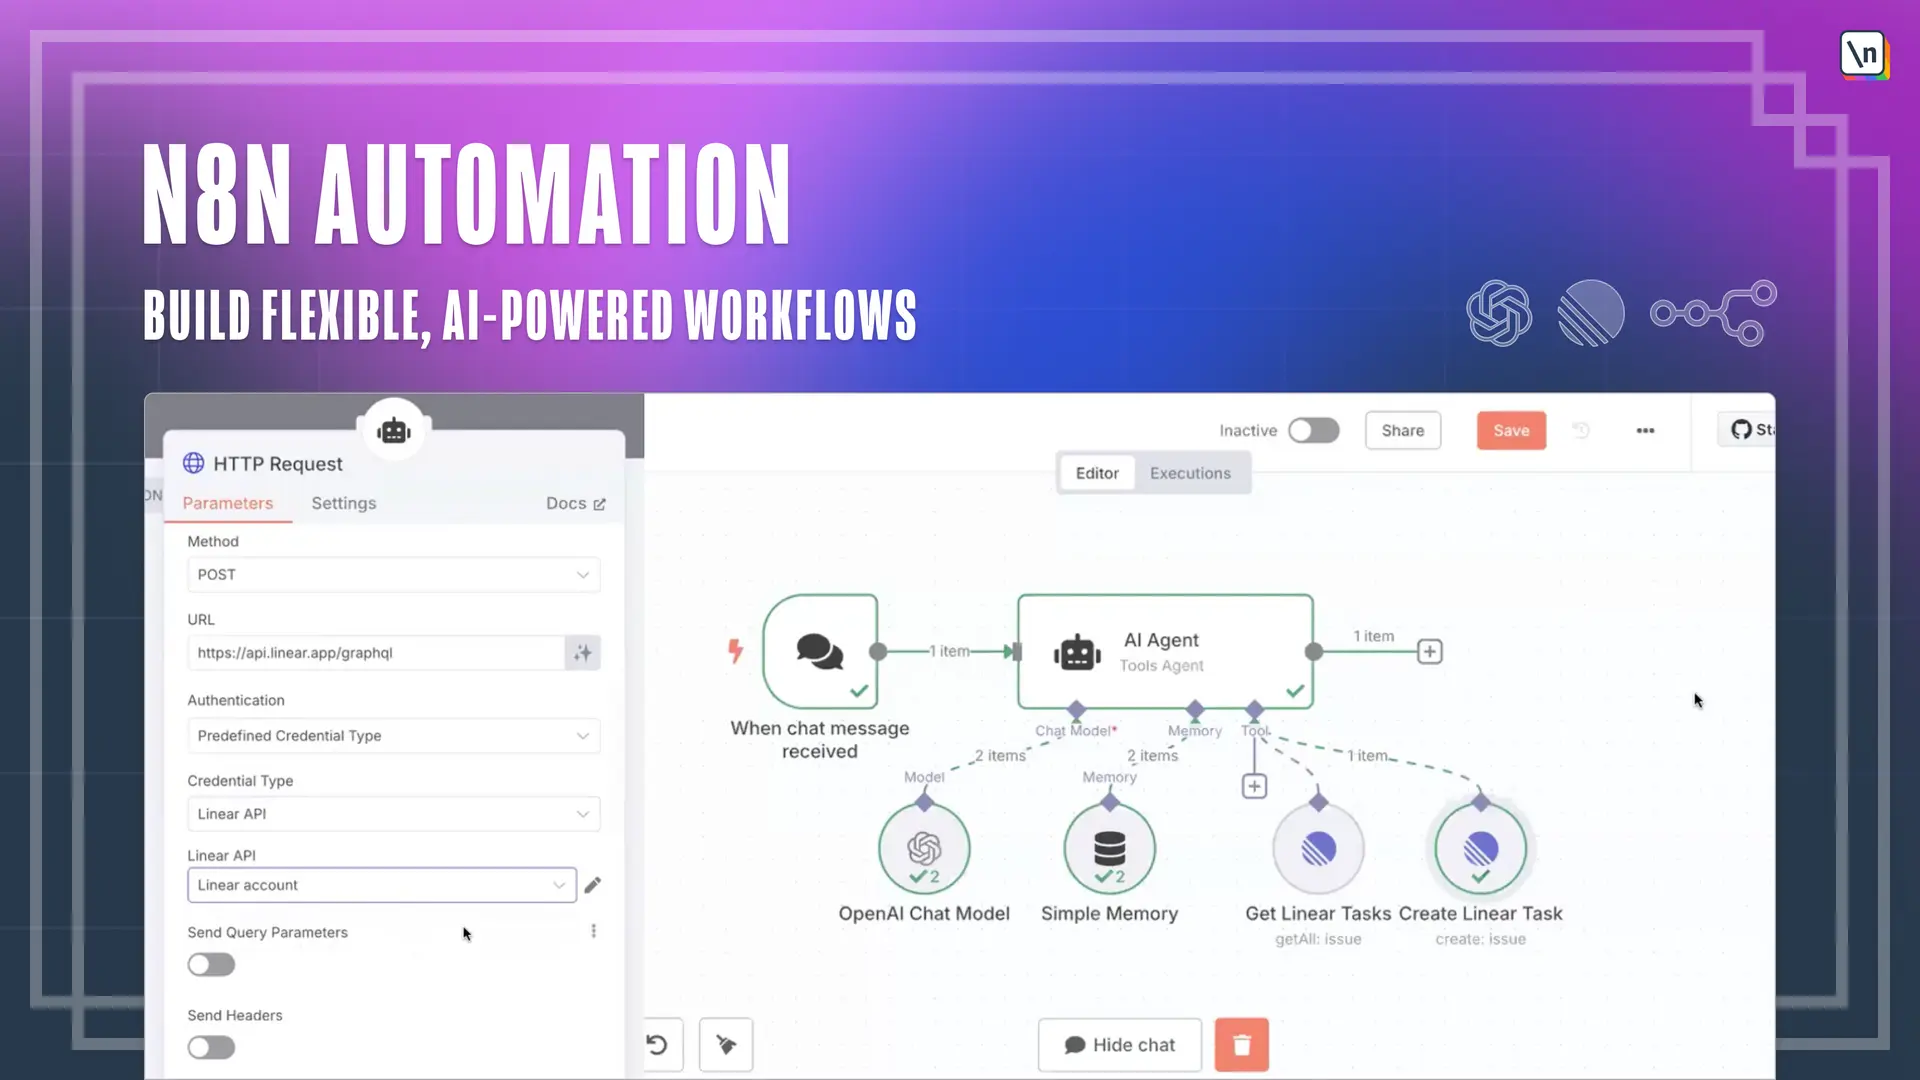
[00:00 - 00:09] Now we're going to add some complexity and to create the real AI agent. So next step, we want to connect to our linear account, right, so we can communicate with it.
[00:10 - 00:15] So we're going to create our first tool which is attached to our AI agent. Let's click on tool.
[00:16 - 00:26] Here, there are so many different tools. And it has three plus hundreds different iterations.
[00:27 - 00:33] So most likely you should find what you're looking for. In our case, let's search for the linear.
[00:34 - 00:40] Here it is. You can also see why I linked it in much different stuff.
[00:41 - 00:50] But let's click on the linear tool. And this is the window that we need to provide our parameters opened as usual.
[00:51 - 01:01] And here we action to take care of the more parameters this time. Let's start from the credentials similar to connecting to the LLM.
[01:02 - 01:07] We just provided the credentials here. In this new credentials, just create new credentials.
[01:08 - 01:11] My guess I have already provided linear API. So let's click it.
[01:12 - 01:17] Awesome. Next, tool description, which is super, super important.
[01:18 - 01:21] Okay. In our case, let's click set manual.
[01:22 - 01:28] And just let's leave it for now with about a little bit later on. Next resources.
[01:29 - 01:33] In our case, we're going to work with the issues/tasks. So let's leave it as it is.
[01:34 - 01:38] Next operation. In our case, we are not going to be creating stuff.
[01:39 - 01:44] First of all, let's start from getting stuff. And let's start from getting many stuff.
[01:45 - 01:52] Let's a big get many. And it will return multiple issues/tasks for us.
[01:53 - 02:05] And to simplify it even farther more, let's click return all actually. This will return all the issues, which we have in our linear path profile.
[02:06 - 02:18] Then, file, let's talk about the description, why we need it. Description is super important because it gives the context for the LLM what we're working with.
[02:19 - 02:29] In our case, let's, for example, provide this kind of the description. Get the list of all tasks from the linear task manager via API.
[02:30 - 02:38] So we are being descriptive here. We were explaining inside of the description what our tool is going to do, what's the purpose of this tool.
[02:39 - 02:49] So once we provide it and field all the fields, let's close this. And we can see our linear tool already floating here.
[02:50 - 03:02] So what is going on then? Once we provided the description and we ask for the AI agent, for example, hey, I want to know what tasks do I have right now at hand.
[03:03 - 03:22] It will read the description of all tools that we have connected to the AI agent. And then it will understand and choose what exactly it has, at hand, first of all, and then it will understand what exactly is the best for the job.
[03:23 - 03:33] Okay. So that's why description is super important because it goes directly into LLM and it influences the decision making on the LLM side.
[03:34 - 03:45] If there's no tools found for the work, it's not going to trigger anything. For example, I might say hi again and nothing will happen because I'm not talking about tasks or anything.
[03:46 - 03:55] So it will be triggered only when LLM decides that it actually needs this tool. And right now the tool is called linear.
[03:56 - 04:06] That's okay, but this is the good handed for you to name your tools properly. In our case, we can click on the tool, then click to change the name here at the top.
[04:07 - 04:18] And we can change it to get the here tasks, for example, renamed. But right now it's much more easier to understand what is going on.
[04:19 - 04:34] And at these points, we have already our first AI agent built within the N10 and without writing even single line of code. How awesome this is.
[04:35 - 04:41] Let's already have new horse to test. Let's actually see what how it's going to perform and how it's going to.
[04:42 - 04:44] Let's click. Hi, for example, usual stuff.
[04:45 - 04:50] Okay, the gizefs just hello. How can I assist you?
[04:51 - 05:06] So right now it understands that I'm not trying to ask for any more for any help. But let's for example, ask it this time to grab some of the available tasks that we have right now inside of our linear account.
[05:07 - 05:14] So let's write something like, give me a list of titles for all of my available tasks. Send.
[05:15 - 05:16] Boom. Have you seen this?
[05:17 - 05:29] Visually, we can confirm that it actually go, went and executed the get linear task, which is great. And we can see that it was successful.
[05:30 - 05:39] And here it is here, our task, how to cook sushi, baked delicious chocolate cookies, cooked pancakes. This is my dust.
[05:40 - 05:48] And it is working like a charm. Not only that, let's get back to our latest logs, which we're really, really mentioning at the very beginning.
[05:49 - 06:00] We can see actually the shape of all the steps that it took to give us the feedback. So you can use it for debugging and to understanding the flow in general.
[06:01 - 06:15] We can see that we started from getting our simple memory into context. Then we have the question and doing asking the question also provided the description of all available tools for us.
[06:16 - 06:24] Then I decided that, hey, we need to execute the get linear task tool. It executed this.
[06:25 - 06:30] It was successful. Then we got back results back to LM.
[06:31 - 06:40] It realized how to process the data and gave us the outputs. And then we saved the output back to the memory so we can use it later on.
[06:41 - 06:47] Beautiful. You already should be able to understand how much power we actually have.
[06:48 - 06:55] We're just building the stuff in 20 minutes or so. But let's go a little bit farther and learn a couple of new tricks.
[06:56 - 07:02] We're creating tasks, but also let's learn about the getting tasks. Okay, so we're not creating.
[07:03 - 07:07] But let's learn about the getting tasks now. Let's click on.
[07:08 - 07:22] Let's click linear. Similar what we did before credentials, linear accounts, good tool description, set manually.
[07:23 - 07:42] In my case, let me quickly find and copy and paste the description so I don't really spend time on it once I copy it right now. So here this linear task manager API for creating new issues slash tags.
[07:43 - 07:52] It's already has team name and ID provided and doesn't require fetching it. So descriptive, easy to understand for human and the LM as well.
[07:53 - 07:57] This is issues as the same operation. This time we're going to create.
[07:58 - 08:11] Okay, so we're choosing the created operation then team or name ID as you remember, I mentioned that there might be multiple teams. It automatically uses our API key to fetch all the list of the teams.
[08:12 - 08:16] So just click on it. If you have any team, when you're linear, you'll be able to see it here.
[08:17 - 08:27] And then the title of our task that we're going to create. But besides having title, let's actually make it a little bit more interesting and a description as well.
[08:28 - 08:33] So let's click discussion. And right now you can see that it says that hey, Parliament title is required.
[08:34 - 08:43] So we need to put something here, particularly provide our title manually. Like what's the point then of having the agent if you're meaning provided manual, right?
[08:44 - 08:55] So what we're going to do. There is a magic button with the stars if you click on it, this was actually by default.
[08:56 - 09:02] Our LM model will be defining what will go in this field. And the same with the description.
[09:03 - 09:17] If you click on it, it will be automatically defined by the lab, which is super cool, useful. In the previous versions, you had to provide really small script to make it automatic, but now they made it even easier, which is awesome.
[09:18 - 09:19] And this is it. This is the empathy.
[09:20 - 09:25] All we need to create the new tasks slash issue. So let's go and test it out.
[09:26 - 09:35] Oh, and but before testing out, let's not forget to change the name once again. This will be a great linear task.
[09:36 - 09:37] Awesome. Rename it.
[09:38 - 09:40] Boom. Here it is.
[09:41 - 09:54] Beautiful. This time, let's ask it to please add new task about how to cook scrambled eggs with the recipe included.
[09:55 - 09:58] Cool. So let's just click send.
[09:59 - 10:11] Okay, we can visually see the thinking process. It used the create linear task tool that we have just created and it was also successful.
[10:12 - 10:22] Once again, you get your clocks to see the general workflow and you can see the output inside of the chat message. But we are not interested in the above chat message.
[10:23 - 10:28] We are right now specifically interested about our linear account. Let's go back there.
[10:29 - 10:33] And here it is. New number 29 task.
[10:34 - 10:38] How to cook scrambled eggs were eggs rated today. Awesome.
[10:39 - 10:44] So it happened, it automatically actually decided and created the task for us. Let's click on it.
[10:45 - 10:55] And it's not only created task, but it also gave us the whole recipe about how to create these scrambled eggs. So the description was filled automatically.
[10:56 - 10:59] This exactly the way as we wanted it. Beautiful.
[11:00 - 11:02] Let's go back to the issues in backlog.