
React Fundamentals
In the last chapter, we built our first React Native application. We explored how React applications are organized by components. Using the key React concepts of state and props, we saw how data is managed and how it flows between components. We also discussed other useful concepts, like handling user input and fetching data from a remote API.
In this section, we'll build another application step-by-step. We'll dive even deeper into React's fundamentals. We'll investigate a pattern that you can use to build React Native apps from scratch and then put those steps to work to build a time-tracking application.
In this app, a user can add, delete, and modify various timers. Each timer corresponds to a different task that the user would like to keep time for:
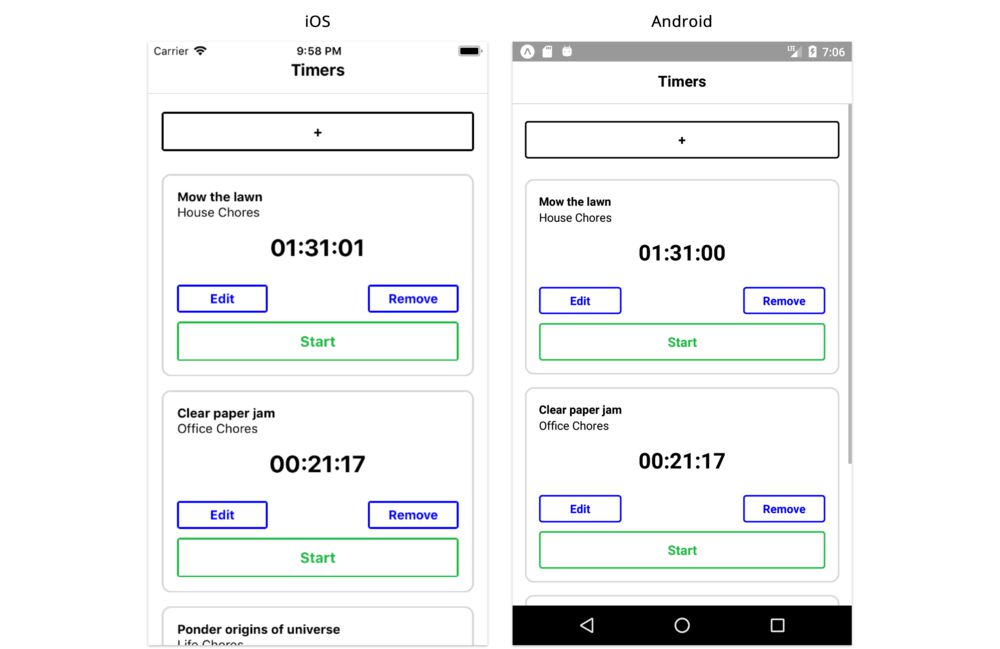
This app will have significantly more interactive capabilities than the one built in the last chapter. As we'll see, this will present us with some interesting challenges.
Getting started
This chapter assumes you've setup your system by following the steps at the beginning of the first chapter.
As with all the chapters in this book, make sure you have the book's sample code at the ready.
Previewing the app
Let's begin by viewing the completed app. To try the completed app on your device:
-
On Android, you can scan this QR code using the Expo app:

-
On iOS, you can navigate to the
time-tracking/directory within the sample code folder and either preview it on the iOS simulator or send the link of the project URL to your device as we explained in the previous chapter.
Play around with it to get a feel for all the functionality.
Breaking the app into components
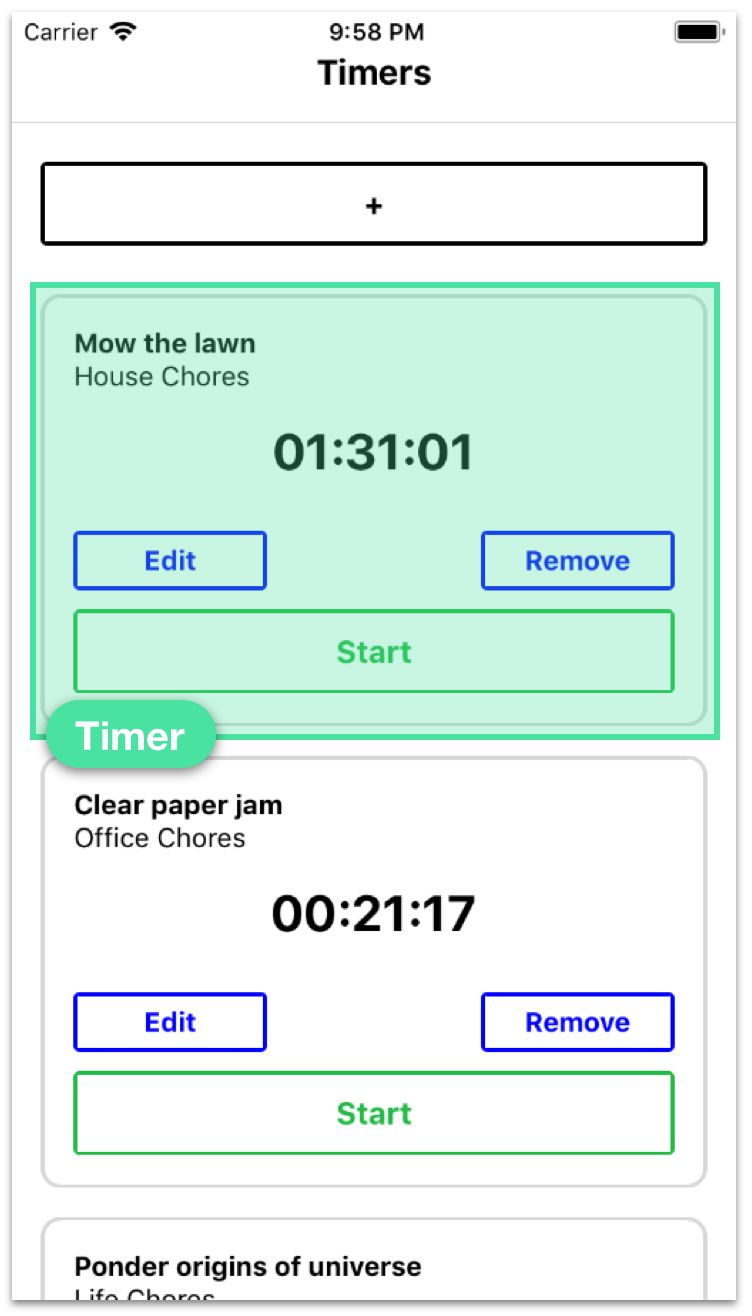
Let's start by breaking our app down into its components. As we noticed in our last project, visual components usually map tightly to their respective React Native components. For example, we can imagine that we'd want a Timer component for each timer:
Our application displays a list of timers and has a "+" icon at the top. We're able to add new timers to the list using this button. This "+" component is interesting because it has two distinct representations. When the "+" button is pressed, the component changes into a form:
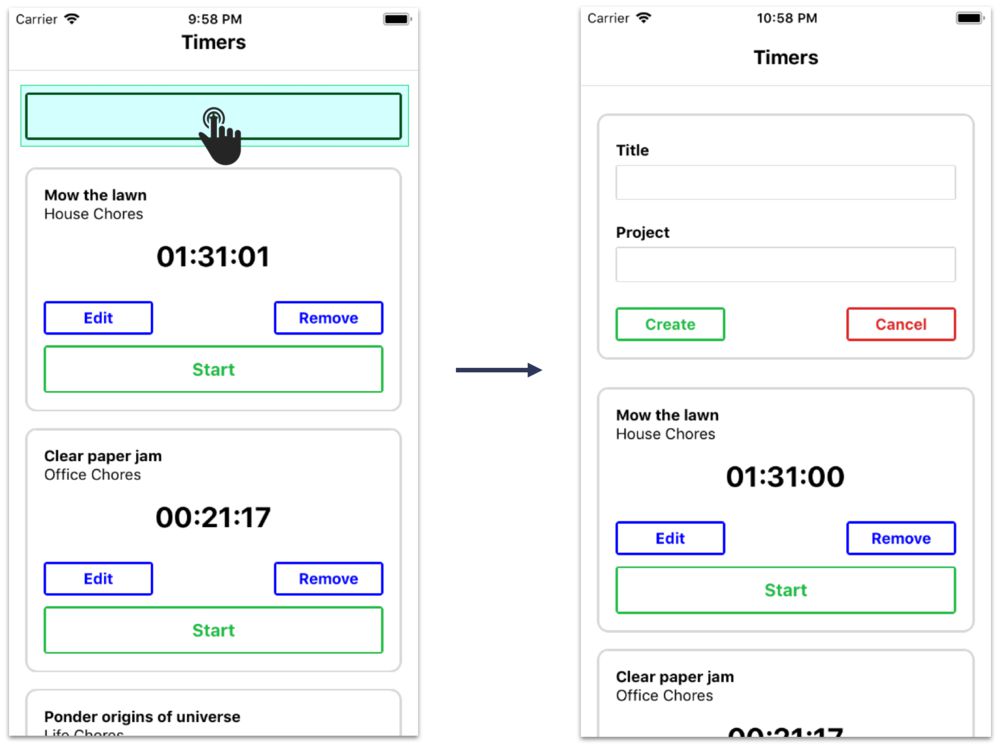
When the form is closed, the component changes back into a "+" button.
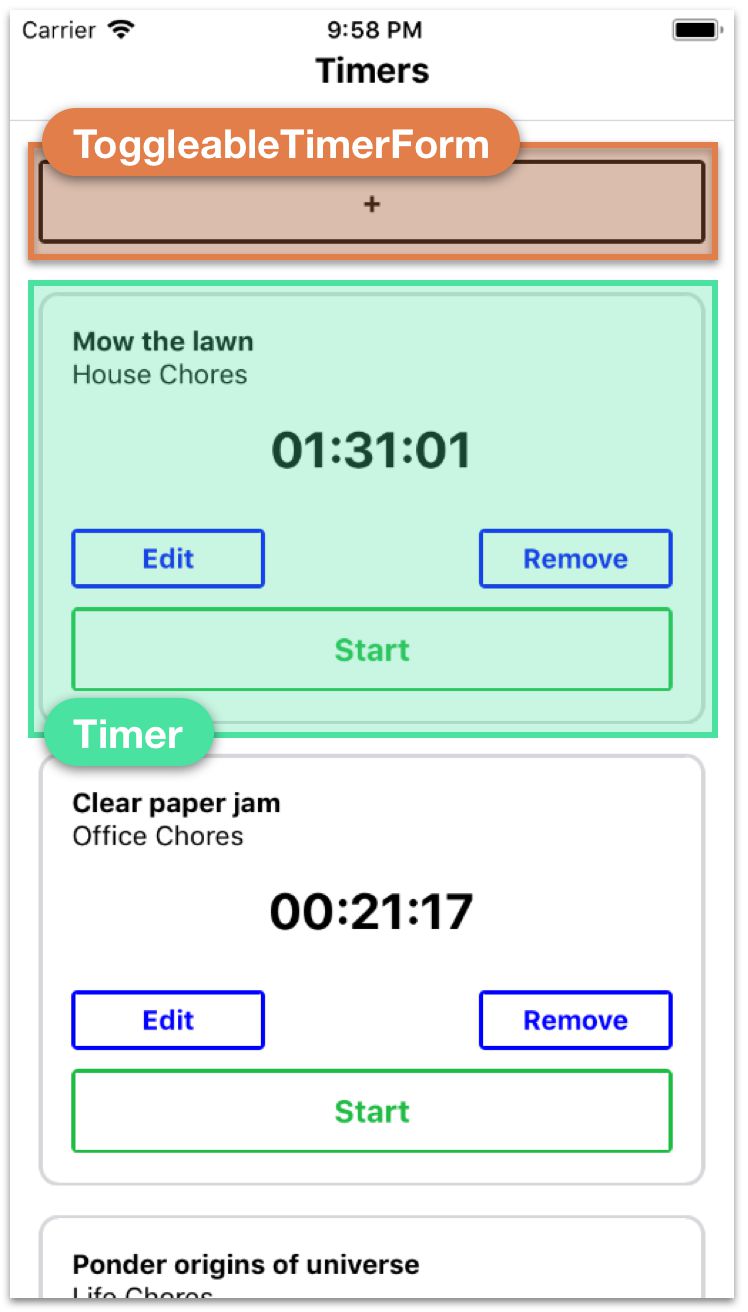
There are two approaches we could take. The first one is to have the parent component decide whether or not to render a "+" component or a form component based on some piece of stateful data. It could swap between the two children. However, this adds more responsibility to the parent component. Since no other child components need this piece of information, it might make more sense to have a new child component own the single responsibility of determining whether or not to display a "+" button or a create timer form. We'll call it ToggleableTimerForm. As a child, it can either render the component TimerForm or the "+" button.
So, we've identified two components in addition to our root application component:
But the Timer component has a fair bit of functionality. As we saw in the completed version of the app, each timer turns into a form when the user clicks "Edit":
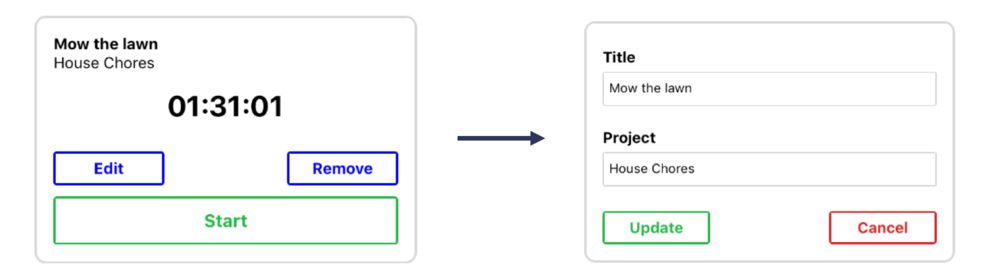
In addition, timers delete themselves when "Remove" is pressed and have buttons for starting and stopping. Do we need to break this up? And if so, how?
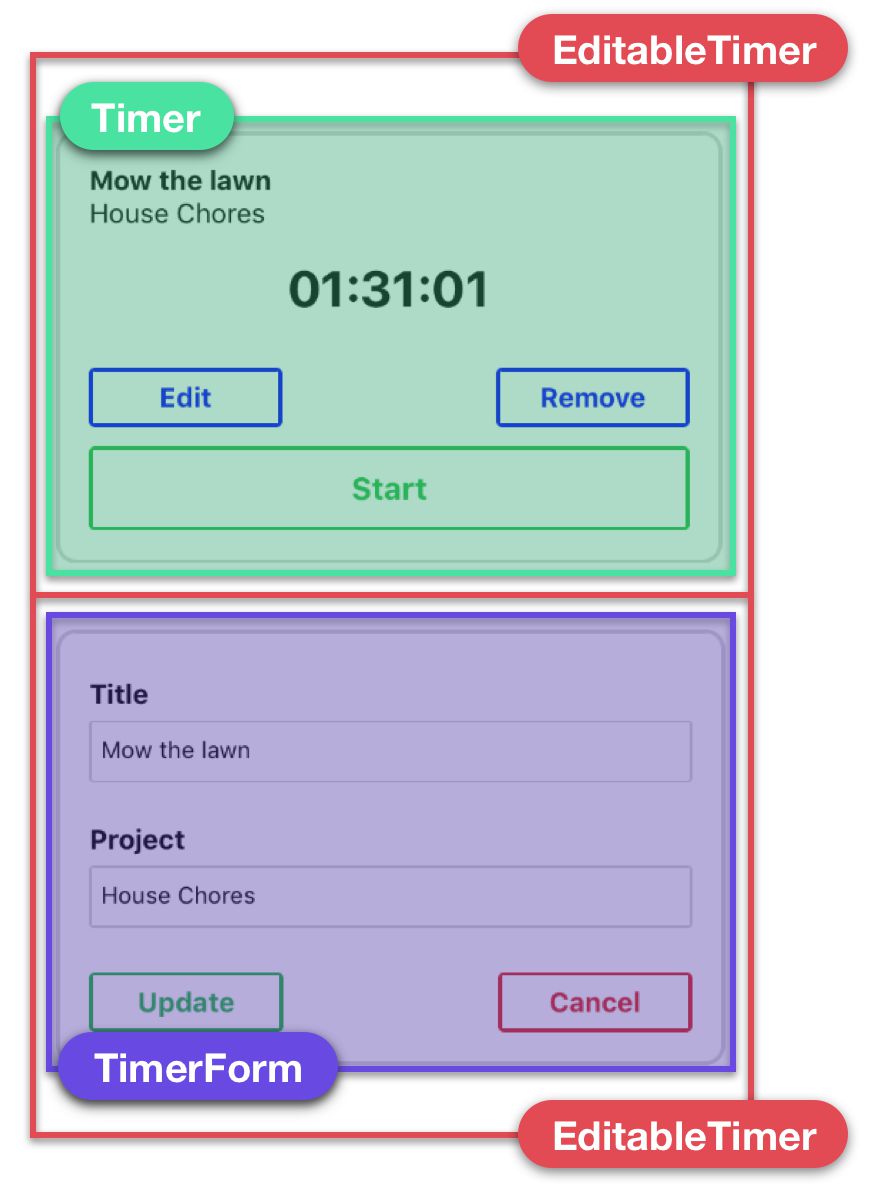
Displaying a timer and editing a timer are indeed two distinct UI components. They should be two distinct React components. Like ToggleableTimerForm, we need some container component that renders either the timer's face or its edit form depending on if the timer is being edited.
We'll call this EditableTimer. The child of EditableTimer will then be either a Timer component or the edit form component. The form for creating and editing timers is very similar, so let's assume that we can use the component TimerForm in both contexts:
As for the other functionality of the timer, like the start and stop buttons, it's a bit tough to determine at this point whether or not they should be their own components. We can trust that the answers will be more apparent after we've started writing some code and have a better idea of the general structure of the components in our application.
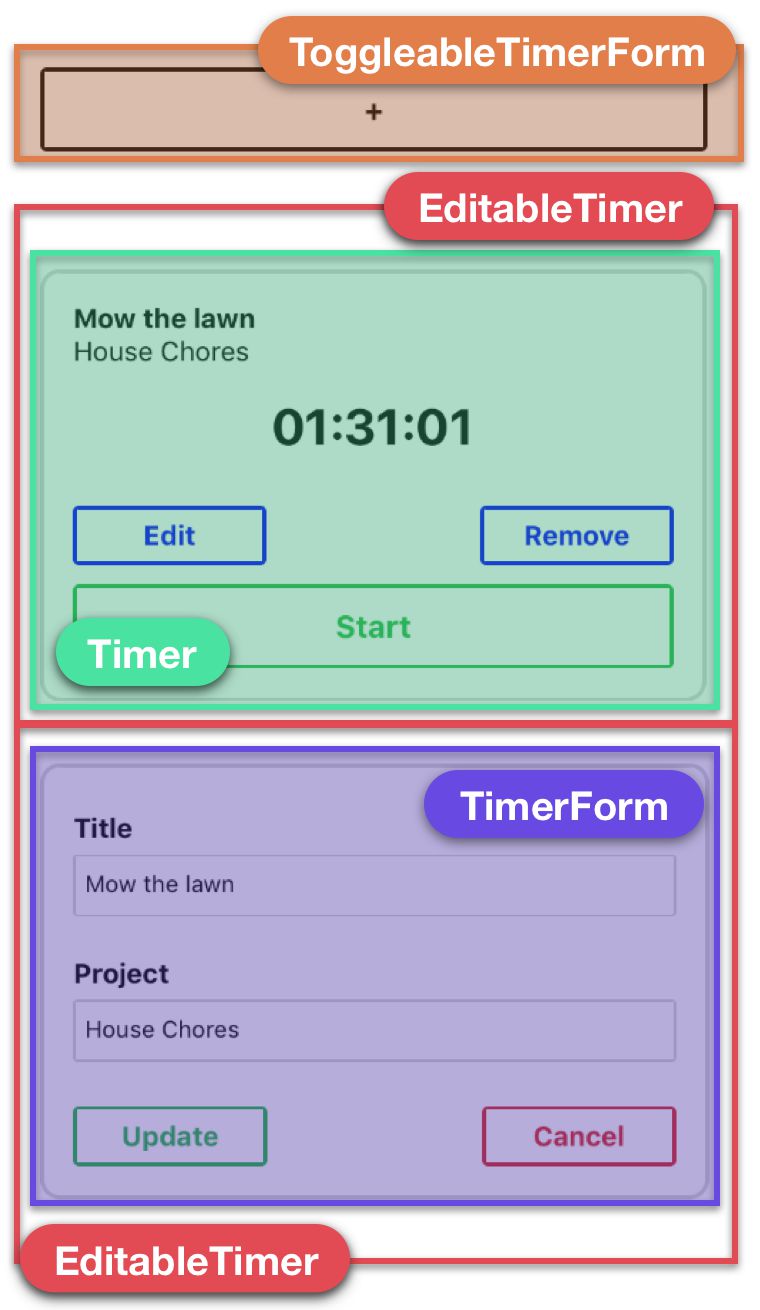
So, we have our final component hierarchy, with some ambiguity around the final state of the timer component:
-
App: Root container-
EditableTimer: Displays either a timer or a timer's edit formTimer: Displays a given timerTimerForm: Displays a given timer's edit form
-
ToggleableTimerForm: Displays a form to create a new timerTimerForm: Displays a new timer's create form
-
For all the buttons in the app, we'll create and use a component called TimerButton.
7 step process
Now that we have a good understanding of the composition of our components, we're ready to build a static version of our app that only contains hardcoded data. As we noticed in the previous chapter, many applications we build will require our top-level component to communicate with a server. In these scenarios, the server will be the initial source of state, and React Native will render itself according to the data the server provides. If our current app followed this pattern it would also send updates to the server, like when a timer is started. However, for simplicity, in this chapter we'll render local state rather than communicating with a server.
It always simplifies things to start off with static components, as we did in the last chapter. The static version of the app will not be interactive. Pressing buttons, for example, won't do anything. But this will enable us to lay the framework for the app, getting a clear idea of how the component tree is organized.
Next, we can determine what the state should be for the app and in which component it should live. At that point, we'll have the data flow from parent to child in place. Then we can add inverse data flow, propagating events from child to parent.
In fact, this follows from a handy process for developing a React Native app from scratch:
- Break the app into components
- Build a static version of the app
- Determine what should be stateful
- Determine in which component each piece of state should live
- Hardcode initial states
- Add inverse data flow
- Add server communication (if present)
We followed this pattern in the last project:
1. Break the app into components
We looked at the desired UI and determined we wanted a custom SearchInput component.
2. Build a static version of the app
Our components started off without using state. Instead, we had our root App component pass down location as a static prop to SearchInput.
3. Determine what should be stateful
In order for our application to become interactive, we had to be able to modify the search value of the search input. The value submitted was our stateful location property.
4. Determine in which component each piece of state should live
Our root App component was responsible for managing the location, temperature, and weather state parameters using React component class methods.
5. Hardcode initial state
We defined a hardcoded location value and passed it down to SearchInput as a custom prop.
6. Add inverse data flow
We defined the handleUpdateLocation function in our App container and passed it down in props so that SearchInput could inform the parent of when our search input's submit button is pressed.
7. Add server communication
We added server communication between our parent component and the MetaWeather API to retrieve actual weather data.
These steps only serve as a guideline. You don't necessarily have to follow it every time you build an application, but you'll likely internalize and become more accustomed to following this structure as you build more applications. If steps in this process aren't completely clear right now, don't worry. The purpose of this chapter is to familiarize yourself with this procedure.
We've already covered step (1) and have a good understanding of all of our components, except for some uncertainty down at the Timer component. Step (2) is to build a static version of the app. As in the last project, this amounts to defining React components, their hierarchy, and their HTML representation. We avoid state for now.
Step 2: Build a static version of the app
Prepare the app
Before beginning, run the following commands in your terminal to create a new React Native app:
expo init time-tracking --template blank@sdk-33 --yarn
cd time-tracking
yarn start
App
Let's start off by writing our App component in the file App.js. We'll begin with our imports:
mport React from 'react';

import { StyleSheet, View, ScrollView, Text } from 'react-native';

import EditableTimer from './components/EditableTimer';
import ToggleableTimerForm from './components/ToggleableTimerForm';
After importing the core React Native components we'll be using in App, we import EditableTimer and ToggleableTimerForm. We'll be implementing those shortly.
We'll have our App component render both ToggleableTimerForm and a couple of EditableTimer components. Because we're building the static version of our app, we'll manually set all the props:
export default class App extends React.Component {
  render() {
    return (
      <View style={styles.appContainer}>
        <View style={styles.titleContainer}>
          <Text style={styles.title}>Timers</Text>
        </View>
        <ScrollView style={styles.timerList}>
          <ToggleableTimerForm isOpen={false} />
          <EditableTimer
            id="1"
            title="Mow the lawn"
            project="House Chores"
            elapsed="8986300"
            isRunning
          />
          <EditableTimer
            id="2"
            title="Bake squash"
            project="Kitchen Chores"
            elapsed="3890985"
            editFormOpen
          />
        </ScrollView>
      </View>
    );
  }
}
At the top, we display a title ("Timers") inside of a Text component. We'll look at the styles object in a moment.
After our title, we render the rest of the components in a ScrollView component. The built-in ScrollView component in React Native is responsible for wrapping components within a scrolling container.
We're passing down one prop to ToggleableTimerForm: isOpen. This is used by the child component to determine whether to render a "+" or TimerForm. When ToggleableTimerForm is "open" the form is being displayed.
We also include two separate EditableTimer components within App. We'll dig into each of these props when we build the component. Notably, isRunning specifies whether the timer is running and editFormOpen specifies whether EditableTimer should display the timer's face or its edit form.
Note that we don't explicitly set any values for the props isRunning on the first EditableTimer or editFormOpen on the second:
          <EditableTimer
            id="1"
            title="Mow the lawn"
            project="House Chores"
            elapsed="8986300"
            isRunning
          />
          <EditableTimer
            id="2"
            title="Bake squash"
            project="Kitchen Chores"
            elapsed="3890985"
            editFormOpen
          />
This is a style for boolean props you'll often encounter in React Native apps. When no explicit value is passed, the prop defaults to true. So <ToggleableTimerForm isOpen /> will give the same result as <ToggleableTimerForm isOpen={true}/>. Conversely, when a prop is absent it is undefined. This means that for the first timer editFormOpen is "falsy."
ScrollViewrenders all of its components at once, even those not currently shown in the screen.
Last, here are the styles we're using:
const styles = StyleSheet.create({
  appContainer: {
    flex: 1,
  },
  titleContainer: {
    paddingTop: 35,
    paddingBottom: 15,
    borderBottomWidth: 1,
    borderBottomColor: '#D6D7DA',
  },
  title: {
    fontSize: 18,
    fontWeight: 'bold',
    textAlign: 'center',
  },
  timerList: {
    paddingBottom: 15,
  },
});
We're not going to focus on styles in this chapter so feel free to just copy over the styles object for each component.
EditableTimer
With all of our child components, we'll save their respective files within a components subdirectory. Let's create components/EditableTimer.js.
First, we'll begin by implementing TimerForm and Timer. We'll be creating those shortly:
mport React from 'react';

import TimerForm from './TimerForm';
import Timer from './Timer';
EditableTimer will either return a timer's face (Timer) or a timer's edit form (TimerForm) based on the prop editFormOpen. We don't anticipate this component will ever manage state.
So far, we've written React components as ES6 classes that extend React.Component. However, there's another way to declare React components: as functions.
Let's see what that looks like:
export default function EditableTimer({
  id,
  title,
  project,
  elapsed,
  isRunning,
  editFormOpen,
}) {
  if (editFormOpen) {
    return <TimerForm id={id} title={title} project={project} />;
  }
  return (
    <Timer
      id={id}
      title={title}
      project={project}
      elapsed={elapsed}
      isRunning={isRunning}
    />
  );
}
EditableTimer is a regular JavaScript function. In React, we call components written this way stateless functional components or functional components for short. While we can write EditableTimer using either component style, it's a perfect candidate to be written as a function.
Think of functional components as components that only need to implement the render() method. They don't manage state and don't need any of React's special lifecycle hooks.
Throughout this book, we'll refer to the two different types as class components and functional components.
Note that the props are passed in as the first argument to the function. We don't use this when working with functional components. Here, we use destructuring to extract all the props from the props object.
The component's render method switches on the prop editFormOpen. If true, we render a TimerForm. Otherwise, we render Timer.
As we saw in App, this component receives six props. This component passes down the props id, title and project to TimerForm. For Timer, we pass down all the timer attributes.
Benefits of functional components
Why would we want to use functional components? There are two main reasons:
First, using functional components where possible encourages developers to manage state in fewer locations. This makes our programs easier to reason about.
Second, using functional components are a great way to create reusable components. Because functional components need to have all their configuration passed from the outside, they are easy to reuse across apps or projects.
A good rule of thumb is to use functional components as much as possible. If we don't need any lifecycle methods and can get away with only a render() function, using a functional component is a great choice.
Note that React still allows us to set
propTypesanddefaultPropson functional components.
TimerForm
TimerForm will contain two TextInput fields for editing a timer's title and project. We'll also add a pair of buttons at the bottom.
This page is a preview of Fullstack React Native: The Complete Guide to Building Beautiful React Native Apps
Get the rest of this chapter plus hundreds of pages of React instruction, 4 sample projects, a screencast, and more.
