
Native Modules
What are native modules?
So far in this book we've written all of our apps purely in JavaScript. We've used the built-in React Native components and APIs to interact with the underlying native iOS and Android platforms.
However, sometimes we want to use native functionality that isn't provided out-of-the-box by React Native. In these cases, we can write native components and APIs ourselves, and expose bindings to use them from JavaScript. In React Native, these bindings are called a "bridge."
Common use cases
Native modules are most commonly used for bridging existing native functionality into JavaScript. Native modules are also occasionally used for performance.
Here are a few of the most common cases:
- Accessing native platform features that React Native doesn't support out-of-the-box, e.g. payments APIs
- Exposing components and functionality when adding React Native to an existing native app
- Using existing iOS and Android libraries, e.g. authentication libraries for a 3rd party service
- High-performance algorithms like image processing that are usually low-level and multithreaded
- Extremely high-performance views when running into performance issues with React Native views (this is rare)
When to use native modules
Using native modules should be the exception, rather than the norm. It's generally best to write views, algorithms, and business logic in JavaScript when possible. The JavaScript we write is almost completely cross-platform, and updating to new versions of React Native is usually low effort. Native modules, on the other hand, must be written per platform, and can be time-consuming to update since they depend on both the native platform APIs and React Native's APIs. Additionally, we can't use the convenient Expo preview app once we start working with native code -- we have to either initialize a new project with react-native init (covered later in this chapter), or we have to eject our existing app using expo eject. For either of these approaches we'll then need to build the app using Xcode and Android Studio before we can see it on our phones.
If we're integrating React Native into an existing app (this is known as a "hybrid" app), it's likely we'll use native modules more frequently, since we'll want to expose the existing components and functionality of our app to React Native. In the short term, it's often faster to bridge existing components than to re-write them in React Native. However, in the long term, it can be better to re-write them -- by migrating components to React Native, we'll only need to maintain a single implementation, and our team will only need knowledge of a single language/platform.
Native modules on npm
When we decide we need a native module, we should first check if there's an existing open source implementation. We'll likely find an npm package for common use cases such as taking photos, playing videos, and displaying maps.
The GitHub organization react-native-community maintains several of the most popular native modules. These modules are very high quality and maintained by React Native core contributors.
It's very important to read the installation instructions, as setup for native modules can vary. Most native modules on npm come with two sets of instructions, one for automatic setup using react-native link, and one for manual setup.
react-native-link
Most of the time, installing a native module consists of 2 steps:
- Install the npm package with:
yarn add foo - Integrate the native code into your app by running
react-native link
Remember,
yarnandnpmwork interchangeably, but you should always stick to one or the other. Because we're using yarn in this book, if you seenpm install fooin a package's installation instructions, make sure to runyarn install fooinstead!
The command react-native link can often integrate native modules automatically. Library authors can configure the various paths and settings used by this command to integrate their native code.
However, react-native link only handles the most common cases, so many native modules come with custom setup instructions beyond this. Custom setup instructions usually involve manually modifying iOS and Android native code.
Manual setup
If you're building a hybrid app, it's likely your directory structure and code will differ somewhat from the structure expected by react-native link. For this reason, native modules usually include a set of instructions for manually integrating the native code into your app. This generally involves modifying the Xcode and gradle build configurations to compile native libraries that were downloaded by yarn into the node_modules directory.
The
react-native linkcommand supports some configuration options by adding anrnpm: { ... }object to your project's package.json. However, documentation is currently non-existent. If you choose to try this, the source code for reading configuration options is currently here.
Building a native module
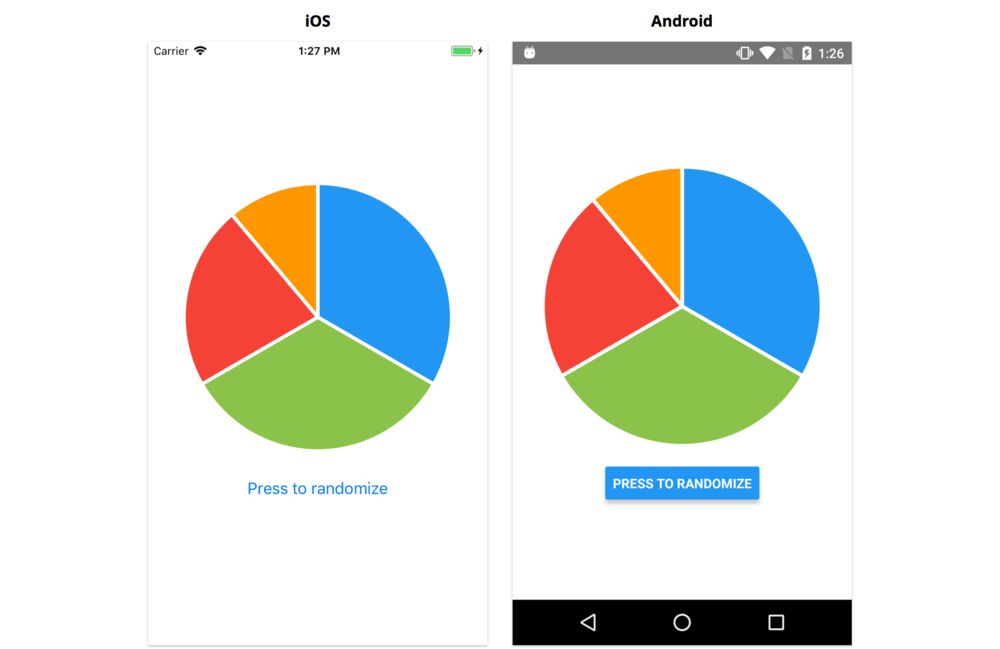
In this chapter, we'll build an app that displays a native pie chart:
There are a variety of graphing libraries available for React Native already, some of which are written in JavaScript and some of which are native modules. In order to explore how native modules work, however, we'll write a native pie chart module from scratch.
The semantics of native iOS and Android code are outside the scope of this book, so we will primarily copy and paste the native code we need. People without any experience writing native code are often able to bridge simple native modules, so we recommend you attempt to follow along even if you don't have any experience with these platforms.
Building this app will consist of the following steps:
- Create a new app using
react-native init - Write the pie chart component for both iOS and Android
- Create a single
PieChart.jsthat renders the native pie chart component from JavaScript
If you're primarily testing on Android, feel free to skip the Xcode/iOS sections, or vice versa. The project will work correctly on one platform regardless of any native code or development tools for the other platform.
Native development is challenging!
There are a lot of things that can go wrong when developing a native app. Although the code we'll write in this chapter is relatively simple (as native apps go), it's likely you'll run into several challenges along the way, especially if you've never done native development before.
The most challenging issues tend to be related to your development environment or build tools. These can be tricky to debug, since they may be somewhat unique to the setup on your computer. When you encounter an error with a development tool or building the app, the best place to start is with a Google search. This will often reveal a Stack Overflow question or GitHub issue where somebody else in the community had the exact same problem. If you don't find anything useful, we recommend opening a GitHub issue on the React Native github repo. This is the most likely way to have your issue resolved in a timely manner. If that still doesn't work, you're welcome to ask us (the authors) for help (instructions on how to do so are in the introduction chapter), but be aware that it's unlikely we will be able to solve problems related to native app development.
It's not all bad news though! The React Native community is extremely active, and new native modules are added to npm frequently -- writing custom native modules will become less and less common as the ecosystem evolves. These complex challenges with native development are a big reason for React Native's success after all!
Development environment
Before we can get started building the pie chart app, you'll need to set up your development environment. If you haven't done native app development before, it's likely you'll need to download some new software. Building for iOS will require a computer running macOS with Xcode installed. Building for Android can be done on any computer with Android Studio installed. We recommend you set up at least one of these tools before continuing with this chapter.
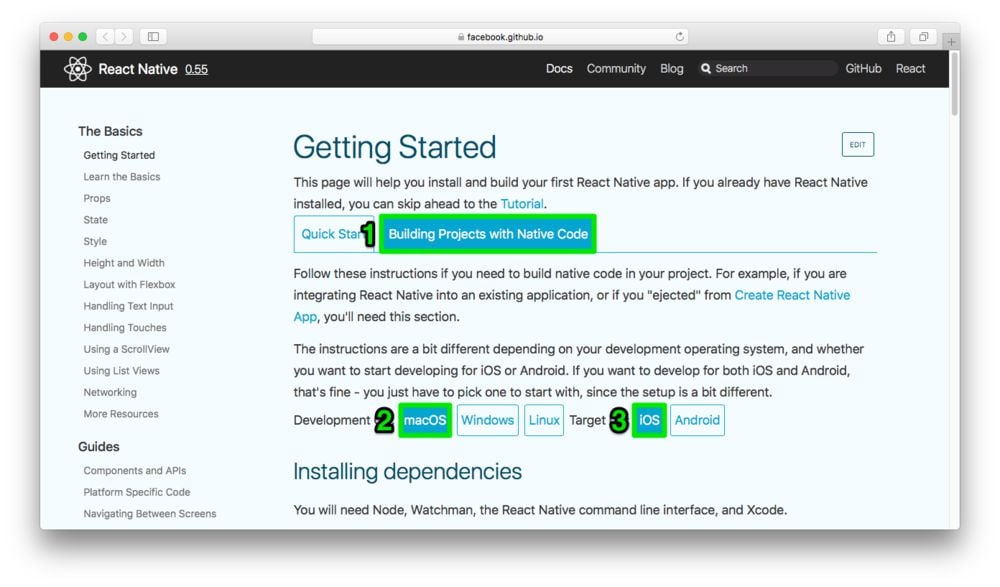
To set up your development environment, follow the instructions on the "Getting Started" page of the React Native docs site. At the top left of the header of this page, you should see a version number -- if this is greater than 0.59, switch to 0.59 now by clicking on the version number and selecting the documentation for 0.59 (since that's the version we use in this chapter). After confirming the version, click the "React Native CLI Quickstart" tab at the top of the page, then select the "Development OS" and "Target OS" you plan to test with.
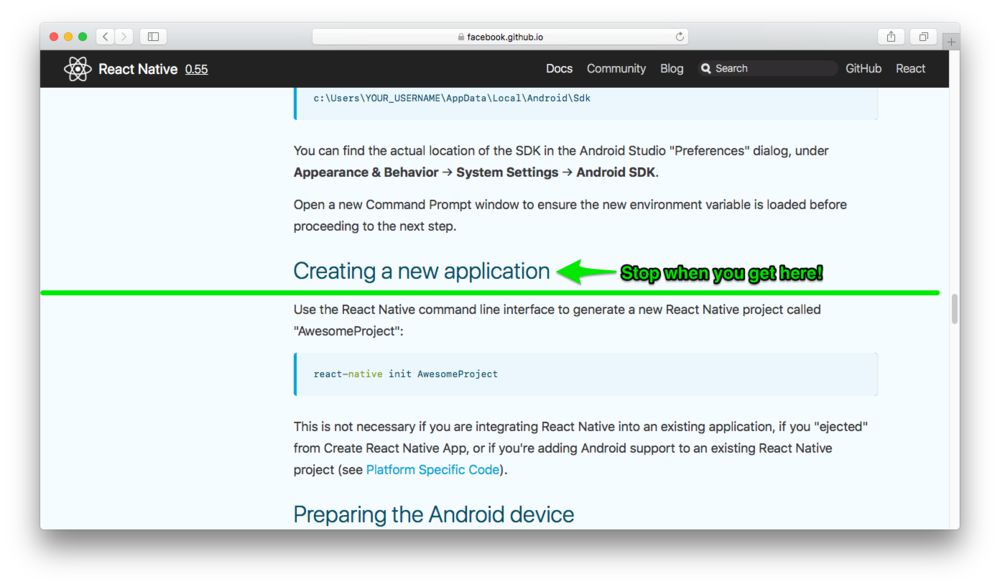
Follow the instructions for the "Development OS" and "Target OS" of your choice, up until the section "Creating a new application." We'll create a new application in a slightly different way than these docs demonstrate (although both will give the same result).
If you've previously followed these instructions and installed dependencies for a version of React Native that's different from 0.59, everything will likely still work. The setup doesn't change very often.
Initializing the project
We're going to create a new project using react-native init
$ react-native init PieChart --version [email protected]
Once this finishes, navigate into the PieChart directory.
Project structure
Let's take a look at the files in our project directory now:
├── .buckconfig
├── .flowconfig
├── .gitattributes
├── .gitignore
├── .watchmanconfig
├── App.js
├── android
├── app.json
├── babel.config.js
├── index.js
├── ios
├── metro.config.js
├── node_modules
├── package.json
└── yarn.lock
Most of the files should look familiar. There are a few new configuration files, but we'll focus mainly on the new ios and android directories and the index.js file.
The ios directory contains an Xcode project and the android directory contains an Android Studio project. From this point on, we'll need to build the project in either Xcode or Android Studio before we're able to preview it in a simulator or on a device.
You may also build using
react-native run-iosandreact-native run-android, which call into the native platform's build tools from the command line. However, if you run into any errors, they'll be easier to diagnose within Xcode or Android Studio.
The index.js file is the "entry point" of our app now -- in other words, it's the first JavaScript file in our app that gets executed when our app launches. Let's look at this file now.
Here's what index.js contains:
/**
 * @format
 */

import {AppRegistry} from 'react-native';
import App from './App';
import {name as appName} from './app.json';

AppRegistry.registerComponent(appName, () => App);
The call to AppRegistry.registerComponent registers a "root component" of our app that will be instantiated by native code. Apps can have multiple root components, each with a unique name, which can be instantiated within native code.
The @format annotation at the top of files created by react-native init tell code formatters, like prettier, that the file should be formatted.
For apps created with
expo init, theApp.jsfile is normally the entry point and theAppcomponent is registered automatically so long as it hasexport defaultin front of it.
How native modules work
There are 2 kinds of native modules:
- API modules
- UI component modules
API modules expose bindings for native methods to be called from JavaScript. When calling a native method from JavaScript, any values passed are marshalled on the JavaScript side and unmarshalled on the native side. All APIs called from JavaScript are asynchronous, so we will need to use promises, callbacks, or events if we want to handle a response from the native side.
UI component modules expose a new React component that we can render from our JavaScript code. When we render this component in our JavaScript, the native thread will use a "View Manager" to create a new native view. The View Manager handles the lifecycle of the native view, including: instantiating the view, marshalling and unmarshalling the component's props, updating the view with its props, and reusing native views where possible (for performance).
Prop types
On both platforms, we'll want our view to consume the same props. This will allow us to create a single React component that works for both iOS and Android. Our pie chart component will use the following props:
  static propTypes = {
    data: PropTypes.arrayOf(
      PropTypes.shape({
        value: PropTypes.number,
        color: ColorPropType,
      }),
    ).isRequired,
    strokeWidth: PropTypes.number,
    strokeColor: ColorPropType,
    ...ViewPropTypes,
  };
The different segments of the pie chart, the data prop, are passed as an array of objects containing a numeric value and a color string. The segments of the pie chart may optionally be rendered with a colored stroke, configurable with a numeric strokeWidth and strokeColor string. We'll also allow a style prop, just like other built-in React Native components.
We'll now build a UI component native module for each platform. As we build the module, we'll make sure it supports the data, strokeWidth, and strokeColor props. The style prop will be handled automatically for us.
Feel free to follow the instructions for just iOS or just Android, and come back to the other platform another time.
iOS
The structure of the ios directory looks like this:
ios/
├── PieChart
│   ├── AppDelegate.h
│   ├── AppDelegate.m
│   ├── Base.lproj
│   │   └── LaunchScreen.xib
│   ├── Images.xcassets
│   │   ├── AppIcon.appiconset
│   │   │   └── Contents.json
│   │   └── Contents.json
│   ├── Info.plist
│   └── main.m
├── PieChart-tvOS
│   └── Info.plist
├── PieChart-tvOSTests
│   └── Info.plist
├── PieChart.xcodeproj
│   ├── project.pbxproj
│   ├── project.xcworkspace
│   ├── xcshareddata
│   └── xcuserdata
└── PieChartTests
    ├── Info.plist
    └── PieChartTests.m
We'll be opening PieChart.xcodeproj in Xcode, and then adding a few new files to the PieChart directory from within Xcode. We won't be adding native tests or configuring our app for Apple TV, so we can ignore the PieChart-tvOS, PieChart-tvOSTests, and PieChartTests directories.
Swift or Objective-C?
When working with iOS, we have two choices for which language we want to use: Swift or Objective-C (abbreviated Obj-C). The React Native framework for iOS is written in Obj-C, so the built-in native modules and most of the documentation uses Obj-C. However, Swift is significantly easier to learn and use, so we'll be using Swift. In general we recommend using Swift for new native modules, unless you know that you need Obj-C for some reason. Regardless of which we choose, we'll still need to use Obj-C for one part of the process.
This page is a preview of Fullstack React Native: The Complete Guide to Building Beautiful React Native Apps
Get the rest of this chapter plus hundreds of pages of React instruction, 4 sample projects, a screencast, and more.
