
JSX and the Virtual DOM
React Uses a Virtual DOM
React works differently than many earlier front-end JavaScript frameworks in that instead of working with the browser's DOM, it builds a virtual representation of the DOM. By virtual, we mean a tree of JavaScript objects that represent the "actual DOM". More on this in a minute.
In React, we do not directly manipulate the actual DOM. Instead, we must manipulate the virtual representation and let React take care of changing the browser's DOM.
As we'll see in this chapter, this is a very powerful feature but it requires us to think differently about how we build web apps.
Why Not Modify the Actual DOM?
It's worth asking: why do we need a Virtual DOM? Can't we just use the "actual-DOM"?
When we do "classic-" (e.g. jQuery-) style web development, we would typically:
-
locate an element (using
document.querySelectorordocument.getElementById) and then -
modify that element directly (say, by setting
.innerHTMLon the element).
This style of development is problematic in that:
- It's hard to keep track of changes - it can become difficult to keep track of current (and prior) state of the DOM to manipulate it into the form we need.
- It can be slow - modifying the actual-DOM is a costly operation, and modifying the DOM on every change can cause significantly degrade the performance.
What is a Virtual DOM?
The Virtual DOM was created to deal with these issues. But what is the Virtual DOM anyway?
The Virtual DOM is a tree of JavaScript objects that represents the actual DOM.
One of the interesting reasons to use the Virtual DOM is the API it gives us. When using the Virtual DOM we code as if we're recreating the entire DOM on every update.
This idea of re-creating the entire DOM results in an easy-to-comprehend development model: instead of the developer keeping track of all DOM state changes, the developer simply returns the DOM they wish to see. React takes care of the transformation behind the scenes.
This idea of re-creating the Virtual DOM every update might sound like a bad idea: isn't it going to be slow? In fact, React's Virtual DOM implementation comes with important performance optimizations that make it very fast.
The Virtual DOM will:
- use efficient diffing algorithms, in order to know what changed
- update subtrees of the DOM simultaneously
- batch updates to the DOM
All of this results in an easy-to-use and optimized way to build web apps.
Virtual DOM Pieces
Again, when building a web app in React, we're not working directly with the browser's "actual DOM" directly, but instead a virtual representation of it. Our job is to provide React with enough information to build a JavaScript object that represents what the browser will render.
But what does this Virtual DOM JavaScript object actually consist of?
React's Virtual DOM is a tree of
ReactElements.
Understanding the Virtual DOM, ReactElements, and
how they interact with the "actual DOM" is a lot
easier to understand by working through some examples, which
we'll do below.
Q: Virtual DOM vs. Shadow DOM, are they the same thing? (A: No)
Maybe you've heard of the "Shadow DOM" and you're wondering, is the Shadow DOM the same thing as the Virtual DOM? The answer is no.
The Virtual DOM is a tree of JavaScript objects that represent the real DOM elements.
The Shadow DOM is a form of encapsulation on our elements. Think about using the
<video>tag in your browser. In avideotag, your browser will create a set of video controls such as a play button, a timecode number, a scrubber progress bar etc. These elements aren't part of your "regular DOM", but instead, part of the "Shadow DOM".Talking about the Shadow DOM is outside the scope of this chapter. But if you want to learn more about the Shadow DOM checkout this article: Introduction to Shadow DOM
ReactElement
A ReactElement is a representation of a DOM
element in the Virtual DOM.
React will take these ReactElements and place
them into the "actual DOM" for us.
One of the best ways to get an intuition about
ReactElement is to play around with it in our
browser.
Experimenting with ReactElement
Try this in your browser
For this section, open up the file
code/jsx/basic/index.html(from the code download) in your browser.Then open up your developer console and type commands into the console. You can access the console in Chrome by right-clicking and picking "Inspect" and then clicking on "Console" in the inspector.
We'll start by using a simple HTML template that includes
one <div> element with an id tag:
<div id='root' />

Let's walk through how we render a
<b></b> tag in our (actual) DOM using
React. Of course, we are not going to create
a <b> tag directly in the DOM (like we
might if we were using a library such as jQuery).
Instead, React expects us to provide a Virtual DOM tree. That is, we're going to give React a set of JavaScript objects which React will turn into a real DOM tree.
The objects that make up the tree will be
ReactElements. To create a
ReactElement, we use the
createElement method provided by React.
For instance, to create a ReactElement that
represents a <b> (bold) element in React,
type the following in the browser console:
var boldElement = React.createElement('b');
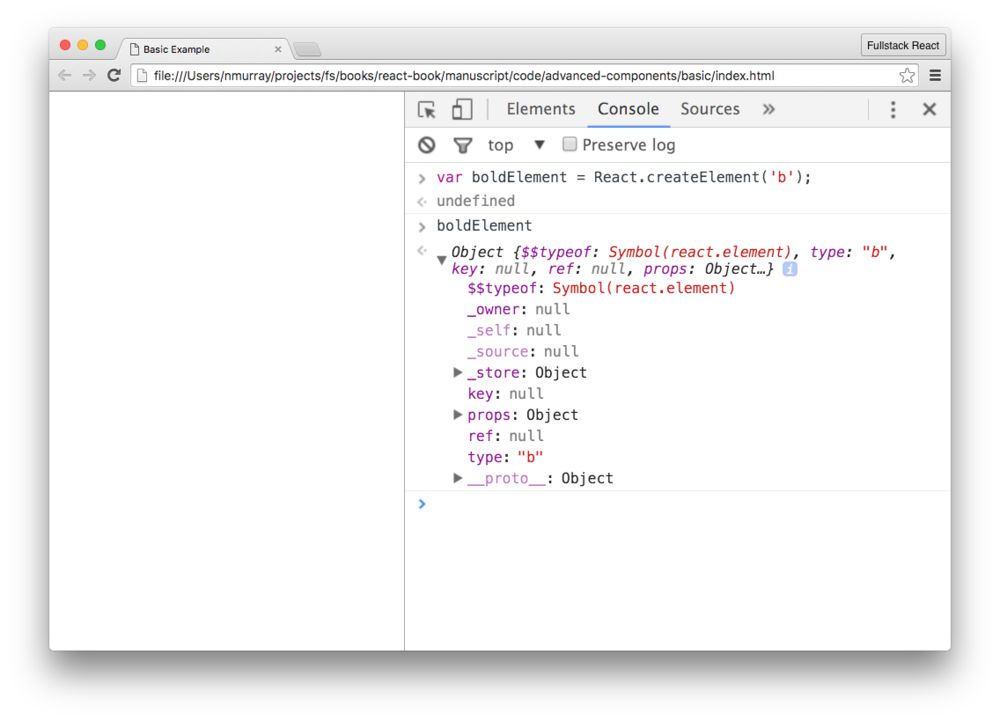
Our boldElement above is an instance of a
ReactElement. Now, we have this
boldElement, but it's not visible without
giving it to React to render in the actual DOM tree.
Rendering Our ReactElement
In order to render this element to the actual DOM tree we need
to use ReactDOM.render() (which we cover in more
detail a bit later in this chapter.
ReactDOM.render() requires two things:
- The root of our virtual tree
- the mount location where we want React write to the actual browser DOM
In our simple template we want to get access to the
div tag with an id of
root. To get a reference to our actual DOM
root element, we use one of the following:
// Either of these will work
var mountElement = document.getElementById('root');
var mountElement = document.querySelector('#root');

// if we were using jQuery this would work too
var mountElement = $('#root')
With our mountElement retrieved from the DOM, we
can give React a point to insert its own rendered DOM.
var boldElement = React.createElement('b');
var mountElement = document.querySelector('#root');
// Render the boldElement in the DOM tree
ReactDOM.render(boldElement, mountElement);
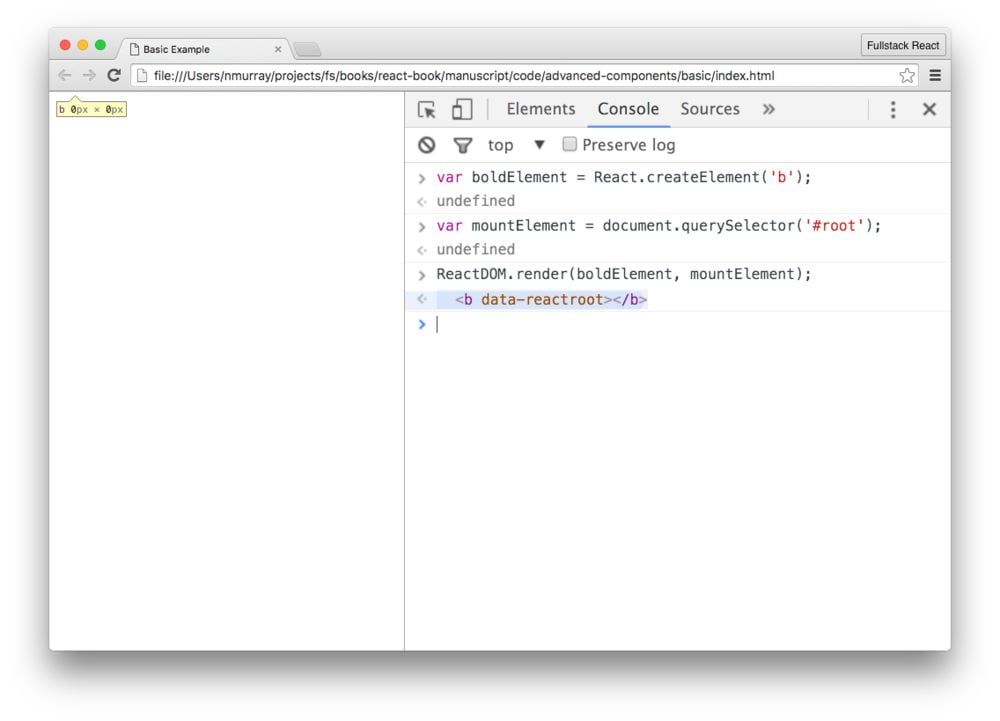
Despite the fact that nothing appears in the DOM, a new empty
element has been inserted into the document as a child of the
mountElement.
If we click the "Elements" tab in the Chrome inspector, we can see that a
btag was created in the actual DOM.
Adding Text (with children)
Although we now have a b tag in our DOM, it would
be nice if we could add some text in the tag. Because text is
in-between the opening and closing b tags, adding
text is a matter of creating a child of the element.
Above, we used React.createElement with only a
single argument ('b' for the
b tag), however the
React.createElement() function accepts three
arguments:
- The DOM element type
- The element
props - The children of the element
We'll walk through props in detail later in
this section, so for now we'll set this parameter to
null.
The children of the DOM element must be a
ReactNode object, which is any of the following:
ReactElement-
A string or a number (a
ReactTextobject) - An array of
ReactNodes
For example, to place text in our boldElement, we
can pass a string as the third argument in the
createElement() function from above:
var mountElement = document.querySelector('#root');
// Third argument is the inner text
var boldElement = React.createElement('b', null, "Text (as a string)");
ReactDOM.render(boldElement, mountElement);

ReactDOM.render()
As we've seen, we use a React renderer places the virtual tree into a "hard" browser view (the "actual" DOM).
But there's a neat side effect of React using its own virtual representation of the view-tree: it can render this tree in multiple types of canvases.
That is, not only can React render into the browser's DOM, but it can also be used to render views in other frameworks such as mobile apps. In React Native (which we talk about later in this book), this tree is rendered into native mobile views.
In this section we'll spend most of our time in the DOM,
so we'll use the ReactDOM renderer to manage
elements in the browser DOM.
As we've seen ReactDOM.render() is the way
we get our React app into the DOM:
// ...
const component = ReactDOM.render(boldElement, mountElement);
We can call the ReactDOM.render() function
multiple times and it will only perform updates (mutations) to
the DOM as necessary.
The ReactDOM.render function accepts a 3rd
argument: a callback argument that is executed after the
component is rendered/updated. We can use this callback as a
way to run functions after our app has started:
ReactDOM.render(boldElement, mountElement, function() {
  // The React app has been rendered/updated
});
JSX
JSX Creates Elements
When we created our ReactElement earlier, we used
React.createElement like this:
var boldElement = React.createElement('b', null, "Text (as a string)");
This works fine as we had a small component, but if we had many nested components the syntax could get messy very quickly. Our DOM is hierarchical and our React component tree is hierarchical as well.
We can think of it this way: to describe pages to our browser we write HTML; the HTML is parsed by the browser to create HTML Elements which become the DOM.
HTML works very well for specifying tag hierarchies. It would be nice to represent our React component tree using markup, much like we do for HTML.
This is the idea behind JSX.
When using JSX, creating the ReactElement objects
are handled for us. Instead of calling
React.createElement for each element, the
equivalent structure in JSX is:
var boldElement = <b>Text (as a string)</b>;
// => boldElement is now a ReactElement
The JSX parser will read that string and call
React.createElement for us.
JSX stands for JavaScript Syntax Extension, and it is a syntax React provides that looks a lot like HTML/XML. Rather than building our component trees using normal JavaScript directly, we write our components almost as if we were writing HTML.
JSX provides a syntax that is similar to HTML. However, in JSX we can create our own tags (which encapsulate functionality of other components).
Although it has a scary-sounding name, writing JSX is not much more difficult than writing HTML. For instance, here is a JSX component:
const element = <div>Hello world</div>;
One difference between React components and HTML tags is in the naming. HTML tags start with a lowercase letter, while React components start with an uppercase. For example:
// html tag
const htmlElement = (<div>Hello world</div>);

// React component
const Message = props => (<div>{props.text}</div>)

// Use our React component with a `Message` tag
const reactComponent = (<Message text="Hello world" />);
We often surround JSX with parenthesis ().
Although this is not always technically required, it helps us
set apart JSX from JavaScript.
Our browser doesn't know how to read JSX, so how is JSX possible?
JSX is transformed into JavaScript by using a pre-processor build-tool before we load it with the browser.
When we write JSX, we pass it through a "compiler"
(sometimes we say the code is transpiled) that
converts the JSX to JavaScript. The most common tool for this
is a plugin to babel, which we'll cover
later.
Besides being able to write HTML-like component trees, JSX provides another advantage: we can mix JavaScript with our JSX markup. This lets us add logic inline with our views.
We've seen basic examples of JSX several times in this book already. What is different in this section is that we're going to take a more structured look at the different ways we can use JSX. We'll cover tips for using JSX and then talk about how to handle some tricky cases.
Let's look at:
- attribute expressions
- child expressions
- boolean attributes
- and comments
JSX Attribute Expressions
In order to use a JavaScript expression in a component's
attribute, we wrap it in curly braces {} instead
of quotes "".
// ...
const warningLevel = 'debug';
const component = (<Alert
                    color={warningLevel === 'debug' ? 'gray' : 'red'}
                    log={true} />)
This example uses the
ternary operator
on the color prop.
If the warningLevel variable is set to
debug, then the color prop will be
'gray', otherwise it will be
'red'.
JSX Conditional Child Expressions
Another common pattern is to use a boolean checking expression and then render another element conditionally.
For instance, if we're building a menu that shows options
for an admin user, we might write:
// ...
const renderAdminMenu = function() {
  return (<MenuLink to="/users">User accounts</MenuLink>)
}
// ...
const userLevel = this.props.userLevel;
return (
  <ul>
    <li>Menu</li>
    {userLevel === 'admin' && renderAdminMenu()}
  </ul>
)
We can also use the ternary operator to render one component or another.
For instance, if we want to show a
<UserMenu> component for a logged in user
and a <LoginLink> for an anonymous user, we
can use this expression:
const Menu = (<ul>{loggedInUser ? <UserMenu /> : <LoginLink />}</ul>)
JSX Boolean Attributes
In HTML, the presence of some attributes sets the attribute to
true. For instance, a disabled <input> HTML
element can be defined:
This page is a preview of Fullstack React: The Complete Book on ReactJS and Friends.
Get the rest of this chapter plus hundreds of pages of React instruction, 5 sample projects, a screencast, and more.
