
Intro to Flux and Redux
Why Flux?
In our projects so far, we've managed state inside of React components. The top-level React component managed our primary state. In this type of data architecture, data flows downward to child components. To make changes to state, child components propagate events up to their parent components by calling prop-functions. Any state mutations took place at the top and then flowed downward again.
Managing application state with React components works fine for a wide variety of applications. However, as apps grow in size and complexity, managing state inside of React components (or the component-state paradigm) can become cumbersome.
A common pain point is the tight coupling between user interactions and state changes. For complex web applications, oftentimes a single user interaction can affect many different, discrete parts of the state.
For example, consider an app for managing email. Clicking an email must:
- Replace the "inbox view" (the list of emails) with the "email view" (the email the user clicked)
- Mark the email as read locally
- Reduce the total unread counter locally
- Change the URL of the browser
- Send a web request to mark the email as read on the server
The function in the top-level component that handles a user clicking on an email must describe all of the state changes that occur. This loads a single function with lots of complexity and responsibility. Wading through all of this logic for managing many disparate parts of an app's state tree can make updates difficult to manage and error-prone.
Facebook was running into this and other architectural problems with their apps. This motivated them to invent Flux.
Flux is a Design Pattern
Flux is a design pattern. The predecessor to Flux at Facebook was another design pattern, Model-View-Controller (MVC). MVC is a popular design pattern for both desktop and web applications.
In MVC, user interactions with the View trigger logic in the Controller. The Controller instructs the Model how to update itself. After the Model updates, the View re-renders.
While React does not have three discrete "actors" like a traditional MVC implementation, it suffers from the same coupling between user interactions and state changes.
Flux overview
The Flux design pattern is made up of four parts, organized as a one-way data pipeline:

The view dispatches actions that describe what happened. The store receives these actions and determines what state changes should occur. After the state updates, the new state is pushed to the View.
Returning to our email example, in Flux, we no longer have a single function handling email clicks that describes all of the state changes. Instead, React notifies the store (through an action) that the user clicked on an email. As we'll see over the next few chapters, we can organize the store such that each discrete part of the state has its own logic for handling updates.
In addition to decoupling interaction handling and state changes, Flux also provides the following benefits:
Breaking up state management logic
As parts of the state tree become interdependent, most of an app's state usually gets rolled up to a top-level component. Flux relieves the top-level component of state management responsibility and allows you to break up state management into isolated, smaller, and testable parts.
React components are simpler
Certain component-managed state is fine, like activating certain buttons on mouse hover. But by managing all other state externally, React components become simple HTML rendering functions. This makes them smaller, easier to understand, and more composable.
Mis-match between the state tree and the DOM tree
Oftentimes, we want to store our state with a different representation than how we want to display it. For example, we might want to have our app store a timestamp for a message (createdAt) but in the view we want to display a human-friendly representation, like "23 minutes ago." Instead of having components hold all this computational logic for derived data, we'll see how Flux enables us to perform these computations before providing state to React components.
We'll reflect on these benefits as we dig deep into the design of a complex application in the next chapter. Before that, we'll implement the Flux design pattern in a basic application so that we can review Flux's fundamentals.
Flux implementations
Flux is a design pattern, not a specific library or implementation. Facebook has open-sourced a library they use. This library provides the interface for a dispatcher and a store that you can use in your application.
But Facebook's implementation is not the exclusive option. Since Facebook started sharing Flux with the community, the community has responded by writing tons of different Flux implementations. A developer has many compelling choices.
While the available choices can be overwhelming, one community favorite has emerged: Redux.
Redux
Redux has gained widespread popularity and respect in the React community. The library has even won the endorsement of the creator of Flux.
Redux's best feature is its simplicity. Stripped of its comments and sanity checks, Redux is only about 100 lines of code.
Because of this simplicity, throughout this chapter we'll be implementing the Redux core library ourselves. We'll use small example applications to see how everything fits together.
In the following chapters, we'll build on this foundation by constructing a feature-rich messaging application that mirrors Facebook's. We'll see how using Redux as the backbone of our application equips our app to handle increasing feature complexity.
Redux's key ideas
Throughout this chapter, we'll become familiar with each of Redux's key ideas. Those ideas are:
- All of your application's data is in a single data structure called the state which is held in the store
- Your app reads the state from this store
- The state is never mutated directly outside the store
- The views emit actions that describe what happened
- A new state is created by combining the old state and the action by a function called the reducer
These key ideas are probably a bit cryptic at the moment, but you'll come to understand each of them over the course of this chapter.
Throughout the rest of the chapter, we'll be referring to Redux. Because Redux is an implementation of Flux, many of the concepts that apply to Redux apply to Flux as well.
While the Flux creators approve of Redux, Redux is arguably not a "strict" Flux implementation. You can read about the nuances on the Redux website.
Building a counter
We'll explore Redux's core ideas by building a simple counter. For now, we'll focus only on Redux and state management. We'll see later how Redux connects to React views.
Preparation
Inside of the code download that came with this book, navigate to redux/counter:
$ cd redux/counter
All the code for the counter will go inside app.js.
Because we're focusing on Redux and state management to start, we'll be running our code in the terminal as opposed to the browser.
The package.json for both of the projects contains the package babel-cli. As we'll indicate in the Try it out sections below, we'll be using the babel-node command that comes with babel-cli to run our code examples:
# example of using `babel-node` to run code in the terminal
$ ./node_modules/.bin/babel-node app.js
Run npm install now inside of redux/counter to install babel-cli:
$ npm install
Overview
Our state will be a number. The number will start off as 0. Our actions will either be to increment or decrement the state. We know from our Redux diagram that the views would dispatch these actions to the store:

When the store receives an action from the views, the store uses a reducer function to process the action. The store provides the reducer function with the current state and the action. The reducer function returns the new state:
// Inside the store, receives `action` from the view
state = reducer(state, action);
For example, consider a store with a current state of 5. The store receives an increment action. The store uses its reducer to derive the next state:
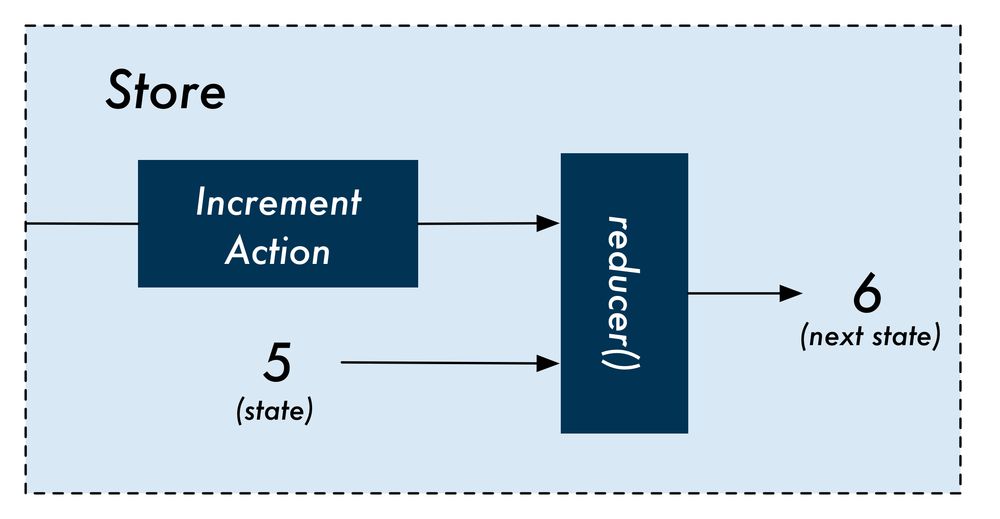
We'll start building our Redux counter by constructing its reducer. We'll then work our way up to see what a Redux store looks like. Our store will be the maintainer of state, accepting actions and using the reducer to determine the next version of the state.
While we're starting with a simple representation of state (a number), we'll be working with much more complicated state in the next chapter.
The counter's actions
We know the reducer function for our counter will accept two arguments, state and action. We know state for our counter will be an integer. But how are actions represented in Redux?
Actions in Redux are objects. Actions always have a type property.
Our increment actions will look like this:
{
  type: 'INCREMENT',
}
And decrement actions like this:
{
  type: 'DECREMENT',
}
We can envision what a simple interface for this counter app might look like:
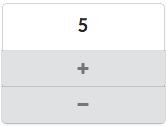
When the user clicks the "+" icon, the view would dispatch the increment action to the store. When the user clicks the "-" icon, the view would dispatch the decrement action to the store.
The image of the interface for the counter app is provided as just an example of what the view might look like. We will not be implementing a view layer for this app.
Incrementing the counter
Let's begin writing our reducer function. We'll start by handling the increment action.
The reducer function for our counter accepts two arguments, state and action, and returns the next version of the state. When the reducer receives an INCREMENT action, it should return state + 1.
Inside of app.js, add the code for our counter's reducer:
function reducer(state, action) {
  if (action.type === 'INCREMENT') {
    return state + 1;
  } else {
    return state;
  }
}
If the action.type is INCREMENT, we return the incremented state. Otherwise, our reducer returns the state unmodified.
You might be wondering if it would be a better idea to raise an error if our reducer receives an
action.typethat it does not recognize.In the next chapter, we'll see how reducer composition "breaks up" state management into smaller, more focused functions. These smaller reducers might only handle a subset of the app's state and actions. As such, if they receive an action they do not recognize, they should just ignore it and return the state unmodified.
Try it out
At the bottom of app.js, let's add some code to test our reducer.
We'll call our reducer, passing in integers for state and seeing how the reducer increments the number. If we pass in an unknown action type, our reducer returns the state unchanged:
const incrementAction = { type: 'INCREMENT' };

console.log(reducer(0, incrementAction)); // -> 1
console.log(reducer(1, incrementAction)); // -> 2
console.log(reducer(5, incrementAction)); // -> 6

const unknownAction = { type: 'UNKNOWN' };

console.log(reducer(5, unknownAction)); // -> 5
console.log(reducer(8, unknownAction)); // -> 8
Save app.js and run it with ./node_modules/.bin/babel-node:
$ ./node_modules/.bin/babel-node app.js
And your output should look like this:
1
2
6
5
8
Decrementing the counter
Again, decrement actions have a type of DECREMENT:
{
  type: 'DECREMENT',
}
To support decrement actions, we add another clause to our reducer:
function reducer(state, action) {
  if (action.type === 'INCREMENT') {
    return state + 1;
  // leanpub-start-insert
  } else if (action.type === 'DECREMENT') {
    return state - 1;
  // leanpub-end-insert
  } else {
    return state;
  }
}
Try it out
At the bottom of app.js, below the code where we dispatched increment actions, add some code to dispatch decrement actions:
const decrementAction = { type: 'DECREMENT' };

console.log(reducer(10, decrementAction)); // -> 9
console.log(reducer(9, decrementAction)); // -> 8
console.log(reducer(5, decrementAction)); // -> 4
Run app.js with ./node_modules/.bin/babel-node:
$ ./node_modules/.bin/babel-node app.js
And your output should look like this:
1
2
6
5
8
9
8
4
Supporting additional parameters on actions
In the last example, our actions contained only a type which told our reducer either to increment or decrement the state. But often behavior in our app can't be described by a single value. In these cases, we need additional parameters to describe the change.
For example, what if we wanted our app to allow the user to specify an amount to increment or decrement by?
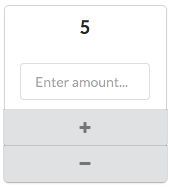
We'll have our actions carry the additional property amount. An INCREMENT action would then look like this:
{
  type: 'INCREMENT',
  amount: 7,
}
We modify our reducer to increment and decrement by action.amount, expecting all actions to now carry this property:
function reducer(state, action) {
  if (action.type === 'INCREMENT') {
    // leanpub-start-insert
    return state + action.amount;
    // leanpub-end-insert
  } else if (action.type === 'DECREMENT') {
    // leanpub-start-insert
    return state - action.amount;
    // leanpub-end-insert
  } else {
    return state;
  }
}
Try it out
Clear out the code we used to test out reducer() in app.js previously.
This time, we'll test calling the reducer with our modified actions that now carry the amount property:
const incrementAction = {
  type: 'INCREMENT',
  amount: 5,
};

console.log(reducer(0, incrementAction)); // -> 5
console.log(reducer(1, incrementAction)); // -> 6

const decrementAction = {
  type: 'DECREMENT',
  amount: 11,
};

console.log(reducer(100, decrementAction)); // -> 89
Run app.js with ./node_modules/.bin/babel-node:
$ ./node_modules/.bin/babel-node app.js
And note the output:
5
6
89
Building the store
So far, we've been calling our reducer and manually supplying the last version of the state along with an action.
In Redux, the store is responsible for both maintaining the state and accepting actions from the view. Only the store has access to the reducer:
This page is a preview of Fullstack React: The Complete Book on ReactJS and Friends.
Get the rest of this chapter plus hundreds of pages of React instruction, 5 sample projects, a screencast, and more.
