
GraphQL Server
Writing a GraphQL Server
In order to use Relay or any other GraphQL library, you need a server that speaks GraphQL. In this chapter, we're going to write a backend GraphQL server with NodeJS and other technologies we've used in earlier chapters.
We're using Node because we can leverage the tooling used elsewhere in the React ecosystem, and Facebook targets Node for many of their backend libraries. However, there are GraphQL server libraries in every popular language, such as Ruby, Python, and Scala. If your existing backend uses a framework in a language other than JavaScript, such as Rails, it might make sense to look into a GraphQL implementation in your current language.
The lessons we'll go over in this section, such as how to design a schema and work with an existing SQL database, are applicable to all GraphQL libraries and languages. We encourage you to follow along with the section and apply what you learn to your own projects, regardless of language.
Let's get to it!
Special setup for Windows users
Windows users require a little additional setup to install the packages for this chapter. Specifically, the sqlite3 package that we use can be a bit difficult to install on some Windows versions.
1. Install windows-build-tools
windows-build-tools allows you to compile native Node modules, which is necessary for the sqlite3 package.
After you've setup Node and npm, install windows-build-tools globally:
npm install --global --production windows-build-tools
2. Add python to your PATH
After installing windows-build-tools, you need to ensure python is in your PATH. This means that typing python into your terminal and pressing enter should invoke Python.
windows-build-tools installs Python here:
C:\<Your User>\.windows-build-tools\python27
Python comes with a script to add itself to your PATH. To run that script in PowerShell:
> $env:UserProfile\.windows-build-tools\python27\scripts\win_add2path.py
If you're getting an error that this script is not found, verify the version number for Python above is correct by looking inside the
C:\<Your User>\.windows-build-toolsdirectory.
After running this, you must restart your computer. Sometimes just restarting PowerShell works. In any case, you can verify that Python is properly installed by invoking python in the terminal. Doing so should start a Python console:
> python
Game Plan
At a high-level, here's what we're going to do:
- Create an Express HTTP server
- Add an endpoint which accepts GraphQL requests
- Construct our GraphQL schema
- Write the glue-code that resolves data for each GraphQL field in our schema
- Support GraphiQL so we can debug and iterate quickly
The schema we're going to draft is going to be for a social network, a sort of "Facebook-lite," backed by a SQLite database. This will show common GraphQL patterns and techniques to efficiently engineer GraphQL servers talking to existing data stores.
Express HTTP Server
Let's start setting up our web server. Create a new directory called graphql-server and run some initial npm commands:
$ mkdir graphql-server
$ cd ./graphql-server
$ npm init
# hit enter a bunch, accept the defaults
$ npm install [email protected] [email protected] [email protected] --save --save-exact
$ echo '{ "presets": ["es2015"] }' > .babelrc
Let's run through what happened: we created a new folder called graphql-server and then jumped inside of it. We ran npm init, which creates a package.json for us. Then we installed some dependencies, Babel and Express. The name Babel should be familiar from earlier chapters - in this case, we installed babel-register to transpile NodeJS files and babel-preset-es2015 to instruct Babel on how to transpile said files. The final command created a file called .babelrc, which configured Babel to use the babel-preset-es2015 package.
Create a new file named index.js, open it, and add these lines:
require('babel-register');

require('./server');
Not a lot going on here, but it's important. By requiring babel-register, every subsequent call to require (or import when using ES2015) will go through Babel's transpiler. Babel will transpile the files according to the settings in .babelrc, which we configured to use the es2015 settings.
For our next trick, create a new file named server.js. Open it and add a quick line to debug that our code is working:
console.log({ starting: true });
If you run node index.js, you should see this happen:
$ node index.js
{ starting: true }
Wonderful start! Now let's add some HTTP.
Express is a very powerful and extensible HTTP framework, so we're not going to go too in-depth; if you're ever curious to learn more about it, check out their documentation.
Open up server.js again and add code to configure Express:
console.log({ starting: true });

import express from 'express';

const app = express();

app.use('/graphql', (req, res) => {
  res.send({ data: true });
});

app.listen(3000, () => {
  console.log({ running: true });
});
The first few lines are straight-forward - we import the express package and create a new instance (you can think of this as creating a new server). At the end of the file, we tell that server to start listening for traffic on port 3000 and show some output after that's happening.
But before we start the server, we need to tell it how to handle different kinds of requests. app.use is how we're going to do that today. It's first argument is the path to handle, and the second argument is a handler function. req and res are shorthand for "request" and "response", respectively. By default, paths registered with app.use will respond on all HTTP methods, so as of now GET /graphql and POST /graphql do the same thing.
Let's give a shot and test it out. Run your server again with node index.js, and in a separate terminal fire off a cURL:
$ node index.js
{ starting: true }
{ running: true }
$ curl -XPOST http://localhost:3000/graphql
{"data":true}
$ curl -XGET http://localhost:3000/graphql
{"date":true}
We have a working HTTP server! Now time to "do some GraphQL," so to speak.
Tired of restarting your server after every change? You can setup a tool like Nodemon to automatically restart your server when you make edits.
npm install -g nodemon && nodemon index.jsshould do the trick.
Adding First GraphQL Types
We need to install some GraphQL libraries; stop your server if it's running, and run these commands:
$ npm install [email protected] [email protected] --save --save-exact
Both have "GraphQL" in their name, so that should sound promising. These are two libraries maintained by Facebook and also serve as reference implementations for GraphQL libraries in other languages.
The graphql library exposes APIs that let us construct our schema, and then exposes an API for resolving raw GraphQL document strings against that schema. It can be used in any JavaScript application, whether an Express web server like in this example, or another servers like Koa, or even in the browser itself.
In contrast, the express-graphql package is meant to be used only with Express. It handles ensuring that HTTP requests and responses are correctly formatted for GraphQL (such dealing with the content-type header), and will eventually allows us to support GraphiQL with very little extra work.
Let's get to it - open up server.js and add these lines after you create the app instance:
const app = express();

import graphqlHTTP from 'express-graphql';
import { GraphQLSchema, GraphQLObjectType, GraphQLString } from 'graphql';

const RootQuery = new GraphQLObjectType({
  name: 'RootQuery',
  description: 'The root query',
  fields: {
    viewer: {
      type: GraphQLString,
      resolve() {
        return 'viewer!';
      }
    }
  }
});

const Schema = new GraphQLSchema({
  query: RootQuery
});

app.use('/graphql', graphqlHTTP({ schema: Schema }));
Note that we've changed our previous arguments to app.use (this replaces the app.use from before).
There's a bunch of interesting things going on here, but let's skip to the good part first. Start up your server (node index.js) and run this cURL command:
$ curl -XPOST -H 'content-type:application/graphql' http://localhost:3000/graphql -d '{ viewer }'
{"data":{"viewer":"viewer!"}}
If you see the above output then your server is configured correctly and resolving GraphQL requests accordingly. Now let's walk through how it actually works.
First we import some dependencies from the GraphQL libraries:
import graphqlHTTP from 'express-graphql';
import { GraphQLSchema, GraphQLObjectType, GraphQLString } from 'graphql';
The graphql library exports many objects and you'll become familiar with them as we write more code. The first two we use are GraphQLObjectType and GraphQLString:
const RootQuery = new GraphQLObjectType({
  name: 'RootQuery',
  description: 'The root query',
  fields: {
    viewer: {
      type: GraphQLString,
      resolve() {
        return 'viewer!';
      }
    }
  }
});
When you create a new instance of GraphQLObjectType, it's analogous to defining a new class. It's required that we give it a name and optional (but very helpful for documentation) that we set a description.
The name field sets the type name in the GraphQL schema. For instance, if want to define a fragment on this type, we would write ... on RootQuery in our query. If we changed name to something like AwesomeRootQuery, we would need to change our fragment to ... on AwesomeRootQuery, even though the JavaScript variable is still RootQuery.
That defines the type, now we need to give it some fields. Each key in the fields object defines a new corresponding field, and each field object has some required properties.
We need to give it:
- a
type- the GraphQL library exports the basic scalar types, such asGraphQLString. - a
resolvefunction to return the value of the field - for now, we have the hard-coded value'viewer!'.
Next we create an instance of GraphQLSchema:
const Schema = new GraphQLSchema({
  query: RootQuery
});
Hopefully the naming makes it clear that this is the top-level GraphQL object.
You can only resolve queries once you have an instance of a schema - you can't resolve query strings against object types by themselves.
Schemas have two properties: query and mutation, which corresponds to the two types of operations we discussed earlier. Both of these take an instance of a GraphQL type, and for now we just set the query to RootQuery.
One quick note on naming things (one of the Hard Problems of computer science): we generally refer to the top-level query of a schema as the root. You'll see many projects that have similar RootQuery-named types.
Finally we hook it all up to Express:
app.use('/graphql', graphqlHTTP({ schema: Schema }));
Instead of manually writing a handler function, the graphqlHTTP function will generate one using our Schema. Internally, this will grab our GraphQL query from the request and hand it off to the main GraphQL library's resolving function.
Adding GraphiQL
Earlier we used GraphQLHub's hosted instance of GraphiQL, the GraphQL IDE. What if I told you that you could add GraphiQL to our little GraphQL server with just one change?
Try adding the graphiql: true option to graphqlHTTP:
app.use('/graphql', graphqlHTTP({ schema: Schema, graphiql: true }));
Restart your server, head to Chrome, and open http://localhost:3000/graphql. You should see something like this:
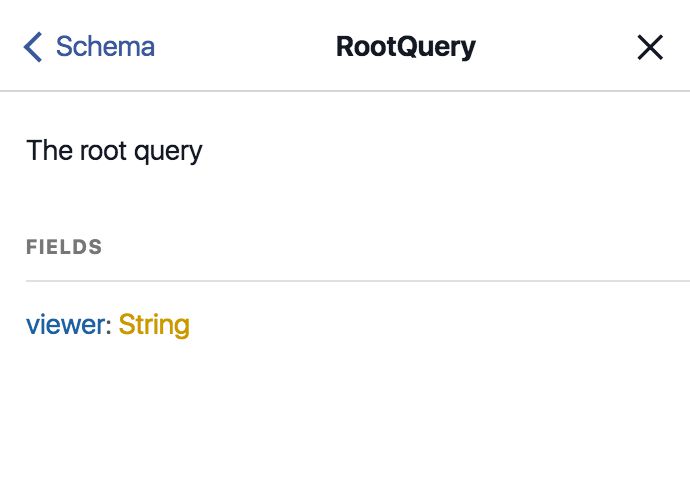
If you open the "Docs" sidebar, you'll see all the information we entered about our Schema - the RootQuery, the description, and it's viewer field:
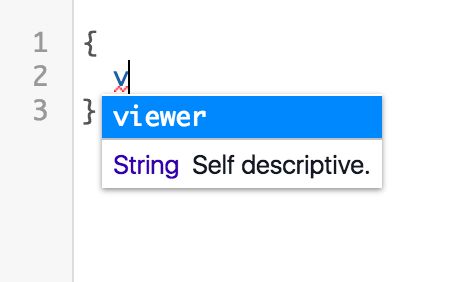
You'll also get auto-complete for our fields:
We get all of this goodness for free by using graphql-express.
It's also possible to setup GraphiQL if you're using another JavaScript framework or an entirely different language, read GraphiQL's documentation for details.
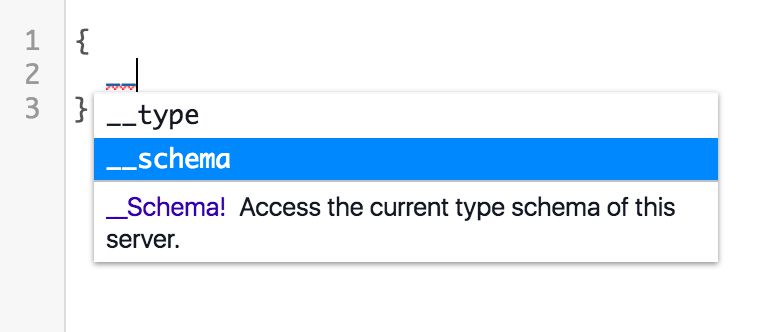
You'll notice that our typeahead suggests some interesting fields like __schema, even though we didn't define that. This is something we've alluded to throughout the chapter: GraphQL's introspection features.
Let's dig into it a bit further.
Introspection
Go ahead and run this GraphQL query inside of our server's GraphiQL instance:
{
  __schema {
    queryType {
      name
      fields {
        name
        type {
          name
        }
      }
    }
  }
}
__schema is a "meta" field that automatically exists on every GraphQL root query operation. It has a whole tree of its own types and their fields, which you can read about in the GraphQL introspection spec. GraphiQL's auto-complete will also give you helpful information and let you explore the possibilities of __schema and the other introspection field, __type.
After running that query, you'll get some data back like this:
{
  "data": {
    "__schema": {
      "queryType": {
        "name": "RootQuery",
        "fields": [
          {
            "name": "viewer",
            "type": {
              "name": "String"
            }
          }
        ]
      }
    }
  }
}
This is essentially a JSON description of our server's schema. This is how GraphiQL populates it's documentation and auto-complete, by issuing an introspection query as the IDE boots up. Since every GraphQL server is required to support introspection, tooling is often portable across all GraphQL servers (again, regardless of the language or library they were implemented with).
We won't do anything else with introspection for this chapter, but it's good to know that it exists and how it works.
Mutation
So far we've set the root query of our schema, but we mentioned that we can also set the root mutation. Remember from earlier that mutations are the correct place for "writes" to happen in GraphQL - whenever you want to add, update, or remove data, it should occur through a mutation operation. As we'll see, mutations differ very little from queries other than the implicit contract that writes should not happen in queries.
To demonstrate mutations, we'll create a simple API to get and set in-memory node objects, similar to the idiomatic Node pattern we described earlier. For now, instead of returning objects that implement a Node interface, we're going to return a string for our nodes.
This page is a preview of Fullstack React: The Complete Book on ReactJS and Friends.
Get the rest of this chapter plus hundreds of pages of React instruction, 5 sample projects, a screencast, and more.
