

Last week, we released a post detailing how to use "create-react-app" with your Node+Express server. By popular demand, this post is a clone of that post except with a Rails-powered API as opposed to a Node+Express powered one.
Update (8/25/2016):
react-scriptsversion0.2.3was released, adding a proxy feature for the Webpack development server to address CORS issues in development. This post has been updated to reflect this feature.Update (12/1/2016): Support the latest version of
react-scripts(0.7.0)
Background
Anyone who tells you that React is easy to get started with isn't lying. You can drop React into your production application, today. All you have to do is include React and ReactDOM in some script tags:
<script src='https://cdnjs.cloudflare.com/ajax/libs/react/15.2.1/react.min.js'></script>
<script src='https://cdnjs.cloudflare.com/ajax/libs/react/15.2.1/react-dom.min.js'></script>
However, if you're like most developers, you will be quickly lured away from these tranquil waters. JSX, ES6, ES6 modules, hot reloading — pick your bait.
While there are discrete steps you can take to enable individual advantages, you'll hit limitations with each sooner or later. For example, you can load babel in script tags and get JSX and ES6. But you'll start running into problems when you want to break up your app across files and use the ES6 module pattern or roll out browser-less unit tests.
Sure, not all roads lead to a JavaScript bundler. But developers starting out have many compelling reasons to want to use one. A well-configured environment gives you the ability to use the complete ES6 feature set as well as other bells and whistles like hot reloading.
Enter create-react-app
There are loads of boilerplates and libraries to help you get started with a more advanced React setup. But the Facebook team recognized that as long as there wasn't a core-team sanctioned solution, the community was likely to remain splintered. The first steps for a more complex React setup can be confusing for novice and experienced developers alike.
The create-react-app project aims to provide a canonical manner for initiating a new React app for those that want the benefits of a more complex setup but don't want to deal with the configuration.
In this post, we'll explore using create-react-app alongside a Rails API server.
We supply the React components used in this post. Therefore, even if you're not familiar with React, follow along and you'll see how the components of a modern web application fit together. We do assume basic knowledge of JavaScript/HTML/Rails.
If you're interested in learning the ins and outs of React, our book fullstackreact.com starts at the ground floor and sprawls out to cover advanced techniques and other tools in the React ecosystem.
Dependencies
I wrote this on a Mac+Chrome, but everything should work on *nix/Cygwin+other modern browsers.
You'll need Ruby, Rails, and Bundler all installed.
Getting started
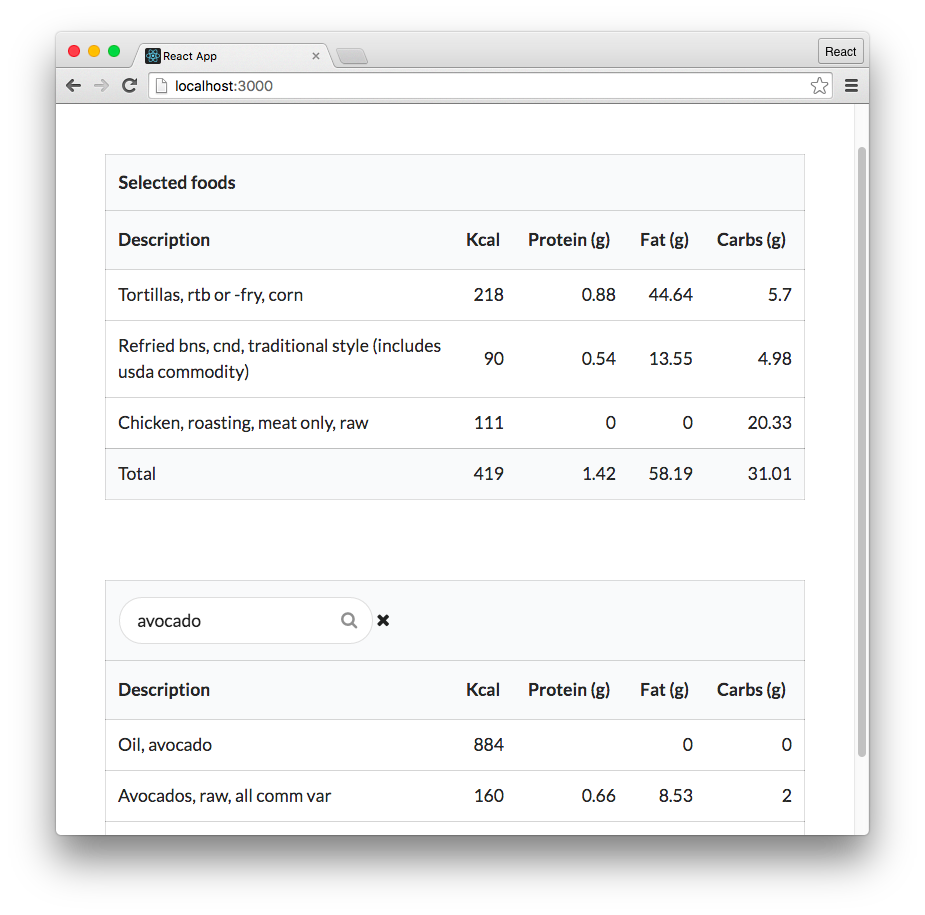
Our sample app will be a simple food nutrition lookup table. The data driving the app is supplied by the USDA's National Nutrient Database.
We'll take a look at the working app first. Then we'll build it up from scratch, starting with our Rails server and adding in our React app.
First, git clone the repository:
$ git clone [email protected]:fullstackreact/food-lookup-demo-rails
cd into that directory. The layout should look like this:
$ cd food-lookup-demo-rails
$ ls -1F
Gemfile
Gemfile.lock
Procfile
README.md
Rakefile
app/
bin/
client/
config/
config.ru
db/
flow-diagram.png
lib/
log/
public/
test/
tmp/
vendor/
This is where the server lives (aptly, server.js). Inside of the db folder is a sqlite database containing the nutrition data. The package.json in this folder specifies the dependencies for the server.
Peeking into the client directory:
$ ls -1F client
package.json
public/
src/
Of interest, we have a Gemfile up top and a package.json down here in client/. The client and the server specify their own dependencies independently. For all intents and purposes, they are two completely separate apps that could exist in their own discrete git repos.
Let's install the dependencies for both:
$ bundle && cd client && npm i && cd ..
Now's a good time to do that thing you've been meaning to do.
Then, we'll create, migrate, and seed our API's database:
bundle exec rake db:create db:migrate db:seed
And then we'll be ready to boot from the top-level directory:
$ rake start
Your browser should open localhost:3000 automagically. Behold, the most advanced and nutritious interface V8 has ever rendered:
The server
Let's shut down the app with CTRL+C:
^C[WARN] Interrupted by User
[DONE] Killing all processes with signal  SIGINT
1:43:20 PM api.1 Exited Abnormally
1:43:20 PM web.1 Exited Abnormally
Let's see what the app looks like stripped down to just the server. You have two options to get to this state: Just use our Git branch or do it yourself.
Option 1: Use the starting-point branch
The starting-point branch contains just the server.
You can check it out inside the repo:
git checkout starting-point
This removes the files inside client/.
The client folder is probably still hanging around. That's because the untracked node_modules folder is inside. Kill it:
$ rm -r client
Option 2: Do it yourself
To build up the app yourself, you can start with a new Rails project:
rails new food-demo --api
The
--apiflag is new in Rails 5. While older versions ofrails newshould not fail if the--apiflag is present, this flag excludes certain dependencies that aren't necessary for an API-only Rails server.
Then, copy over the following files from the GitHub repository:
app/models/food.rbapp/controllers/foods_controller.rbconfig/routes.rbdb/(the entire folder)
With those files in place, you can then run the following command to create the database, perform the migration, and seed it:
bundle exec rake db:create db:migrate db:seed
You can check out the migration under db/migrate or the seed logic in db/seeds.rb if you're so inclined.
Testing the server
With a functioning server in place, let's give it a spin:
$ bundle exec rails s -p 3001
We're only booting up the server as we don't have the client yet. This server provides a single API endpoint, /api/food. It expects a single parameter, q, the food we are searching for.
You can give it a spin. The server is on 3001. You can use curl or your browser. The example below pipes to the tool jq for human readability:
$ curl localhost:3001/api/food?q=hash+browns | jq '.'

[
  {
    "description": "Fast foods, potatoes, hash browns, rnd pieces or patty",
    "kcal": 272,
    "protein_g": 2.58,
    "carbohydrate_g": 28.88,
    "sugar_g": 0.56
  },
  {
    "description": "Chick-fil-a, hash browns",
    "kcal": 301,
    "protein_g": 3,
    "carbohydrate_g": 30.51,
    "sugar_g": 0.54
  },
  {
    "description": "Denny's, hash browns",
    "kcal": 197,
    "protein_g": 2.49,
    "carbohydrate_g": 26.59,
    "sugar_g": 1.38
  },
  {
    "description": "Restaurant, family style, hash browns",
    "kcal": 197,
    "protein_g": 2.49,
    "carbohydrate_g": 26.59,
    "sugar_g": 1.38
  }
]
Mmm, Chick-fil-A. Really hope you're not reading this on a Sunday.
Now that we understand how this endpoint works, let's build the front-end application. Kill the server with CTRL+C.
Here we go
Ensure that you have create-react-app installed globally:
$ npm i -g create-react-app
And then at the top-level directory of the project we'll create our client app. We want the React app to be in a folder called client, so we'll just use that name in the create-react-app command:
$ create-react-app client
This creates a new directory with the following file structure:
$ ls -1F client
node_modules/
package.json
public/
src/
Taking a look at client/package.json, we note a single dev dependency and react and react-dom under dependencies:
{
  "name": "client",
  "version": "0.0.1",
  "private": true,
  "devDependencies": {
    "react-scripts": "0.7.0"
  },
  "dependencies": {
    "react": "^15.3.1",
    "react-dom": "^15.3.1"
  },
  "scripts": {
    "start": "react-scripts start",
    "build": "react-scripts build",
    "eject": "react-scripts eject"
  }
}
What, exactly, is react-scripts?
react-scripts
react-scripts is an NPM package specifically for use with create-react-app. It's the "black box" which contains the essentials:
-
Dependencies
- Like Babel, ESLint, and Webpack.
-
Configuration
- Config files for Webpack, Babel and ESLint, both for development and production.
-
Scripts
- For instance, the command
react-scripts startruns a script shipped with this package. It's responsible for ultimately booting the Webpack development server.
- For instance, the command
To see it in action, we can run npm start from inside of this folder:
$ cd client && npm start
This will launch a Webpack dev server and should also open localhost:3000 in your browser if you're on a Mac:

We have our API server in the top-level directory and we were able to boot that. And we have our client app down here in client and we're able to boot a server for this.
But why does our React app need its own server? And how are we going to get these two servers working together?
Understanding this requires getting down to The Rub.
The Rub ™
Webpack is a JavaScript bundler. You might have many different JavaScript modules, like React components and Redux reducers, strewn across many different files. Webpack rolls these up into one gigantic "bundle." Think of the bundle as a combination of a vanilla index.html that includes a file bundle.js. This JavaScript file is one big, long file with every line of JavaScript that your app depends on, all shoved into one location. This single file will contain browser-ready JavaScript as Babel will have already worked its transpiling magic.
You can instruct Webpack you would like it to produce this bundle. create-react-app inserts a build command into package.json:
$ npm run build
This command kicks off Webpack and Webpack spits out a bundle. You could then serve the index.html from that bundle wherever you'd like.
So, we could use Webpack to generate this bundle. And we could have our API server serve the static asset index.html. We'd run the build command inside client/ and out would come the magic build folder. We could then serve this folder with our API server.
And it would work. And we might even be happy about it.
However, there's a better approach: You can have Webpack boot a little Node server to serve the bundle. This means that when you make updates to your JavaScript/assets, you don't have to re-build and re-load — you just hit the server again to get the latest bundle. This workflow enables hot reloading, where your web app will reload itself when assets change, saving your modifier+R keys from a significant amount of wear.
In fact, if you run npm run build you'll find that this command is intended for production use. It does all kinds of optimization that can be time consuming — aggravating when you're quickly iterating in development. Booting a Webpack dev server is the way to go.
In production, we'll use
npm run buildto create our static bundle. We can then throw that bundle anywhere (like S3), independent of the API server. We'll explore this process in the next post.
So the user will direct their browser to localhost:3000, hitting the Webpack dev server. But then how will the React app communicate with our API server?
Our intuition would be to have a flow like this:
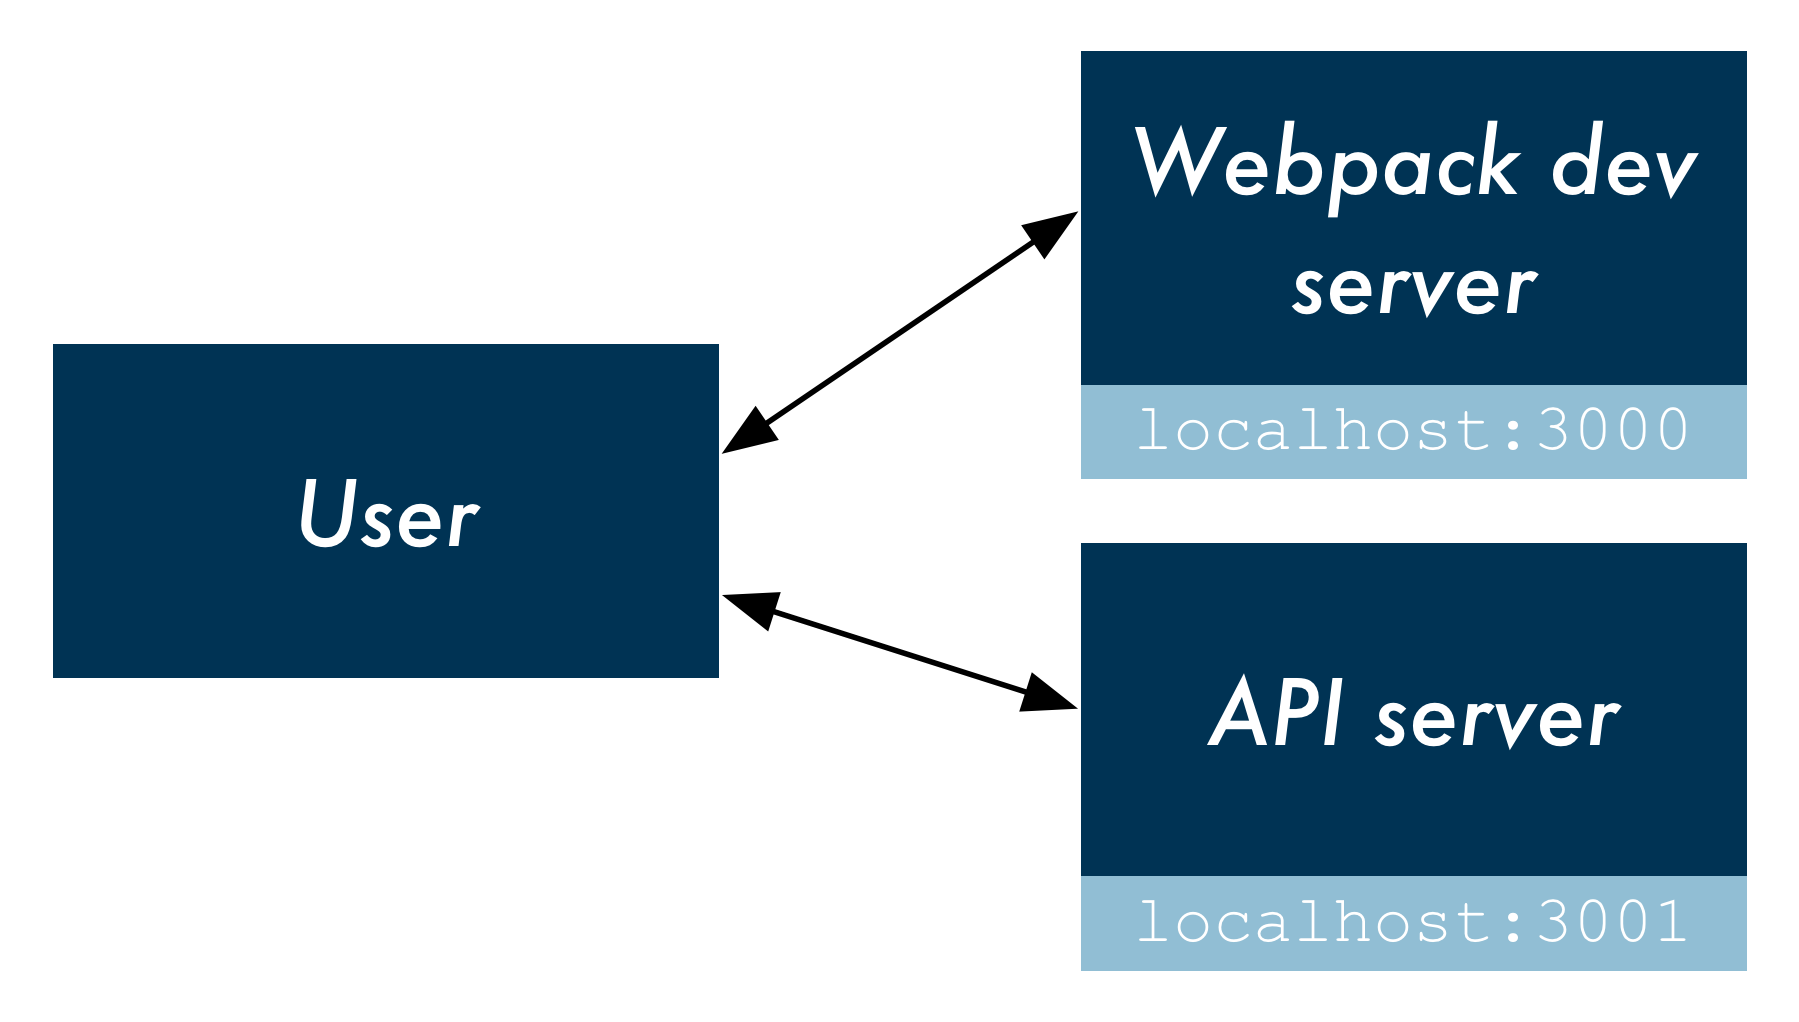
In this flow, the user's browser makes a request to localhost:3000, loading the static assets from the Webpack dev server. The user's browser / React then makes requests as needed directly to the API server hosted on localhost:3001 with calls like this:
fetch("localhost:3001/api/foods?q=carrots", {
  // ...
});
This would produce an issue, however. The React app (hosted at localhost:3000) would be attempting to load a resource from a different origin (localhost:3001). This would be performing Cross-Origin Resource Sharing. The browser prevents these types of requests from scripts for security reasons.
create-react-app provides a mechanism for working with an API server in development. We can have the Webpack development server proxy requests intended for our API server, like this:

In this flow, React makes an API request to localhost:3000, the Webpack development server. And then the development server simply proxies that request to the API server, negating any CORS issues.
So, the Rub: we need to (1) launch both the Webpack dev server and the API server in order to run the app locally. And then (2) we need to get the Webpack dev server to proxy requests intended for our API server.
For the first challenge, we could use two terminal windows: boot each server in its own window. But we could get a bit fancier.
Foreman
Foreman is a utility for managing multiple processes. We'll see how it works by implementing it.
Insert foreman into your Gemfile:
gem 'foreman', '~> 0.82.0'
Install it with bundler:
$ bundle install
We then declare a Procfile, which specifies the commands Foreman should use to boot each of our desired processes. Let's create this file now:
$ touch Procfile
Open Procfile in your favorite editor. We'll declare two processes: one for web (our React app) and one for api (our Rails server):
web: cd client && npm start
api: bundle exec rails s -p 3001
Save and close. We want Foreman to set process.env.PORT for our React app to 3000. We boot Foreman with this command:
$ foreman start -p 3000
The client app will boot — we can see it running in our browser at localhost:3000. And our API server is up and listening at localhost:3001. Hitting CTRL+C kills both processes together, humanely.
For our sanity, let's add a Rake task that executes this command for us. Create the file lib/tasks/start.rake:
task :start do
  exec 'foreman start -p 3000'
end
We can now boot the app with:
$ rake start
With the foundations in place, let's wire the two up. We'll toss in the food lookup React components which will make requests against our API server.
The app's React components
Let's steal a few files from the master branch of food-lookup-demo-rails.
If you're still inside that repository on the starting-point branch, you can run the following to grab these files from master:
git checkout master -- {client/src,client/semantic,client/semantic.json}
If instead you used rails new to start a new project from scratch, manually copy and paste those files from the repository.
We use Semantic UI for styling the app. It's included inside of src/index.js. index.css contains a few kludgey margins.
The meat is in Client.js and App.js.
For brevity, we won't walk through the React components. For the purposes of reading along, you just need to know that changing the value of the search bar ultimately calls search() on Client.
Client.js contains a Fetch call to our API endpoint:
function search(query) {
  return fetch(`/api/food?q=${query}`, {
    accept: 'application/json',
  }).then(checkStatus)
    .then(parseJSON);
}
This is the one touch point between our React web app and the API server.
Notice how the URL does not include the base localhost:3001. That's because, as noted earlier, we want this request to be made to the Webpack development server. Thanks to the configuration established by create-react-app, the Webpack dev server will infer what traffic to proxy. It will proxy a request if the URL is not recognized or if the request is not loading static assets (like HTML/CSS/JS).
We just need to instruct Webpack to use the proxy.
If you're not coding along at home and want to take a peek at
App.js, just check it out over on GitHub.
Setting up the proxy
To have the Webpack development server proxy all requests starting with /api to our API server, we just need to add the following line to client/package.json:
// Inside client/package.json
"proxy": "http://localhost:3001/",
We're set.
Testing it out
Our React app is ready and in place in client/. We have Foreman setup to boot both our Webpack dev server and our Rails API server together. And we've specified the route that Webpack should proxy API traffic to.
Let's boot both servers:
$ rake start
We're in business!

Learn React the right way
The up-to-date, in-depth, complete guide to React and friends.
Download the first chapter