


We've previously covered how to deploy a React app to S3. But what about deploying a React app that's backed by an API server, like the one we discussed in this post?
While the README for that project discusses a solution, it doesn't go into much depth. In this post, we'll get #deep.
We'll:
- Discuss the deployment strategy with Heroku
- Deploy the app to Heroku
- Discuss an alternative setup that involves S3 and Heroku together
If you want to follow along, go ahead and clone the example app now:
$ git clone [email protected]:fullstackreact/food-lookup-demo
# Install npm packages for client and server
$ cd food-lookup-demo
$ npm i && cd client && npm i && cd ..
Let's get started.
Our deployment strategy
What's Heroku?
Heroku is a Platform-as-a-Service (PaaS). They make deploying dynamic web apps dead simple, taking care of lots of the underlying details. What's more, they have an ecosystem of add-ons that you can easily plug into your app. Should your app need databases, caching, or logging services, Heroku has a platform partner that you can integrate with.
Heroku has a free tier. Heroku calls each virtual server (or "compute instance") a "dyno." The free tier gives you one dyno. The free tier is not sufficient for a production app but is fine for our hobbyist purposes.
Note that the free dyno "sleeps" after some period of inactivity. This means that initial requests to "wake up" the dyno will take significantly longer as your dyno needs to be retrieved and booted.
You deploy to your dyno using git push. After
pushing your code via git up to your dyno, your app will
restart and your changes will be live.
The strategy
The food lookup app involves a React app that interfaces with a Node+Express API server. As you might recall from our original post about this app, we run two servers in development: a Webpack server that serves our React app and the Node+Express app that serves our API. The browser communicates exclusively with the Webpack server which then proxies API-specific requests to our API:

This works fine for development. But it's not a valid strategy for deployment:
- The Webpack development server is intended for, well, development.
- We can only run one server on each dyno.
For #1, recall that the Webpack development server is watching changes to your React app/assets and is compiling everything on the fly. This is purely a development feature -- we don't want to use it in production. As we discussed briefly in the last post, we can have Webpack produce an optimized bundle for our app that's intended for production use.
For #2, even if we wanted to use a Webpack development server to toy around with our app on Heroku, we'd need to use two dynos to do so -- one dyno for our Webpack dev server and one for our API server. Getting the two to communicate would be a little tricky and we'd no longer be eligible for the free tier. 💸
Instead, we want to use the build task provided
by create-react-app to produce a static bundle of our React
app. This static bundle will contain optimizations for
production.
The neat part is that we can then put this bundle really anywhere. It will be a completely self-contained folder. All of our app's JavaScript, HTML, and CSS is included, along with any images. Because these assets are static, any basic web host will do.
Our Node+Express app, however, will be its own running process. So it will need a more specialized environment to run in. That's where a PaaS like Heroku comes in.
So, one configuration for deployment is to produce our static bundle and stick it on some basic file server on the web. We can use Amazon's S3, for example. We can then deploy our API server to Heroku. The two would communicate like this:
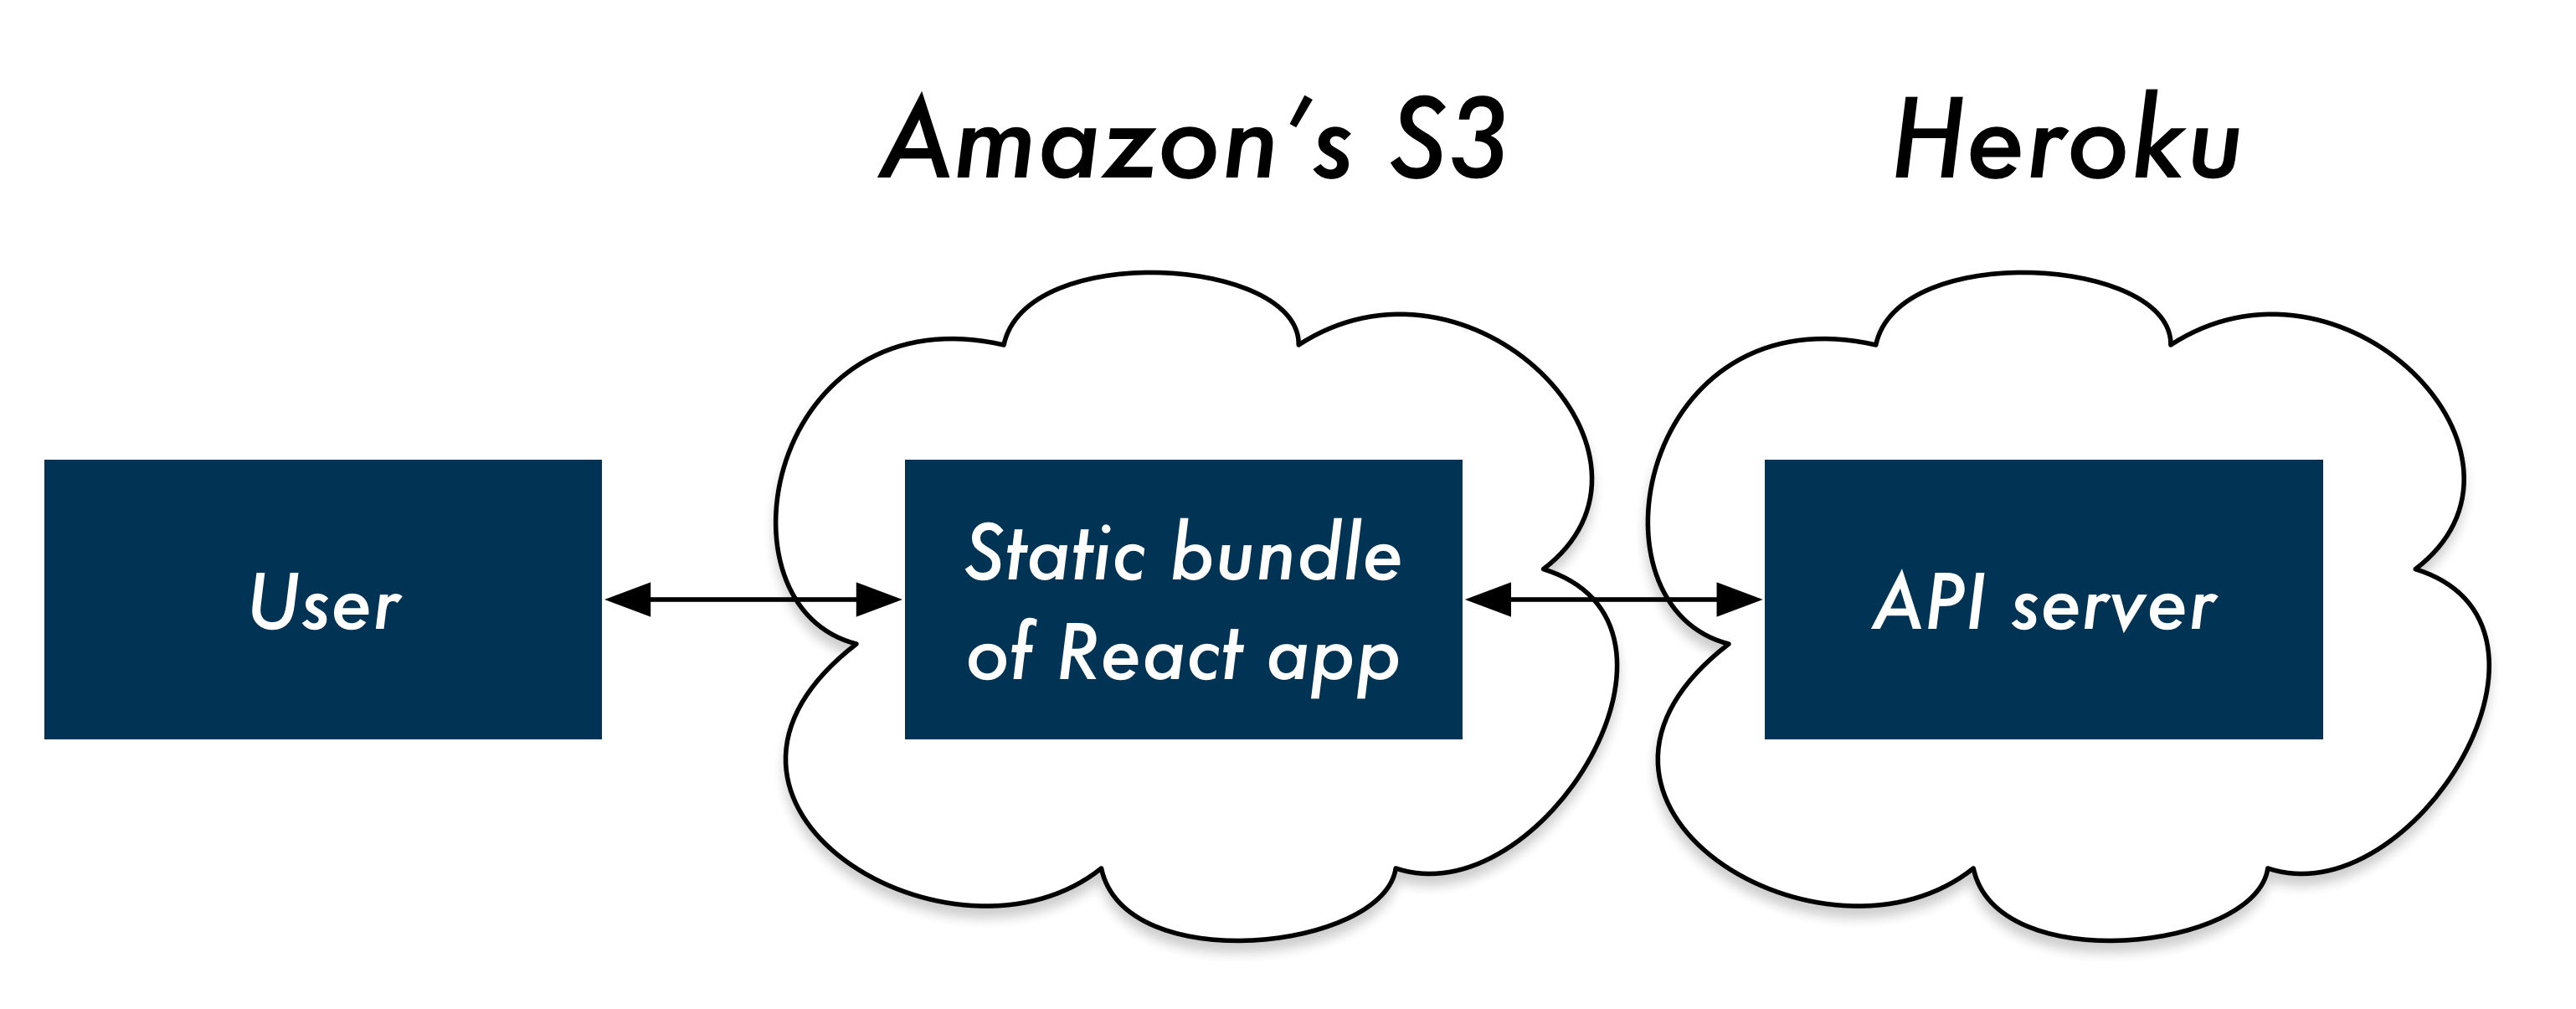
Again, any file host for our React app's static bundle would do. The user's browser would download and run our React app, which would then make requests to our API server.
There are a couple hurdles with this approach. One hurdle is that we'd need to have two deployment targets, both S3 (for the React app) and Heroku (for the API server).
We'll discuss this deployment strategy at the end of this post.
For now, to keep things simple, it would be great if we could keep to a single deployment target, Heroku. At the time of writing, Heroku doesn't have a canonical way to easily deploy static sites. But instead, we can have our API server also serve the static assets for our React app. Here's what that request flow would look like:
- Browser requests
/ - Node+Express server serves the JS, HTML, and CSS for our React app
- React app loads in the browser
-
React app communicates with
/api/foodon our API server
A diagram of this approach:
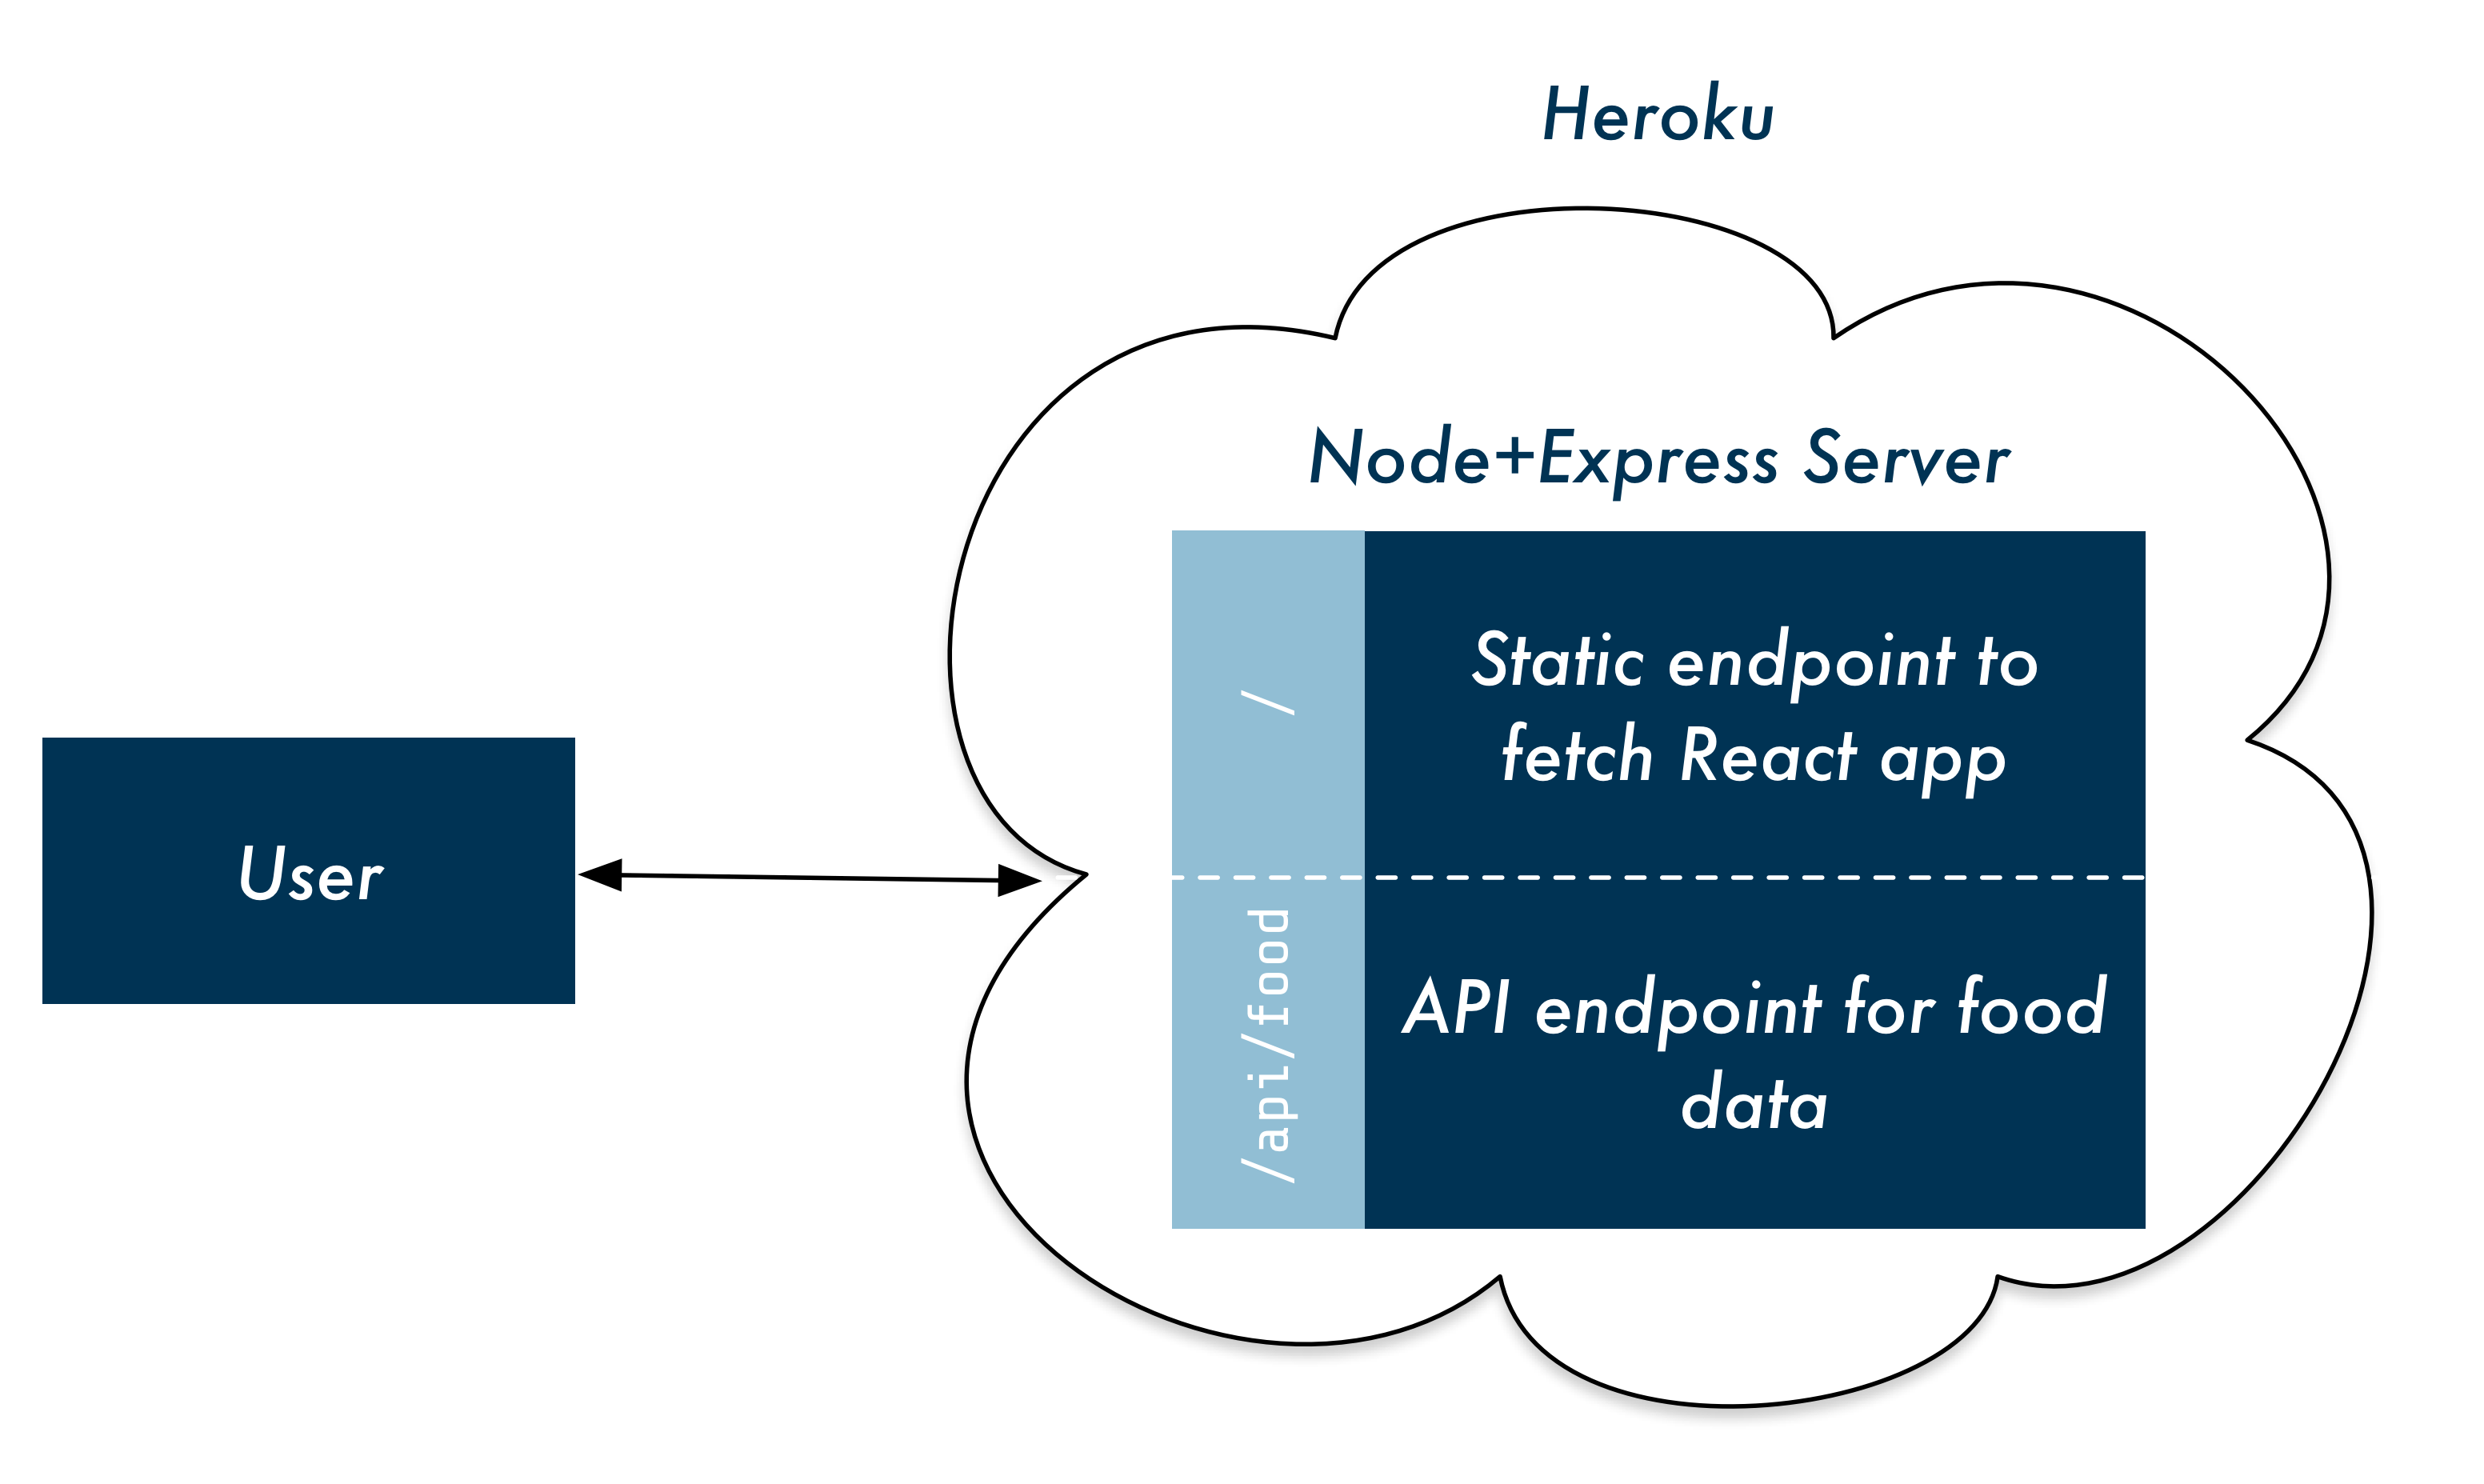
So our API server becomes an all-purpose server. It serves both the static assets for our site as well as the API endpoint that our React app communicates with.
We'll see how we accomplish this in a bit. First, let's setup Heroku.
Setting up Heroku
To setup Heroku, we need to:
- Sign up for an account
- Install Heroku's command-line tool
- Instantiate the Heroku app
1. Sign up
Sign up here.
2. Install the CLI tool
Follow this tutorial.
3. Instantiate the Heroku app
If you haven't already, clone the repository we're working with in this post:
$ git clone [email protected]:fullstackreact/food-lookup-demo
$ cd food-lookup-demo
# Install npm packages for client and server
$ npm i && cd client && npm i && cd ..
Inside that folder, we can run
heroku apps:create to instantiate a new Heroku
app. This does two primary things:
- Sets up our app on Heroku.
-
Adds the
herokutarget to git. We'll see what this means in a moment.
The command takes this format:
$ heroku apps:create <YOUR-APP-NAME>
The name of your app must be unique across Heroku. That's because Heroku will host your app at a subdomain:
http://<YOUR-APP-NAME>.herokuapp.com
Run that command now.
The name
food-lookup-demois already taken. I wonder who has it? 🙃
Our Heroku app and tooling is all set up. And our app is instantiated on Heroku.
To deploy our app, we'll eventually run this command:
$ git push heroku master
In the past, you've probably run this command:
$ git push origin master
If you're using a service like GitHub,
origin points to GitHub. Here,
heroku points to our Heroku app. We're able
to use git to upload our app to Heroku. Neat.
But first, we need to prepare our app for deployment.
Preparing the app
Before deploying our app, we need to create our React
app's static bundle. create-react-app provides the handy
build command. Change into the
client directory and run it:
$ cd client
$ npm run build
The build/ folder will contain all the necessary
files to run our React app.
Now, in order for build/ to make it up to Heroku,
we have to add it to git. Do so now:
# from the root of the project
$ git add client/build
$ git commit -m 'Adding `build` to source control'
Next, as we discussed earlier, we need to have our
Node+Express server serve this static bundle. If you check out
server.js, you'll see that we already added
a handler for this:
// Express only serves static assets in production
if (process.env.NODE_ENV === "production") {
  app.use(express.static("client/build"));
}
In production, our Node+Express app will serve
/build. /build contains an
index.html. When the user's browser requests
/, our Node+Express app will serve
index.html which will load our React app.
So, our app is ready for deployment.
Deploy
With everything in place, deployments are a cinch:
$ git push heroku master
After our repository makes it to Heroku, we'll start seeing a message log of the deploy process:
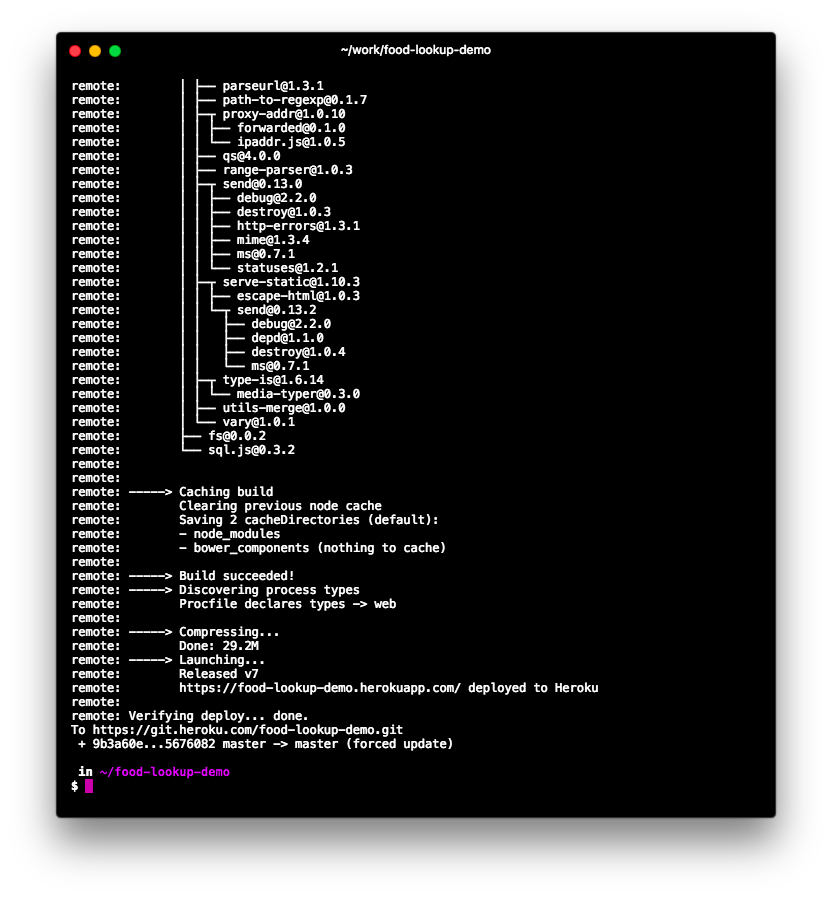
After the deploy completes, Heroku will spit out the URL of the app. We can also use this command to open the page in our browser:
$ heroku open
Run the command and witness the might of your live, deployed app!
Deploying to both S3 and Heroku
As we mentioned earlier, another deployment strategy is to deploy your React app's bundle to a static web host like S3 and deploy your API server to Heroku:
This strategy is a bit more work, but has a few nice features:
- You can keep your client app and API server entirely separate
- You decouple the deployments of your front-end app and your back-end API
For prototyping and hobby projects, neither of these features are particularly compelling. But for larger teams or larger apps, there are real benefits to this approach.
We recently wrote a post describing deploying a React app to S3. You can use the concepts from that post to deploy your React app to S3 and then the concepts from this post to deploy your API server to Heroku.
However, there is one caveat: CORS. We discuss CORS (or Cross-Origin Resource Sharing) in this post. The gist: The user's browser will have loaded your React app from S3. Your React app will then be attempting to make requests out to your API server over on Heroku. For security reasons, your browser will prevent this from happening.
There are several ways to solve this. One relatively
straightforward solution: We can add some headers to our API
server's response that tell the browser that it's OK
receiving requests from the domain of our Heroku app. We could
add lines like this to server.js:
app.use((req, res, next) => {
  res.header(
    "Access-Control-Allow-Origin",
    "http://<YOUR-APP-NAME>.herokuapp.com"
  );
  res.header(
    "Access-Control-Allow-Headers",
    "Origin, X-Requested-With, Content-Type, Accept"
  );
  next();
});
That adds two headers to every outgoing response, telling the browser our API server is OK with requests originating from our React app. You can also use the express library cors to set this up.
With those headers in place, everything should work swimmingly.
You're now armed with two strategies for sharing your projects with the world. Questions, comments, or other ideas? Leave a comment below.
Because you found this post helpful, you'll love our book — it's packed with over 800 pages of content and over a dozen projects, including chapters on React fundamentals, Redux, Relay, GraphQL, and more.

Learn React the right way
The up-to-date, in-depth, complete guide to React and friends.
Download the first chapter