
Awesome, we've built our first component. Now let's get a bit fancier and start building a more complex interface.
In the previous section of 30 Days of React, we
started building our first React component. In this section,
we'll continue our work with our
App component and start building a more complex
UI.
A common web element we might see is a user timeline. For instance, we might have an application that shows a history of events happening such as applications like Facebook and Twitter.
Styles
As we're not focusing on CSS in this course, we're not covering the CSS specific to build the timeline as you see it on the screen.
However, we want to make sure the timeline you build looks similar to ours. If you include the following CSS as a
<link />tag in your code, your timeline will look similar and will be using the same styling ours is using:<link href="https://cdn.jsdelivr.net/gh/fullstackreact/30-days-of-react@master/day-04/src/components/Timeline/Timeline.css" rel="stylesheet" type="text/css" />And make sure to surround your code in a component with the class of
demo(we left it this way purposefully as it's the exact same code we use in all the demos here). Check out the https://jsfiddle.net/auser/zwomnfwk/ for a working example.The entire compiled CSS can be found on the github repository at https://github.com/fullstackreact/30-days-of-react/blob/master/day-04/src/components/Timeline/Timeline.css.
In addition, in order to make the timeline look exactly like the way ours does on the site, you'll need to include font-awesome in your web application. There are multiple ways to handle this. The simplest way is to include the link styles:
<link
  href="https://maxcdn.bootstrapcdn.com/font-awesome/4.7.0/css/font-awesome.min.css"
  rel="stylesheet"
  type="text/css"
/>
All the code for the examples on the page is available at the github repo (at https://github.com/fullstackreact/30-days-of-react).
We could build this entire UI in a single component. However, building an entire application in a single component is not a great idea as it can grow huge, complex, and difficult to test.
class Timeline extends React.Component {
  render() {
    return (
      <div className="notificationsFrame">
        <div className="panel">
          <div className="header">

            <div className="menuIcon">
              <div className="dashTop"></div>
              <div className="dashBottom"></div>
              <div className="circle"></div>
            </div>

            <span className="title">Timeline</span>

            <input
              type="text"
              className="searchInput"
              placeholder="Search ..." />

            <div className="fa fa-search searchIcon"></div>
          </div>
          <div className="content">
            <div className="line"></div>
            <div className="item">

              <div className="avatar">
                <img
                alt='doug'
                src="http://www.croop.cl/UI/twitter/images/doug.jpg" />
              </div>

              <span className="time">
                An hour ago
              </span>
              <p>Ate lunch</p>
            </div>

            <div className="item">
              <div className="avatar">
                <img
                  alt='doug' src="http://www.croop.cl/UI/twitter/images/doug.jpg" />
              </div>

              <span className="time">10 am</span>
              <p>Read Day two article</p>
            </div>

            <div className="item">
              <div className="avatar">
                <img
                  alt='doug' src="http://www.croop.cl/UI/twitter/images/doug.jpg" />
              </div>

              <span className="time">10 am</span>
              <p>Lorem Ipsum is simply dummy text of the printing and typesetting industry.</p>
            </div>

            <div className="item">
              <div className="avatar">
                <img
                  alt='doug' src="http://www.croop.cl/UI/twitter/images/doug.jpg" />
              </div>

              <span className="time">2:21 pm</span>
              <p>Lorem Ipsum has been the industry's standard dummy text ever since the 1500s, when an unknown printer took a galley of type and scrambled it to make a type specimen book.</p>
            </div>

          </div>
        </div>
      </div>
    )
  }
}
Breaking it down
Rather than build this in a single component, let's break it down into multiple components.
Looking at this component, there are 2 separate parts to the larger component as a whole:
- The title bar
- The content

We can chop up the content part of the component into individual places of concern. There are 3 different item components inside the content part.
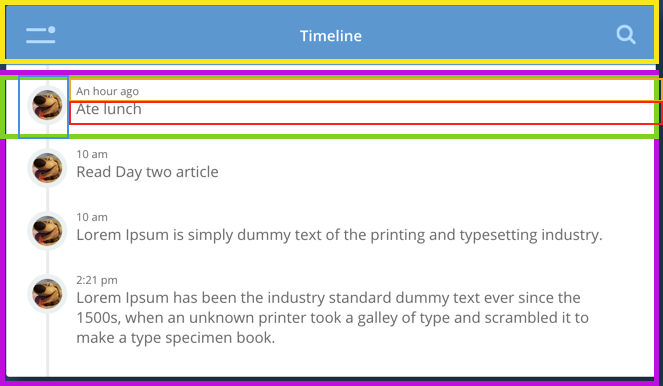
If we wanted to go one step further, we could even break down the title bar into 3 component parts, the menu button, the title, and the search icon. We could dive even further into each one of those if we needed to.
Deciding how deep to split your components is more of an art than a science and is a skill you'll develop with experience.
In any case, it's usually a good idea to start looking at applications using the idea of components. By breaking our app down into components it becomes easier to test and easier to keep track of what functionality goes where.
The container component
To build our notifications app, let's start by building the container to hold the entire app. Our container is simply going to be a wrapper for the other two components.
None of these components will require special functionality
(yet), so they will look similar to our
HelloWorld component in that it's just a
component with a single render function.
Let's build a wrapper component we'll call
App that might look similar to this:
class App extends React.Component {
  render() {
    return (
      <div className="notificationsFrame">
        <div className="panel">{/* content goes here */}</div>
      </div>
    );
  }
}
Notice that we use the attribute called
classNamein React instead of the HTML version ofclass. Remember that we're not writing to the DOM directly and thus not writing HTML, but JSX (which is just JavaScript).The reason we use
classNameis becauseclassis a reserved word in JavaScript. If we useclass, we'll get an error in our console.
Child components
When a component is nested inside another component, it's called a child component. A component can have multiple children components. The component that uses a child component is then called it's parent component.
With the wrapper component defined, we can build our
title and content components by,
essentially, grabbing the source from our original design and
putting the source file into each component.
For instance, the header component looks like this, with a
container element
<div className="header">, the
menu icon, a title, and the search bar:
class Header extends React.Component {
  render() {
    return (
      <div className="header">
        <div className="menuIcon">
          <div className="dashTop"></div>
          <div className="dashBottom"></div>
          <div className="circle"></div>
        </div>
        <span className="title">Timeline</span>

        <input type="text" className="searchInput" placeholder="Search ..." />

        <div className="fa fa-search searchIcon"></div>
      </div>
    );
  }
}
And finally, we can write the Content component
with timeline items. Each timeline item is wrapped in a single
component, has an avatar associated with it, a timestamp, and
some text.
class Content extends React.Component {
  render() {
    return (
      <div className="content">
        <div className="line"></div>

        {/* Timeline item */}
        <div className="item">
          <div className="avatar">
            <img
              alt="Doug"
              src="http://www.croop.cl/UI/twitter/images/doug.jpg"
            />
            Doug
          </div>

          <span className="time">An hour ago</span>
          <p>Ate lunch</p>
          <div className="commentCount">2</div>
        </div>

        {/* ... */}
      </div>
    );
  }
}
In order to write a comment in a React component, we have to place it in the brackets as a multi-line comment in JavaScript.
Unlike the HTML comment that looks like this:
<!-- this is a comment in HTML -->the React version of the comment must be in brackets:
{/* This is a comment in React */}
Putting it all together
Now that we have our two children components, we can
set the Header and the
Content components to be children of the
App component. Our App component can
then use these components
as if they are HTML elements built-in to the browser.
Our new App component, with a header and content
now looks like:
class App extends React.Component {
  render() {
    return (
      <div className="notificationsFrame">
        <div className="panel">
          <Header />
          <Content />
        </div>
      </div>
    );
  }
}
Note!
Don't forget to call
ReactDOM.renderto place your app on the pagevar mountComponent = document.querySelector("#app"); ReactDOM.render(<App />, mountComponent);
With this knowledge, we now have the ability to write multiple components and we can start to build more complex applications.
However, you may notice that this app does not have any user interaction nor custom data. In fact, as it stands right now our React application isn't that much easier to build than straight, no-frills HTML.
In the next section, we'll look how to make our component more dynamic and become data-driven with React.
Learn React the right way
The up-to-date, in-depth, complete guide to React and friends.
Download the first chapter