Writing your First Angular 2 Web Application
Simple Reddit Clone
In this chapter we’re going to build an application that allows the user to post an article (with a title and a URL) and then vote on the posts.
You can think of this app as the beginnings of a site like Reddit or Product Hunt.
In this simple app we’re going to cover most of the essentials of Angular 2 including:
- Building custom components
- Accepting user input from forms
- Rendering lists of objects into views
- Intercepting user clicks and acting on them
By the time you’re finished with this chapter you’ll have a good grasp on how to build basic Angular 2 applications.
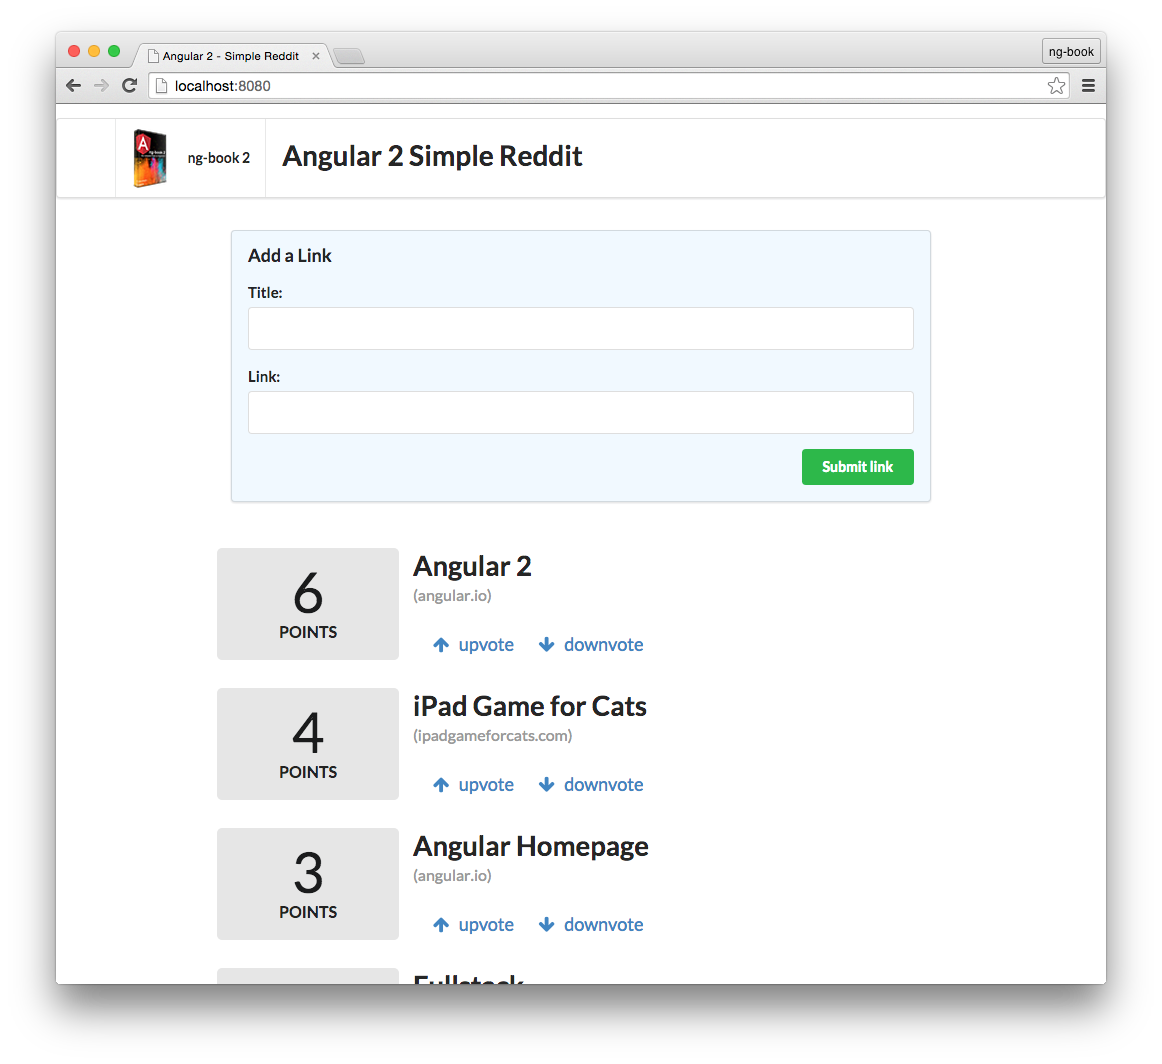
Here’s a screenshot of what our app will look like when it’s done:

First, a user will submit a new link and after submitting the users will be able to upvote or downvote each article. Each link will have a score and we can vote on which links we find useful.
In this project, and throughout the book, we’re going to use TypeScript. TypeScript is a superset of JavaScript ES6 that adds types. We’re not going to talk about TypeScript in depth in this chapter, but if you’re familiar with ES5 (“normal” javascript) / ES6 (ES2015) you should be able to follow along without any problems.
We’ll go over TypeScript more in depth in the next chapter. So don’t worry if you’re having trouble with some of the new syntax.
Getting started
TypeScript
To get started with TypeScript, you’ll need to have Node.js installed. There are a couple of different ways you can install Node.js, so please refer to the Node.js website for detailed information.
Do I have to use TypeScript? No, you don’t have to use TypeScript to use Angular 2, but you probably should. ng2 does have an ES5 API, but Angular 2 is written in TypeScript and generally that’s what everyone is using. We’re going to use TypeScript in this book because it’s great and it makes working with Angular 2 easier. That said, it isn’t strictly required.
Once you have Node.js setup, the next step is to install TypeScript. Make sure you install at least version 1.7 or greater. To install it, run the following npm command:
$ npm install -g typescript
npm is installed as part of Node.js. If you don’t have npm on your system, make sure you used a Node.js installer that includes it.
Windows Users: We’ll be using Linux/Mac-style commands on the command line throughout this book. We’d highly recommend you install Cygwin as it will let you run commands just as we have them written out in this book.
angular-cli
Angular provides a utility to allow users to create and manage projects from the command line. It automates tasks like creating projects, adding new controllers, etc. It’s generally a good idea to use angular-cli as it will help create and maintain common patterns across our application.
To install angular-cli, just run the following command:
Once it’s installed you’ll be able to run it from the command line using the ng command. When you do, you’ll see a lot of output, but if you scroll back, you should be able to see the following:
$ ng
Could not start watchman; falling back to NodeWatcher for file system events.
Visit http://ember-cli.com/user-guide/#watchman for more info.
Usage: ng <command (Default: help)>
The reason we got that huge output is because when we run ng with no arguments, it runs the default help command, which explains how to use the tool.
If you’re running OSX or Linux, you probably received this line among the output:
Could not start watchman; falling back to NodeWatcher for file system events.
This means that we don’t have a tool called watchman installed. This tool helps angular-cli when it needs to monitor files in your filesystem for changes. If you’re running OSX, it’s recommended to install it using Homebrew with the following command:
If you’re on OSX and got an error when running brew, it means that you probably don’t have Homebrew installed. Please refer to the page http://brew.sh/ to learn how to install it and try again.
If you’re on Linux, you may refer to the page https://ember-cli.com/user-guide/#watchman for more information about how to install watchman.
If you’re on Windows instead, you don’t need to install anything and angular-cli will use the native Node.js watcher.
And with that we have angular-cli and its dependencies installed. Throughout this chapter we’re going to use this tool to create our first application.
Example Project
Now that you have your environment ready, let’s start writing our first Angular application!
Let’s open up the terminal and run the ng new command to create a new project from scratch:
$ ng new angular2_hello_world
Once you run it, you’ll see the following output:
installing ng2
  create .editorconfig
  create README.md
  create src/app/app.component.css
  create src/app/app.component.html
  create src/app/app.component.spec.ts
  create src/app/app.component.ts
  create src/app/app.module.ts
  create src/app/index.ts
  create src/app/shared/index.ts
  create src/assets/.gitkeep
  create src/assets/.npmignore
  create src/environments/environment.dev.ts
  create src/environments/environment.prod.ts
  create src/environments/environment.ts
  create src/favicon.ico
  create src/index.html
  create src/main.ts
  create src/polyfills.ts
  create src/styles.css
  create src/test.ts
  create src/tsconfig.json
  create src/typings.d.ts
  create angular-cli.json
  create e2e/app.e2e-spec.ts
  create e2e/app.po.ts
  create e2e/tsconfig.json
  create .gitignore
  create karma.conf.js
  create package.json
  create protractor.conf.js
  create tslint.json
Successfully initialized git.
⠧ Installing packages for tooling via npm
This will run for a while while it’s installing npm dependencies. Once it finishes we’ll see a success message:
Installed packages for tooling via npm.
There are a lot of files generated! Don’t worry too much about all of them yet. We’ll walk through what each one means and is used for throughout the book. For now, let’s focus on getting started with Angular code.
Let’s go inside the angular2_hello_world directory, which the ng command created for us and see what has been created:
$ cd angular2_hello_world
$ tree -F -L 1
.
├── README.md              // an useful README
├── angular-cli.json       // angular-cli configuration file
├── e2e/                   // end to end tests
├── karma.conf.js          // unit test configuration
├── node_modules/          // installed dependencies
├── package.json           // npm configuration
├── protractor.conf.js     // e2e test configuration
├── src/                   // application source
└── tslint.json            // linter config file
3 directories, 6 files
For now, the folder we’re interested in is src, where our application lives. Let’s take a look at what was created there:
$ cd src
$ tree -F
.
|-- app/
|   |-- app.component.css
|   |-- app.component.html
|   |-- app.component.spec.ts
|   |-- app.component.ts
|   |-- app.module.ts
|   |-- index.ts
|   `-- shared/
|       `-- index.ts
|-- assets/
|-- environments/
|   |-- environment.dev.ts
|   |-- environment.prod.ts
|   `-- environment.ts
|-- favicon.ico
|-- index.html
|-- main.ts
|-- polyfills.ts
|-- styles.css
|-- test.ts
|-- tsconfig.json
`-- typings.d.ts
4 directories, 18 files
Using your favorite text editor, let’s open index.html. You should see this code:
    <!doctype html>
    <html>
    <head>
      <meta charset="utf-8">
      <title>Angular2HelloWorld</title>
      <base href="/">

      <meta name="viewport" content="width=device-width, initial-scale=1">
      <link rel="icon" type="image/x-icon" href="favicon.ico">
    </head>
    <body>
      <app-root>Loading...</app-root>
    </body>
    </html>
Let’s break it down a bit:
    <!doctype html>
    <html>
    <head>
      <meta charset="utf-8">
      <title>Angular2HelloWorld</title>
      <base href="/">
If you’re familiar with writing HTML file, this first part should be trivial, we’re declaring the page charset, title and base href.
<meta name="viewport" content="width=device-width, initial-scale=1">
If we continue to the template body, we see the following:
      <app-root>Loading...</app-root>
    </body>
    </html>
The app-root tag is where our application will be rendered. We’ll see this later when we inspect other parts of the source code. The text Loading… is a placeholder that will be displayed before our app code loads. We can use this technique to inform the user the application is still loading by using either a message like we’re doing here, or a spinner or other kind of progress notification we see fit.
Writing Application Code
This page is a preview of ng-book 2.
Get the rest of this chapter plus hundreds of pages Angular 2 instruction, 5 sample projects, a screencast, and more.
Ready to master Angular 2?
- What if you could master the entire framework – with solid foundations – in less time without beating your head against a wall? Imagine how quickly you could work if you knew the best practices and the best tools?
- Stop wasting your time searching and have everything you need to be productive in one, well-organized place, with complete examples to get your project up without needing to resort to endless hours of research.
- You will learn what you need to know to work professionally with ng-book 2: The Complete Book on Angular 2 or get your money back.
Download the First Chapter (for free)