Writing Your First Angular Web Application
Simple Reddit Clone
In this chapter we’re going to build an application that allows the user to post an article (with a title and a URL) and then vote on the posts.
You can think of this app as the beginnings of a site like Reddit or Product Hunt.
In this simple app we’re going to cover most of the essentials of Angular including:
- Building custom components
- Accepting user input from forms
- Rendering lists of objects into views
- Intercepting user clicks and acting on them
- Deploying our app to a server
By the time you’re finished with this chapter you’ll know how to take an empty folder, build a basic Angular application, and deploy it to production. After working through this chapter you’ll have a good grasp on how Angular applications are built and a solid foundation to build your own Angular app.
Here’s a screenshot of what our app will look like when it’s done:
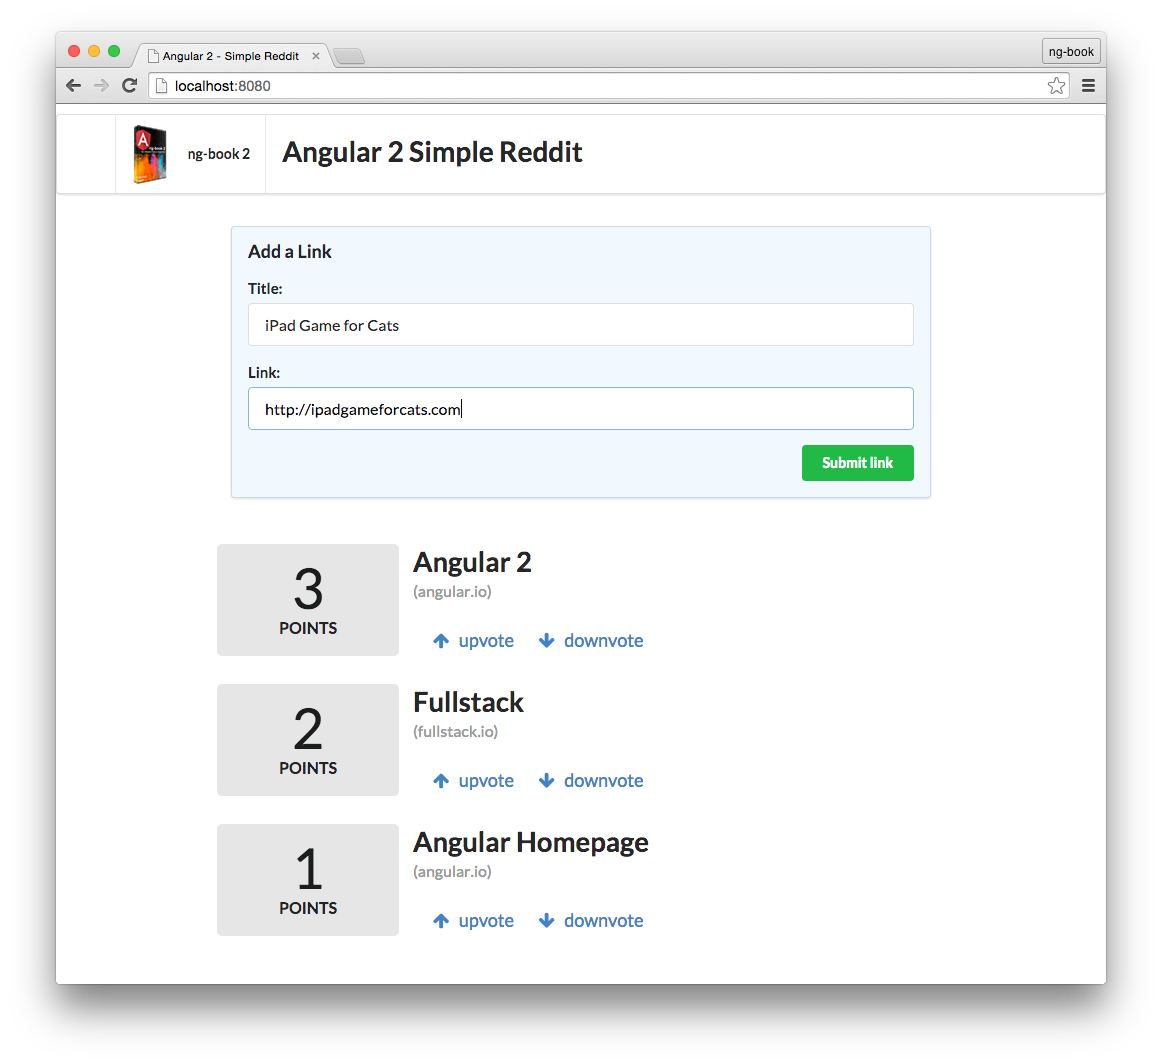
First, a user will submit a new link and after submitting the users will be able to upvote or downvote each article. Each link will have a score and we can vote on which links we find useful.

In this project, and throughout the book, we’re going to use TypeScript. TypeScript is a superset of JavaScript ES6 that adds types. We’re not going to talk about TypeScript in depth in this chapter, but we’ll go over TypeScript more in depth in the next chapter.
Don’t worry if you’re having trouble with some of the new syntax. If you’re familiar with ES5 (“normal” JavaScript) / ES6 (ES2015) you should be able to follow along and we’ll talk more about TypeScript in a bit.
Getting started
Node.js and npm
To get started with Angular, you’ll need to have Node.js installed. There are a couple of different ways you can install Node.js, so please refer to the Node.js website for detailed information.
Make sure you install Node 12.2.0 or higher.
If you’re on a Mac, your best bet is to install Node.js directly from the Node.js website instead of through another package manager (like Homebrew). Installing Node.js via Homebrew is known to cause some issues.
The Node Package Manager (npm for short) is installed as a part of Node.js. To check if npm is available as a part of our development environment, we can open a terminal window and type:
{lang=shell,line-numbers=off}
$ npm -v
If a version number is not printed out and you receive an error, make sure to download a Node.js installer that includes npm.
Your npm version should be 6.9.0 or higher.
TypeScript
Once you have Node.js setup, the next step is to install TypeScript. Make sure you install at least version 2.1 or greater. To install it, run the following npm command:
$ npm install -g typescript
Do I have to use TypeScript? No, you don’t have to use TypeScript to use Angular, but you probably should. Angular does have an ES5 API, but Angular is written in TypeScript and generally that’s what everyone is using. We’re going to use TypeScript in this book because it’s great and it makes working with Angular easier. That said, it isn’t strictly required.
Browser
We highly recommend using the Google Chrome Web Browser to develop Angular apps. We’ll use the Chrome developer toolkit throughout this book. To follow along with our development and debugging we recommend downloading it now.
Special instruction for Windows users
Throughout this book, we will be using Unix/Mac commands in the terminal. Most of these commands, like ls and cd, are cross-platform. However, sometimes these commands are Unix/Mac-specific or contain Unix/Mac-specific flags (like ls -1p).
As a result, be alert that you may have to occasionally determine the equivalent of a Unix/Mac command for your shell. Fortunately, the amount of work we do in the terminal is minimal and you will not encounter this issue often.
Windows users should be aware that our terminal examples use Unix/Mac commands.
Angular CLI
Angular provides a utility to allow users to create and manage projects from the command line. It automates tasks like creating projects, adding new controllers, etc. It’s generally a good idea to use Angular CLI as it will help create and maintain common patterns across our application.
To install Angular CLI, run the following command:
$ npm install -g @angular/cli
Once it’s installed you’ll be able to run it from the command line using the ng command. When you do, you’ll see a lot of output, but if you scroll back, you should be able to see the following:
If everything installed correctly, you should see the current version output to your terminal. Congratulations!
If you’re running OSX or Linux, you might receive this line in the output:
Could not start watchman; falling back to NodeWatcher for file system events.
This means that we don’t have a tool called watchman installed. This tool helps Angular CLI when it needs to monitor files in your filesystem for changes. If you’re running OSX, it’s recommended to install it using Homebrew with the following command:
If you’re on OSX and got an error when running brew, it means that you probably don’t have Homebrew installed. Please refer to the page http://brew.sh/ to learn how to install it and try again.
If you’re on Linux, you may refer to the page https://ember-cli.com/user-guide/#watchman for more information about how to install watchman.
If you’re on Windows instead, you don’t need to install anything and Angular CLI will use the native Node.js watcher.
If you’re curious about all of the things that Angular CLI can do, try out this command:
Don’t worry about understanding all of the options - we’ll be covering the important ones in this chapter.
Now that we have Angular CLI and its dependencies installed, let’s use this tool to create our first application.
Example Project
Open up the terminal and run the ng new command to create a new project from scratch:
$ ng new angular-hello-world
Once you run it, you maybe asked a few questions about your configuration preferences.
For example, if asked if you want to add Angular routing, in this example say No, but you’ll probably want to use it for a bigger project
When asked about what CSS framework you want to use, we’ll just use CSS for now.
After you answer the questions, you’ll see (roughly) following output:
Once you run it, you’ll see (roughly) following output:
CREATE angular-hello-world/README.md (1034 bytes)
CREATE angular-hello-world/angular.json (3504 bytes)
CREATE angular-hello-world/package.json (1323 bytes)
CREATE angular-hello-world/tsconfig.json (384 bytes)
CREATE angular-hello-world/tslint.json (2805 bytes)
CREATE angular-hello-world/.editorconfig (245 bytes)
CREATE angular-hello-world/.gitignore (503 bytes)
CREATE angular-hello-world/src/environments/environment.prod.ts (51 bytes)
CREATE angular-hello-world/src/environments/environment.ts (631 bytes)
CREATE angular-hello-world/src/favicon.ico (5430 bytes)
CREATE angular-hello-world/src/index.html (304 bytes)
CREATE angular-hello-world/src/main.ts (370 bytes)
CREATE angular-hello-world/src/polyfills.ts (3194 bytes)
CREATE angular-hello-world/src/test.ts (642 bytes)
CREATE angular-hello-world/src/assets/.gitkeep (0 bytes)
CREATE angular-hello-world/src/styles.css (80 bytes)
CREATE angular-hello-world/src/browserslist (375 bytes)
CREATE angular-hello-world/src/karma.conf.js (964 bytes)
CREATE angular-hello-world/src/tsconfig.app.json (194 bytes)
CREATE angular-hello-world/src/tsconfig.spec.json (282 bytes)
CREATE angular-hello-world/src/tslint.json (314 bytes)
CREATE angular-hello-world/src/app/app.module.ts (314 bytes)
CREATE angular-hello-world/src/app/app.component.css (0 bytes)
CREATE angular-hello-world/src/app/app.component.html (1141 bytes)
CREATE angular-hello-world/src/app/app.component.spec.ts (986 bytes)
CREATE angular-hello-world/src/app/app.component.ts (207 bytes)
CREATE angular-hello-world/e2e/protractor.conf.js (752 bytes)
CREATE angular-hello-world/e2e/src/app.e2e-spec.ts (299 bytes)
CREATE angular-hello-world/e2e/src/app.po.ts (208 bytes)
CREATE angular-hello-world/e2e/tsconfig.e2e.json (213 bytes)
...
added 1146 packages in 105.319s
    Successfully initialized git.
This will run for a while while it’s installing npm dependencies. Once it finishes we’ll see a success message.
The exact files that your project generates may vary slightly depending on the version of @angular/cli that was installed.
There are a lot of files generated! Don’t worry about understanding all of them yet. Throughout the book we’ll walk through what each one means and what it’s used for.
Let’s go inside the angular-hello-world directory, which the ng command created for us and see what has been created:
$ cd angular-hello-world
$ tree -F -L 1
.
|-- README.md              // a useful README
|-- angular.json           // angular-cli configuration file
|-- e2e/                   // end-to-end tests
|-- node_modules/          // installed dependencies
|-- package-lock.json      // npm dependencies lockfile
|-- package.json           // npm configuration
|-- src/                   // our application's code
|-- tsconfig.json          // typescript config
`-- tslint.json            // linting config
3 directories, 6 files
The tree command is completely optional. But if you’re on OSX it can be installed via brew install tree
For now, the folder we’re interested in is src, where we’ll put our custom application code. Let’s take a look at what was created there:
$ cd src
$ tree -F
.
|-- app/
|   |-- app.component.css
|   |-- app.component.html
|   |-- app.component.spec.ts
|   |-- app.component.ts
|   `-- app.module.ts
|-- assets/
|-- browserslist
|-- environments/
|   |-- environment.prod.ts
|   `-- environment.ts
|-- favicon.ico
|-- index.html
|-- karma.conf.js
|-- main.ts
|-- polyfills.ts
|-- styles.css
|-- test.ts
|-- tsconfig.app.json
|-- tsconfig.spec.json
`-- tslint.json
3 directories, 18 files
Using your favorite text editor, let’s open index.html. You should see this code:
    <!doctype html>
    <html lang="en">
    <head>
      <meta charset="utf-8">
      <title>AngularHelloWorld</title>
      <base href="/">

      <meta name="viewport" content="width=device-width, initial-scale=1">
      <link rel="icon" type="image/x-icon" href="favicon.ico">
    </head>
    <body>
      <app-root></app-root>
    </body>
    </html>
This page is a preview of ng-book 2.
Get the rest of this chapter plus hundreds of pages Angular 7 instruction, 5 sample projects, a screencast, and more.
Ready to master Angular 7?
- What if you could master the entire framework – with solid foundations – in less time without beating your head against a wall? Imagine how quickly you could work if you knew the best practices and the best tools?
- Stop wasting your time searching and have everything you need to be productive in one, well-organized place, with complete examples to get your project up without needing to resort to endless hours of research.
- You will learn what you need to know to work professionally with ng-book: The Complete Book on Angular 7 or get your money back.
Download the First Chapter (for free)