Angular 7: Introduction to Redux with TypeScript
In this chapter and the next we’ll be looking at a data-architecture pattern called Redux. In this chapter we’re going to discuss the ideas behind Redux, build our own mini version, and then hook it up to Angular. In the next chapter we’ll use Redux to build a bigger application.
In most of our projects so far, we’ve managed state in a fairly direct way: We tend to grab data from services and render them in components, passing values down the component tree along the way.
Managing our apps in this way works fine for smaller apps, but as our apps grow, having multiple components manage different parts of the state becomes cumbersome. For instance, passing all of our values down our component tree suffers from the following downsides:
Intermediate property passing - In order to get state to any component we have to pass the values down through inputs. This means we have many intermediate components passing state that it isn’t directly using or concerned about
Inflexible refactoring - Because we’re passing inputs down through the component tree, we’re introducing a coupling between parent and child components that often isn’t necessary. This makes it more difficult to put a child component somewhere else in the hierarchy because we have to change all of the new parents to pass the state
State tree and DOM tree don’t match - The “shape” of our state often doesn’t match the “shape” of our view/component hierarchy. By passing all data through the component tree via props we run into difficulties when we need to reference data in a far branch of the tree
State throughout our app - If we manage state via components, it’s difficult to get a snapshot of the total state of our app. This can make it hard to know which component “owns” a particular bit of data, and which components are concerned about changes
Pulling data out of our components and into services helps a lot. At least if services are the “owners” of our data, we have a better idea of where to put things. But this opens a new question: what are the best practices for “service-owned” data? Are there any patterns we can follow? In fact, there are.
In this chapter, we’re going to discuss a data-architecture pattern called Redux which was designed to help with these issues. We’ll implement our own version of Redux which will store all of our state in a single place. This idea of holding all of our application’s state in one place might sound a little crazy, but the results are surprisingly delightful.
Redux
If you haven’t heard of Redux yet you can read a bit about it on the official website. Web application data architecture is evolving and the traditional ways of structuring data aren’t quite adequate for large web apps. Redux has been extremely popular because it’s both powerful and easy to understand.
Data architecture can be a complex topic and so Redux’s best feature is probably its simplicity. If you strip Redux down to the essential core, Redux is fewer than 100 lines of code.
We can build rich, easy to understand, web apps by using Redux as the backbone of our application. But first, let’s walk through how to write a minimal Redux and later we’ll work out patterns that emerge as we work out these ideas in a larger app.
There are several attempts to use Redux or create a Redux-inspired system that works with Angular. Two notable examples are:
ngrx is a Redux-inspired architecture that is heavily observables-based. angular2-redux uses Redux itself as a dependency, and adds some Angular helpers (dependency-injection, observable wrappers).
Here we’re not going to use either. Instead, we’re going to use Redux directly in order to show the concepts without introducing a new dependency. That said, both of these libraries may be helpful to you when writing your apps.
Redux: Key Ideas
The key ideas of Redux are this:
- All of your application’s data is in a single data structure called the state which is held in the store
- Your app reads the state from this store
- This store is never mutated directly
- User interaction (and other code) fires actions which describe what happened
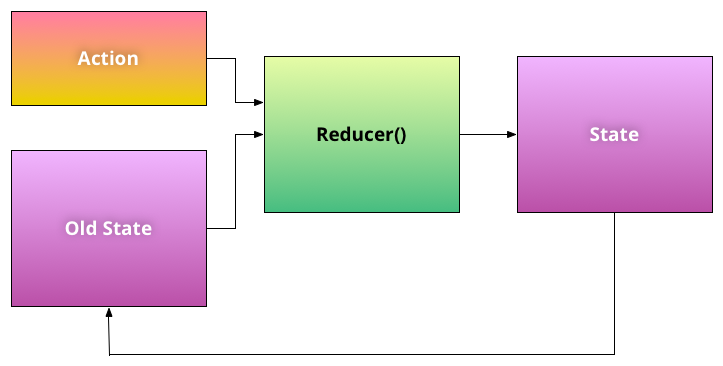
- A new state is created by combining the old state and the action by a function called the reducer.
If the above bullet list isn’t clear yet, don’t worry about it - putting these ideas into practice is the goal of the rest of this chapter.
Core Redux Ideas
What’s a reducer?
Let’s talk about the reducer first. Here’s the idea of a reducer: it takes the old state and an action and returns a new state.
A reducer must be a pure function. That is:
- It must not mutate the current state directly
- It must not use any data outside of its arguments
Put another way, a pure function will always return the same value, given the same set of arguments. And a pure function won’t call any functions which have an effect on the outside world, e.g. no database calls, no HTTP calls, and no mutating outside data structures.
Reducers should always treat the current state as read-only. A reducer does not change the state instead, it returns a new state. (Often this new state will start with a copy of old state, but let’s not get ahead of ourselves.)
Let’s define our very first reducer. Remember, there are three things involved:
- An
Action, which defines what to do (with optional arguments)
- The
state, which stores all of the data in our application
- The
Reducer which takes the state and the Action and returns a new state.
Defining Action and Reducer Interfaces
Since we’re using TypeScript we want to make sure this whole process is typed, so let’s set up an interface for our Action and our Reducer:
The Action Interface
Our Action interface looks like this:
    interface Action {
      type: string;
      payload?: any;
    }
Notice that our Action has two fields:
type andpayload
The type will be an identifying string that describes the action like INCREMENT or ADD_USER. The payload can be an object of any kind. The ? on payload? means that this field is optional.
The Reducer Interface
Our Reducer interface looks like this:
    interface Reducer<T> {
      (state: T, action: Action): T;
    }
Our Reducer is using a feature of TypeScript called generics. In this case type T is the type of the state. Notice that we’re saying that a valid Reducer has a function which takes a state (of type T) and an action and returns a new state (also of type T).
Creating Our First Reducer
The simplest possible reducer returns the state itself. (You might call this the identity reducer because it applies the identity function on the state. This is the default case for all reducers, as we will soon see).
    let reducer: Reducer<number> = (state: number, action: Action) => {
      return state;
    };
Notice that this Reducer makes the generic type concrete to number by the syntax Reducer<number>. We’ll define more sophisticated states beyond a single number soon.
We’re not using the Action yet, but let’s try this Reducer just the same.
Running the examples in this section
You can find the code for this chapter in the folder code/redux. If the example is runnable you will see the filename the code is from above each code box.
In this first section, these examples are run outside of the browser and run by node.js. Because we’re using TypeScript in these examples, you should run them using the commandline tool ts-node, (instead of node directly).
You can install ts-node by running:
npm install -g ts-node
Or by doing an npm install in the code/redux/redux-chat directory and then calling ./node_modules/.bin/ts-node [filename]
For instance, to run the example above you might type (not including the $):
 $ cd code/redux/redux-chat/tutorial
 $ npm install
 $ ./node_modules/.bin/ts-node 01-identity-reducer.ts
Use this same procedure for the rest of the code in this chapter until we instruct you to switch to your browser.
Running Our First Reducer
Let’s put it all together and run this reducer:
    interface Action {
      type: string;
      payload?: any;
    }

    interface Reducer<T> {
      (state: T, action: Action): T;
    }

    let reducer: Reducer<number> = (state: number, action: Action) => {
      return state;
    };

    console.log( reducer(0, null) ); // -> 0
And run it:
{lang=bash,line-numbers=off}
$ cd code/redux/redux-chat/tutorial
$ ./node_modules/.bin/ts-node 01-identity-reducer.ts
0
It seems almost silly to have that as a code example, but it teaches us our first principle of reducers:
By default, reducers return the original state.
In this case, we passed a state of the number 0 and a null action. The result from this reducer is the state 0.
But let’s do something more interesting and make our state change.
Adjusting the Counter With actions
Eventually our state is going to be much more sophisticated than a single number. We’re going to be holding all of the data for our app in the state, so we’ll need a better data structure for the state eventually.
That said, using a single number for the state lets us focus on other issues for now. So let’s continue with the idea that our state is simply a single number that is storing a counter.
Let’s say we want to be able to change the state number. Remember that in Redux we do not modify the state. Instead, we create actions which instruct the reducer on how to generate a new state.
Let’s create an Action to change our counter. Remember that the only required property is a type. We might define our first action like this:
let incrementAction: Action = { type: 'INCREMENT' }
We should also create a second action that instructs our reducer to make the counter smaller with:
let decrementAction: Action = { type: 'DECREMENT' }
Now that we have these actions, let’s try using them in our reducer:
    let reducer: Reducer<number> = (state: number, action: Action) => {
      if (action.type === 'INCREMENT') {
        return state + 1;
      }
      if (action.type === 'DECREMENT') {
        return state - 1;
      }
      return state;
    };
This page is a preview of ng-book 2.
Get the rest of this chapter plus hundreds of pages Angular 7 instruction, 5 sample projects, a screencast, and more.
Ready to master Angular 7?
- What if you could master the entire framework – with solid foundations – in less time without beating your head against a wall? Imagine how quickly you could work if you knew the best practices and the best tools?
- Stop wasting your time searching and have everything you need to be productive in one, well-organized place, with complete examples to get your project up without needing to resort to endless hours of research.
- You will learn what you need to know to work professionally with ng-book: The Complete Book on Angular 7 or get your money back.
Download the First Chapter (for free)