How Angular Works
In this chapter, we’re going to talk about the high-level concepts of Angular. We’re going to take a step back so that we can see how all the pieces fit together.s
If you’ve used AngularJS 1.x, you’ll notice that Angular has a new mental-model for building applications. Don’t panic! As AngularJS 1.x users ourselves we’ve found Angular to be both straightforward and familiar. A little later in this book we’re going to talk specifically about how to convert your AngularJS 1.x apps to Angular.
In the chapters that follow, we won’t be taking a deep dive into each concept, but instead we’re going to give an overview and explain the foundational ideas.
The first big idea is that an Angular application is made up of Components. One way to think of Components is a way to teach the browser new tags. If you have an Angular 1 background, Components are analogous to directives in AngularJS 1.x (it turns out, Angular has directives too, but we’ll talk more about this distinction later on).
However, Angular Components have some significant advantages over AngularJS 1.x directives and we’ll talk about that below. First, let’s start at the top: the Application.
Application
An Angular Application is nothing more than a tree of Components.
At the root of that tree, the top level Component is the application itself. And that’s what the browser will render when “booting” (a.k.a bootstrapping) the app.
One of the great things about Components is that they’re composable. This means that we can build up larger Components from smaller ones. The Application is simply a Component that renders other Components.
Because Components are structured in a parent/child tree, when each Component renders, it recursively renders its children Components.
For example, let’s create a simple inventory management application that is represented by the following page mockup:
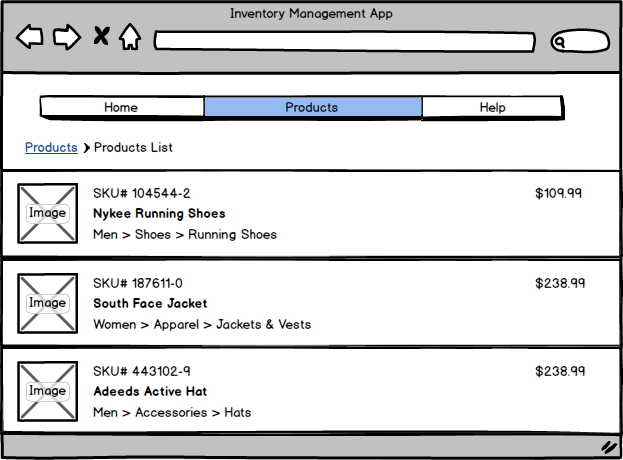
Given this mockup, to write this application the first thing we want to do is split it into components.
In this example, we could group the page into three high level components
- The Navigation Component
- The Breadcrumbs Component
- The Product List Component
The Navigation Component
This component would render the navigation section. This would allow the user to visit other areas of the application.

The Breadcrumbs Component
This would render a hierarchical representation of where in the application the user currently is.

The Product List Component
The Products List component would be a representation of a collection of products.

Breaking this component down into the next level of smaller components, we could say that the Product List is composed of multiple Product Rows.

And of course, we could continue one step further, breaking each Product Row into smaller pieces:
- the Product Image component would be responsible for rendering a product image, given its image name
- the Product Department component would render the department tree, like Men > Shoes > Running Shoes
- the Price Display component would render the price. Imagine that our implementation customizes the pricing if the user is logged in to include system-wide tier discounts or include shipping for instance. We could implement all this behavior into this component.
Finally, putting it all together into a tree representation, we end up with the following diagram:
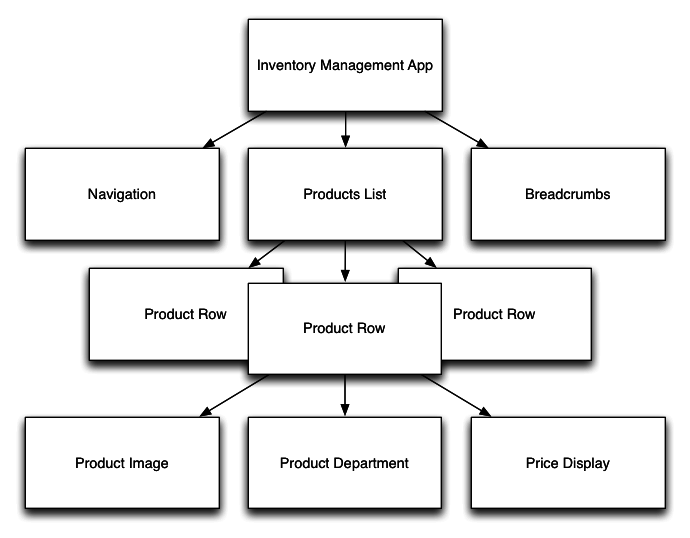
At the top we see Inventory Management App: that’s our application.
Under the application we have the Navigation, the Breadcrumb and the Products List components.
The Products List component has Product Rows, one for each product.
And the Product Row uses three components itself: one for the image, the department, and the price.
Let’s work together to build this application.
You can find the full code listing for this chapter in the downloads under how-angular-works/inventory-app.
Here’s a screenshot of what our app will look like when we’re done:

How to Use This Chapter
In this chapter we’re going to explain the fundamental concepts required when building Angular apps by walking through an app that we’ve built. We’ll explain:
- How to break your app into components
- How to make reusable components using inputs
- How to handle user interactions, such as clicking on a component
In this chapter, we’ve used angular-cli, just as we did before. This means you can use all of the normal ng commands such as:
{lang=shell,line-numbers=off}
ng serve # runs the app
Also, in this chapter, we’re not going to give step-by-step instructions on how to create each file in the app. If you’d like to follow along at home, when we introduce a new component you can run:
{lang=shell,line-numbers=off}
ng generate component NameOfNewComponentHere
This will generate the files you need, and you’re free to type in your code there or copy and paste code from the book or from our example code.
We’ve provided the entire, completed application in the code download folder under how-angular-works/inventory-app. If you ever feel lost or need more context, take some time to look at the completed example code.
Let’s get started building!
Product Model
One of the key things to realize about Angular is that it doesn’t prescribe a particular model library.
Angular is flexible enough to support many different kinds of models (and data architectures). However, this means the choice is left to you as the user to determine how to implement these things.
We’ll have a lot to say about data architectures in future chapters. For now, though, we’re going to have our models be plain JavaScript objects.
    /**
     * Provides a `Product` object
     */
    export class Product {
      constructor(
        public sku: string,
        public name: string,
        public imageUrl: string,
        public department: string[],
        public price: number) {
      }
    }
If you’re new to ES6/TypeScript this syntax might be a bit unfamiliar.
We’re creating a new Product class and the constructor takes 5 arguments. When we write public sku: string, we’re saying two things:
- there is a
public variable on instances of this class called sku
sku is of type string.
If you’re already familiar with JavaScript, you can quickly catch up on some of the differences, including the public constructor shorthand, here at learnxinyminutes
This Product class doesn’t have any dependencies on Angular, it’s just a model that we’ll use in our app.
Components
As we mentioned before, Components are the fundamental building block of Angular applications. The “application” itself is just the top-level Component. Then we break our application into smaller child Components.
When building new Angular applications, we often follow this process: we mockup the design in wireframes (or on paper) and then we break down the parts into Components.
We’ll be using Components a lot, so it’s worth looking at them more closely.
Each component is composed of three parts:
- Component Decorator
- A View
- A Controller
To illustrate the key concepts we need to understand about components, we’ll start with the top level Inventory App and then focus on the Products List and child components:

Here’s what a basic, top-level AppComponent looks like:
{lang=javascript,line-numbers=off}
@Component({
selector: ‘inventory-app-root’,
template: `
<div class="inventory-app">
(Products will go here soon)
</div>
`
})
export class AppComponent {
// Inventory logic here
}
If you’ve been using Angular 1 the syntax might look pretty foreign! But the ideas are pretty similar, so let’s take them step by step.
The @Component is called a decorator. It adds metadata to the class that follows it (AppComponent).
The @Component decorator specifies:
- a
selector, which tells Angular what element to match
- a
template, which defines the view
The Component controller is defined by a class, the AppComponent class, in this case.
Let’s take a look into each part now in more detail.
Component Decorator
The @Component decorator is where you configure your component. One of the primary roles of the @Component decorator is to configure how the outside world will interact with your component.
There are lots of options available to configure a component (many of which we cover in the Advanced Components Chapter). In this chapter we’re just going to touch on the basics.
Component selector
With the selector key, you indicate how your component will be recognized when used in a template. The idea is similar to CSS or XPath selectors. The selector is a way to define what elements in the HTML will match this component. In this case, by saying selector: 'inventory-app-root', we’re saying that in our HTML we want to match the inventory-app-root tag, that is, we’re defining a new tag that has new functionality whenever we use it. E.g. when we put this in our HTML:
<inventory-app-root></inventory-app-root>
Angular will use the AppComponent component to implement the functionality.
Component template
The view is the visual part of the component. By using the template option on @Component, we declare the HTML template that the component will use:
{lang=javascript,line-numbers=off}
@Component({
selector: ‘inventory-app-root’,
template: `
<div class="inventory-app">
(Products will go here soon)
</div>
`
})
For the template above, notice that we’re using TypeScript’s backtick multi-line string syntax. Our template so far is pretty sparse: just a div with some placeholder text.
We can also move our template out to a separate file and use templateUrl instead:
{lang=javascript,line-numbers=off}
@Component({
selector: ‘inventory-app-root’,
templateUrl: ‘./app.component.html’
})
export class AppComponent {
// Inventory logic here
}
Adding A Product
Our app isn’t very interesting without Products to view. Let’s add some now.
We can create a new Product like this:
{lang=javascript,line-numbers=off}
// this is just an example of how to use Product,
// we’ll do something similar in our Angular code in a moment
  // first, we have to import `Product` so that we can use it
import { Product } from './product.model';

// now we can create a new `Product`
let newProduct = new Product(
      'NICEHAT',                               // sku
      'A Nice Black Hat',                      // name
      '/assets/images/products/black-hat.jpg', // imageUrl
      ['Men', 'Accessories', 'Hats'],          // department
      29.99);                                  // price
Our constructor for Product takes 5 arguments. We can create a new Product by using the new keyword.
Normally, I probably wouldn’t pass more than a few arguments to a function. Another option here is to configure the Product class to take an Object in the constructor, then we wouldn’t have to remember the order of the arguments. That is, Product could be changed to do something like this:
new Product({sku: "MYHAT", name: "A green hat"})
But for now, this 5 argument constructor is easy to use.
We want to be able to show this Product in the view. In order to make properties accessible to our template we add them as instance variables to the Component.
This page is a preview of ng-book 2.
Get the rest of this chapter plus hundreds of pages Angular 7 instruction, 5 sample projects, a screencast, and more.
Ready to master Angular 7?
- What if you could master the entire framework – with solid foundations – in less time without beating your head against a wall? Imagine how quickly you could work if you knew the best practices and the best tools?
- Stop wasting your time searching and have everything you need to be productive in one, well-organized place, with complete examples to get your project up without needing to resort to endless hours of research.
- You will learn what you need to know to work professionally with ng-book: The Complete Book on Angular 7 or get your money back.
Download the First Chapter (for free)